Jump to content

Cleaning the copper plating on Omega movements


Recommended Posts

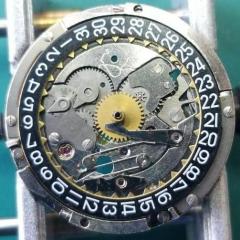
I bought an Omega 1022 for parts, and the bridges and plates are discoloured.

From what I've read, the coating is copper, over a beryllium bronze base. 

Apart from ultrasonic cleaning, is there a way to safely clean/polish these parts ?

Acid is usually used to clean copper (vinegar?) but I don't know how thick/robust the plating is.

Any suggestions ?

Link to comment
Share on other sites

The Jury is out on what Omega actually used to plate their movements one side of the argument says that they used a beryilium copper alloy on the brass plates and the other side says that the movement where plated with pink gold. It is most likley a copper alloy because gold cannot be plated directley on to brass without using a barrier layer of nickel.

There is somone one who sent parts of for analysis to determine exactly what the coating was but a lot of people have argued that these results are not definitive the results can be seen at the below site,

http://members.iinet.net.au/~fotoplot/rgold/rgold.html

It does state that the plating is between 1 micron and 5 microns thick so not very thick at all so any polishing would have to be done with none abrasive cleaners or you will soon see the yellow brass showing through.

I know that if you put a copper coin into coca cola over night it will turn it bright and shiny and belive me I am not suggesting you do that for one minute but I have some scrap copper plated  movements I may try it in the next few days and see what happens and post the results.

Personally I would just clean them and live with the tarnish and discolourisation.

Edited by wls1971
Link to comment
Share on other sites

1 hour ago, RyMoeller said:

Interesting read.  Seems pretty definitive to me.  :)

The results state that "This tentative identification would need to be verified by elctron-probe micro analysis" this hasnt been done as far as I know and some have stated that the age of the parts could account for no gold content being found on the movement parts, they all so say why would a watch company plate parts in copper alone when this would tarnish quicker than the brass metal underneath it.

Link to comment
Share on other sites

On 3/28/2017 at 7:31 PM, Geo said:

I can highly recommend this stuff http://www.ebay.co.uk/itm/CLOCK-CLEANING-CONCENTRATE-NO-1-250MLS-/250475705782?pt=LH_DefaultDomain_3&hash=item3a5183f5b6dilute as recommended and use it in an ultrasonic bath at 50 centigrade.

Here's a couple of watches cleaned with the above.


The vinegar and cola didn't do much good, but I bought some of the stuff you recommended and I'm impressed how well it cleaned up the plates.

  • Like 1
Link to comment
Share on other sites


  • Recently Browsing

    • No registered users viewing this page.
  • Topics

  • Posts

    • Thank you for the advise!! It worked. The setting screw was a lock/unlock to remove the rotor. 
    • I have that French tech sheet too, it is a little different than the English one (eg, it doesn't have the auto works diagram). BTW, it looks like you are looking up the case number in the 1979 ABC supplement. The 1974 ABC catalog does have the 3093 case. As you determined it takes the 1222-5 crystal.  When I serviced my President 'A' (which also takes that crystal), I was able to fit a 29.8 crystal from my DPA crystal assortment. Those are, in my opinion, a great deal. The assortment comes with 10 sizes each from 27.8mm to 32.4mm in 0.2 increments. I pretty much use them for any non-armored crystal that takes a high dome crystal. I think they no longer make them but Cousins has still has some in stock but when I bought them they were around $40 for the set and now they are around $100. Still, at 40 cents a crystal it's still a good deal. For the large driving wheel, I remember I once assembled the keyless/motion works first and when I placed the large driving wheel it was interfering with the setting wheel on the dial side as the teeth were not fully meshing and it wouldn't fully seat. If that isn't the issue I got nothing and am looking forward to see how you solve it 🙂
    • Not sure, but just looking at it, it seems like the screw on the right may be a fake? The one on the left may not be a screw in the regular sense at all, rather a 2 position device, I think you need to point the slot towards either of the 2 dots and one will secure and one will open. Like I said this is just my best guess looking at the pictures.
    • Hi! I am in the process of restoring a rado captain cook mkII. I want to remove the rotor, but I am not sure how to and need some help. As you can hopefully see on the photo there are 2 screws. The left one has two positions, the right one looks like a regular screw. I have tried turning the right one, but it does not give even after using more force than I would expect. Anyone know the function of the left screw with the two positions and how to remove the rotor? Thanks!!
    • Welcome to the group Stirky. You can search for just about every subject in the craft here. Don't be afraid to ask if you can't find the answer that may have already been covered ( some ad nauseum LOL ). You don't have to buy Bergeon to get good quality. There are many decent mid-range tools available that will last you a lifetime. Cousins would be a good place to start . Cheers from across the pond ! Randy
×
×
  • Create New...