Leaderboard


Popular Content
Showing content with the highest reputation on 02/16/17 in all areas
-
Below is a quick experiment with a denture cleaning tablet (I would like to point out I do have a full set of teeth the tablets where bought to clean white enamel dials which they are very good if used with caution) This is a old dial from a scrap ladies movement and is typical of the 30's 40's period and is a two tone dial with printed details it is suffering from typical ageing and oxidisation I do wear watches daily that have dials in this condition As you can see the dial is readable and all the printing can be seen it does however look what can only be described as grimy, so to see if denture cleaners can be used on dials like this to improve the look I soaked the dial for 10 minutes in a solution made from a denture cleaning tablet and deionised water. Forgiving the fact the photo is not very good the damage done can be seen with the loss of much of the printed fine detail on the dial it has taken only 10 minutes to totally ruin the dial with no improvement in the look of the dial what so ever, it does however smell minty fresh3 points
-
It's difficult to give a definitive answer because not all dials are made of the same materials. If attempting to clean always try in a not viewing area of the dial if possible. However if it was me I would leave alone as it is showing its a nice vintage watch.3 points
-
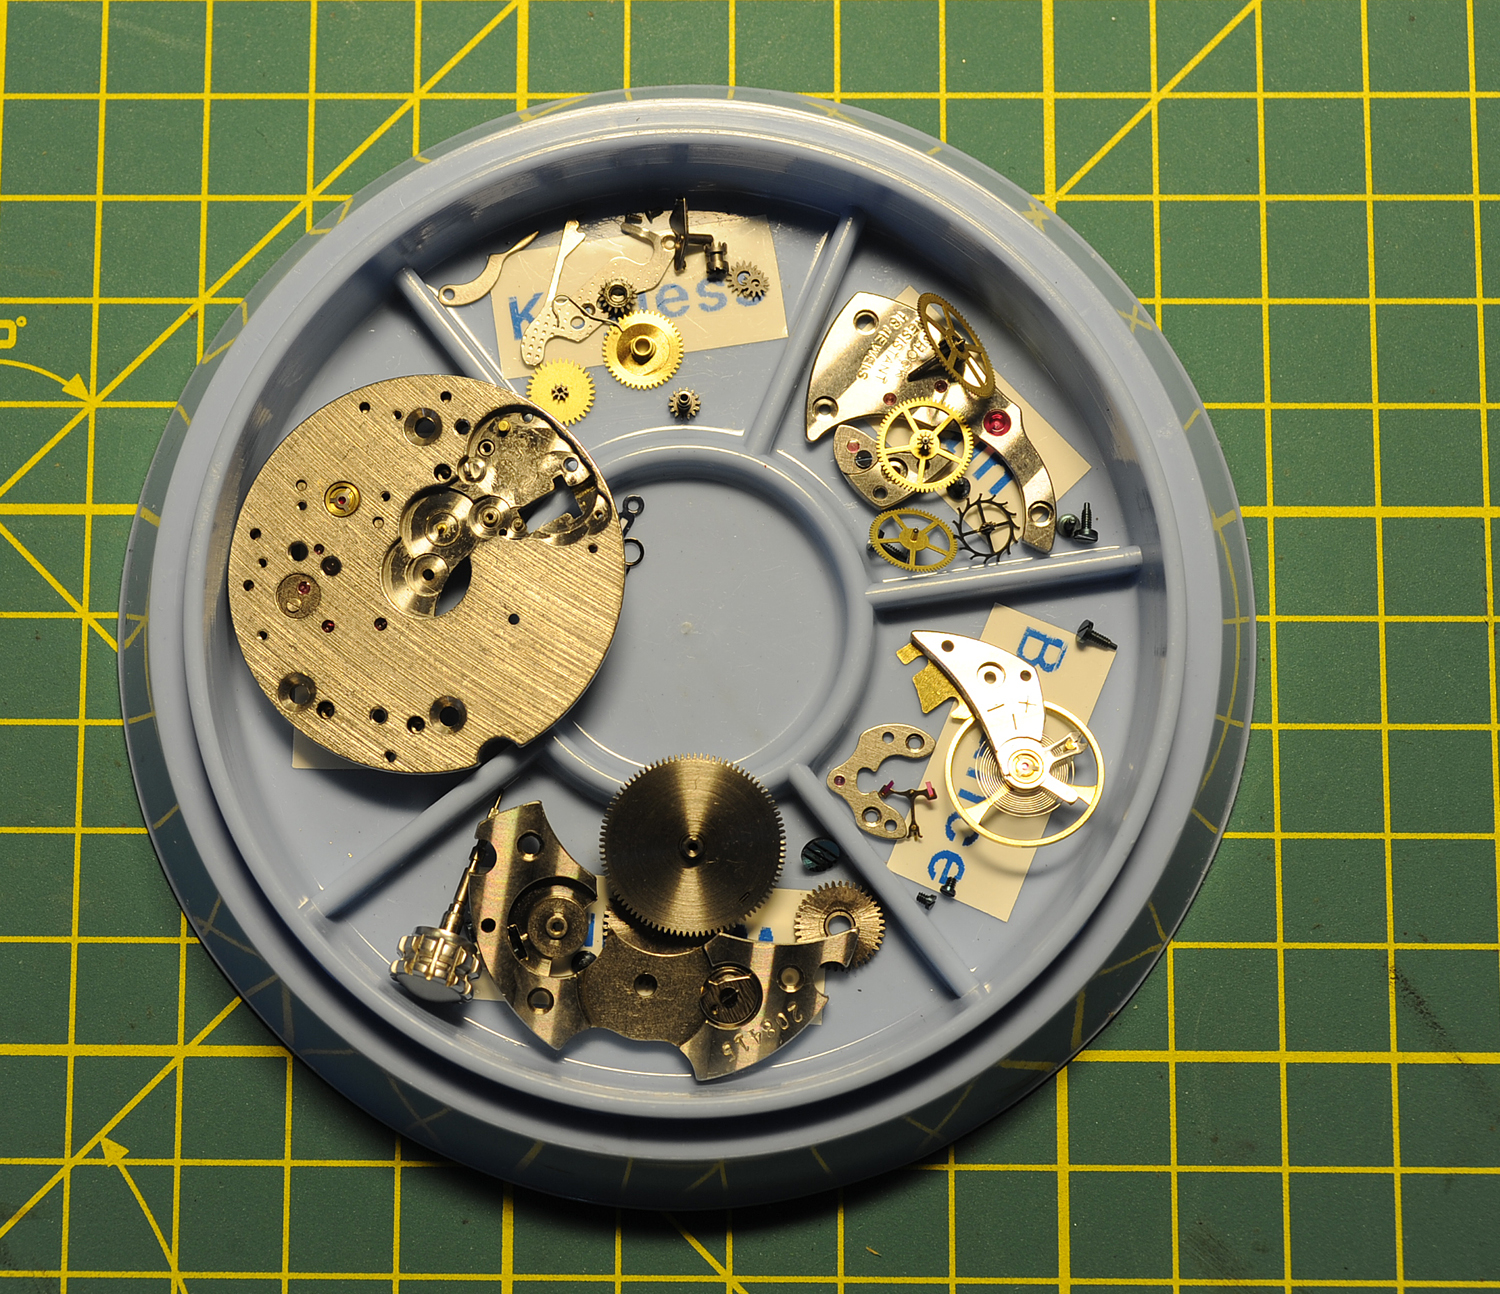
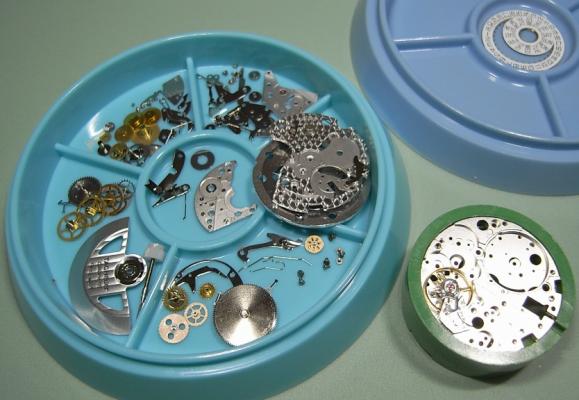
Here we go with part 2. Now it's easy to note, that I'm not a professional as the cleaning equipment is only... ehm... semi-professional. Special treatment for the balance and the pallet fork. The equipment for oiling and grease. Inserting the new mainspring. Reassembling the train bridge. Surprise: Much easier than on other watches, the parts fall into correct positions by themselves. Nice. Barrel bridge and ratchet system. The keyless works. Assembling and oiling the Pallet fork. The return of the balance. A drop of oil for the balance and escape wheel stones. Winding up and...it runs! Oops, some adjustment needed. Better. Reassembling the automatic device. Inserting the screws for movement and dial. Time for the cannon pinion and the hour wheel. Bringing back dial and hands (oh, I love those Maxi dials). Back in the case... ...and completed with the automatic device. Some grease for the gasket. Got it. It's called a wrist watch, so it's for the wrist not for the safe.3 points
-
Take care with the denture cleaner. It is certainly worth a try on enamel dials provided they don't have any lume paint (or indeed any other decoration painted on top of the enamel) but don't try it with painted, printed, or lacquered dials like the one that @jdrichard has; that way lies potential disaster as the inks and lacquers use are likely to vanish.2 points
-
Endeavor, Here is a nice set from Uncle Larry's Watch Shop for $129.00. david2 points
-
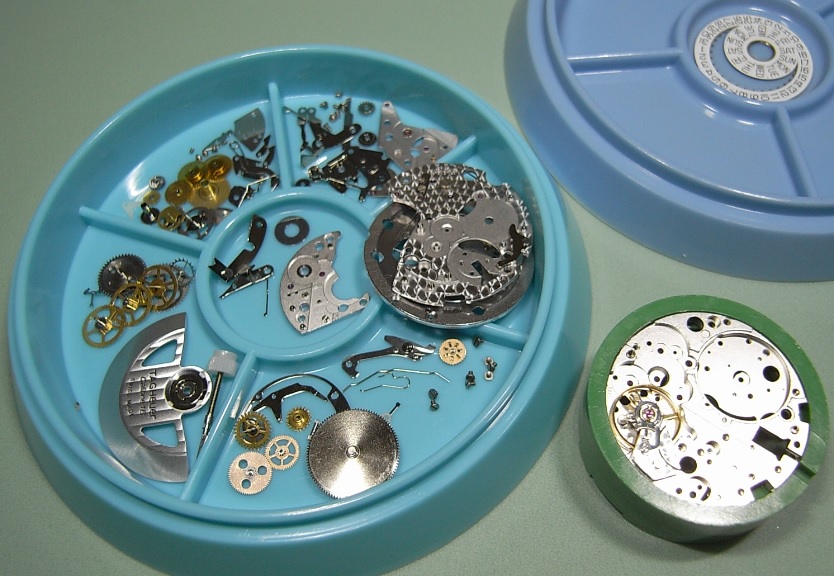
Here a little walkthrough the servicing of my Rolex 5513, calibre 1520. Sorry for the funny english, I'm no native speaker. I'm not a professional watchmaker, this is only amateur-work. I start by opening the case, taking off the automatic device and disassemble it. Now I remove the movement and take off hands and dial. Removing the cannon pinion. Now it's time for the balance and the pallet fork. Continuing disassembling with ratchet and train wheels. Next one is the barrel bridge. I decided to use a new mainspring. Now it's time for the keyless works. On the other side of the movement the spring for stopping the balance. Removing the screws for the movement and the dial. And reassemble the balance for protection reasons. Ok, everything taken apart, ready for cleaning. Best regards Erik1 point
-
When fitting new stems to watches I use these tools :- Digital calipers, Fine grade diamond lap Wire cutter Pin vice Now for fitting. (1) Hold the stem in the pin vice and screw on the crown tightly by hand. (2) With the movement fitted correctly in the case, insert the stem until it locks in place. Now measure the gap between the case and the underside of the stem. In this case it is 2.16mm. (3) Subtract 0.2mm from this size and this will give the amount to remove from the stem. In this case it will be 1.96mm which will give 0.2mm clearance below the crown when fitted to the watch. (4) Now remove the crown from the stem and hold the stem very tightly in the pin vice, then place the pin vice and stem between the jaws of the digital calipers then zero the calipers. (5) Remove the calipers and without touching the zero button set them to minus 1.96mm. THEN RE-ZERO THE CALIPERS AT THIS LENGTH The wire cutters are now used cut off the excess thread leaving a small amount to be filed to the exact length. (6) All that is required now is to dress the stem with the diamond lap a little at a time until the calipers read zero. (7) Finally screw the crown on tightly and it should be ready to fit to the watch without further adjustment. I find that this method cuts down on trial and error. FOR SCREW DOWN CROWNS. A) Screw down the crown tightly onto the case without the stem and measure the distance nbetween the bottom of the crown and the case. B ) Screw the new stem tightly into the crown, then insert into the watch until it engages and locks into the movement. C) Press the crown down firmly as far as it will go and hold it there. D) Using the vernier callipers, measure the distance between the bottom of the crown and the case. E) Subtract the size determined in (D) from the size measured in (A) then subtract a further 0.15mm from this size. This is the amount to shorten the stem by. This should allow the crown to screw full home without compressing the stem too tightly between the movement and the inside of the crown. F) Cut the stem leaving it slightly longer than the size determined in (E), and dress down to size using the diamond lap and vernier callipers as described in the original post. G) Screw the crown onto the shortened stem and check fit and function, before using a tiny spot of Loctite 221 to secure. Click here to view the article1 point
-
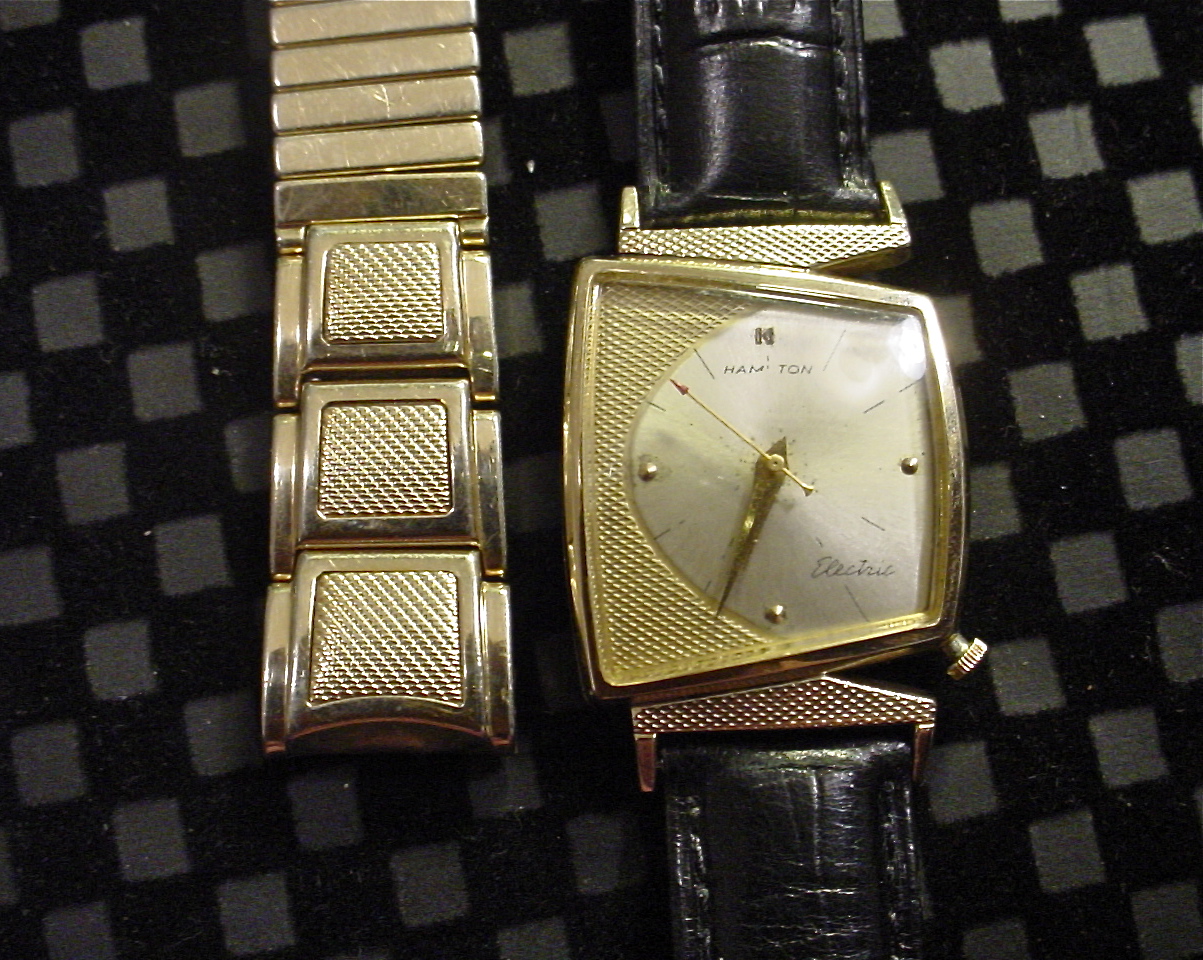
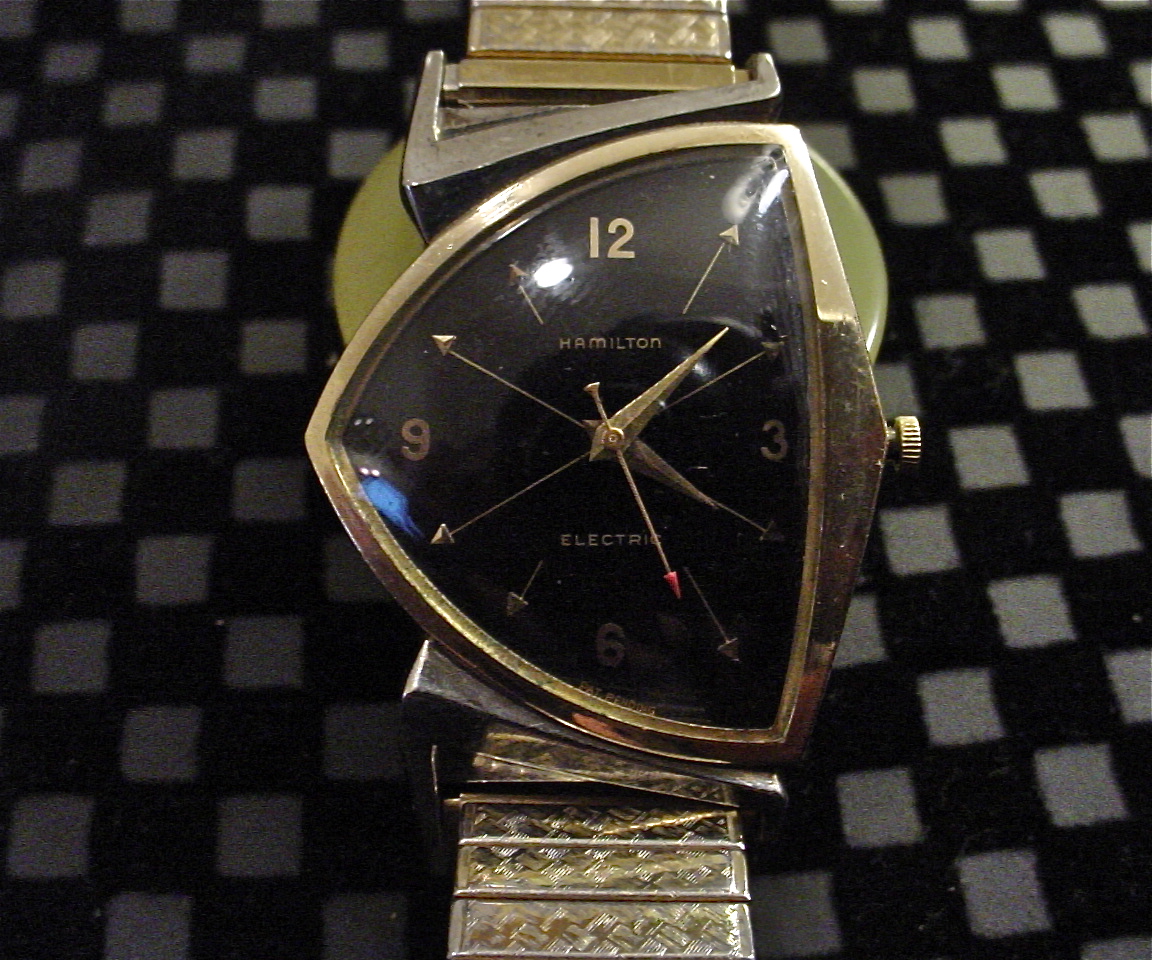
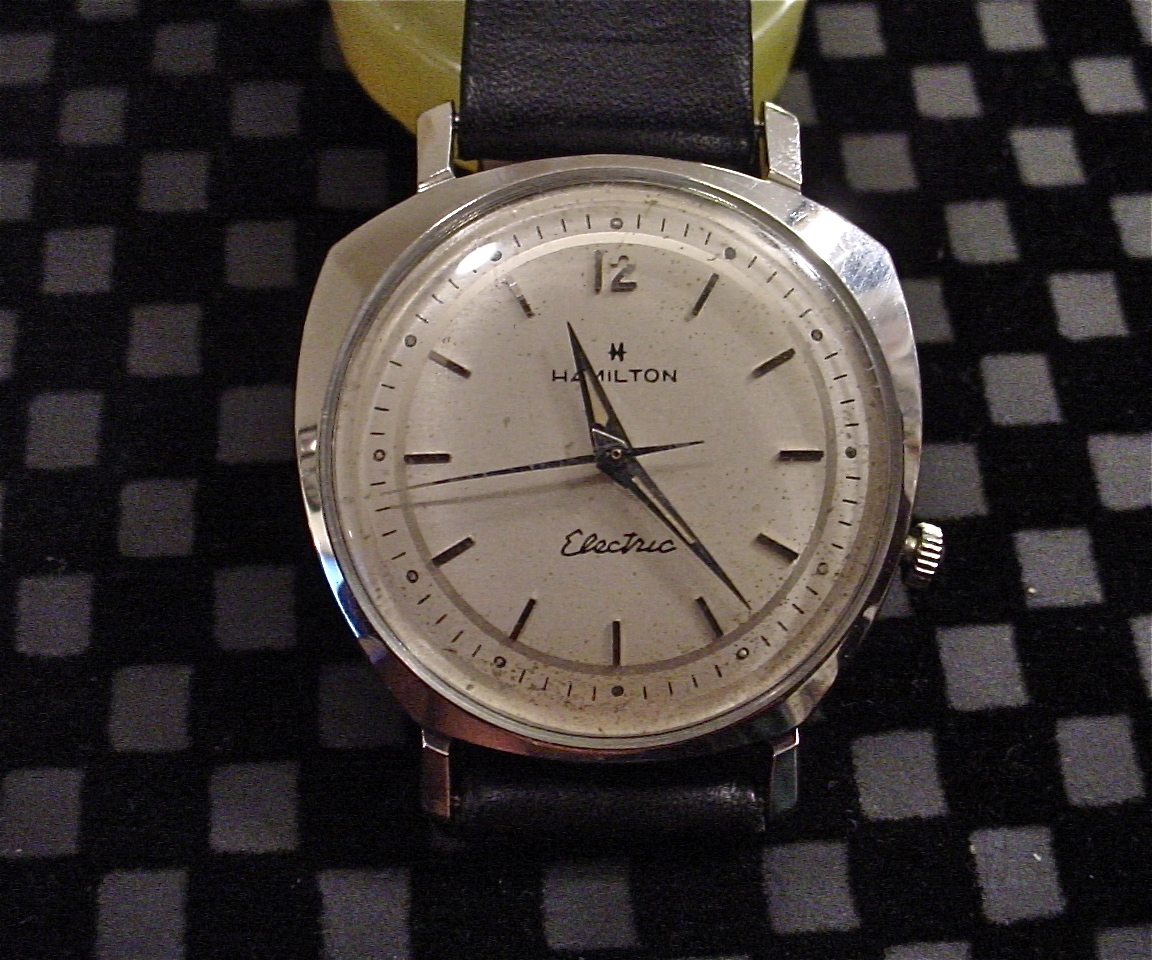
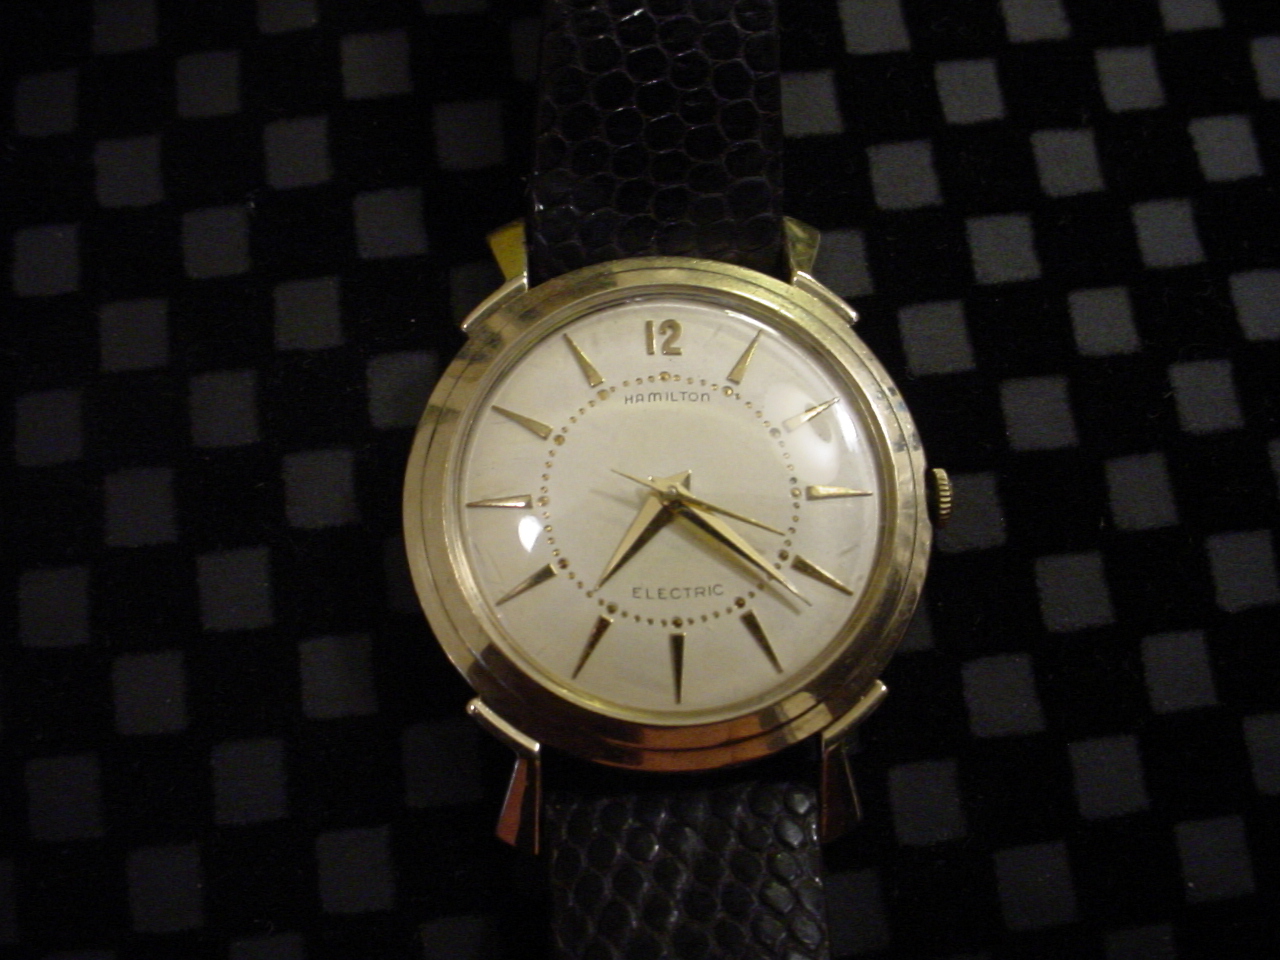
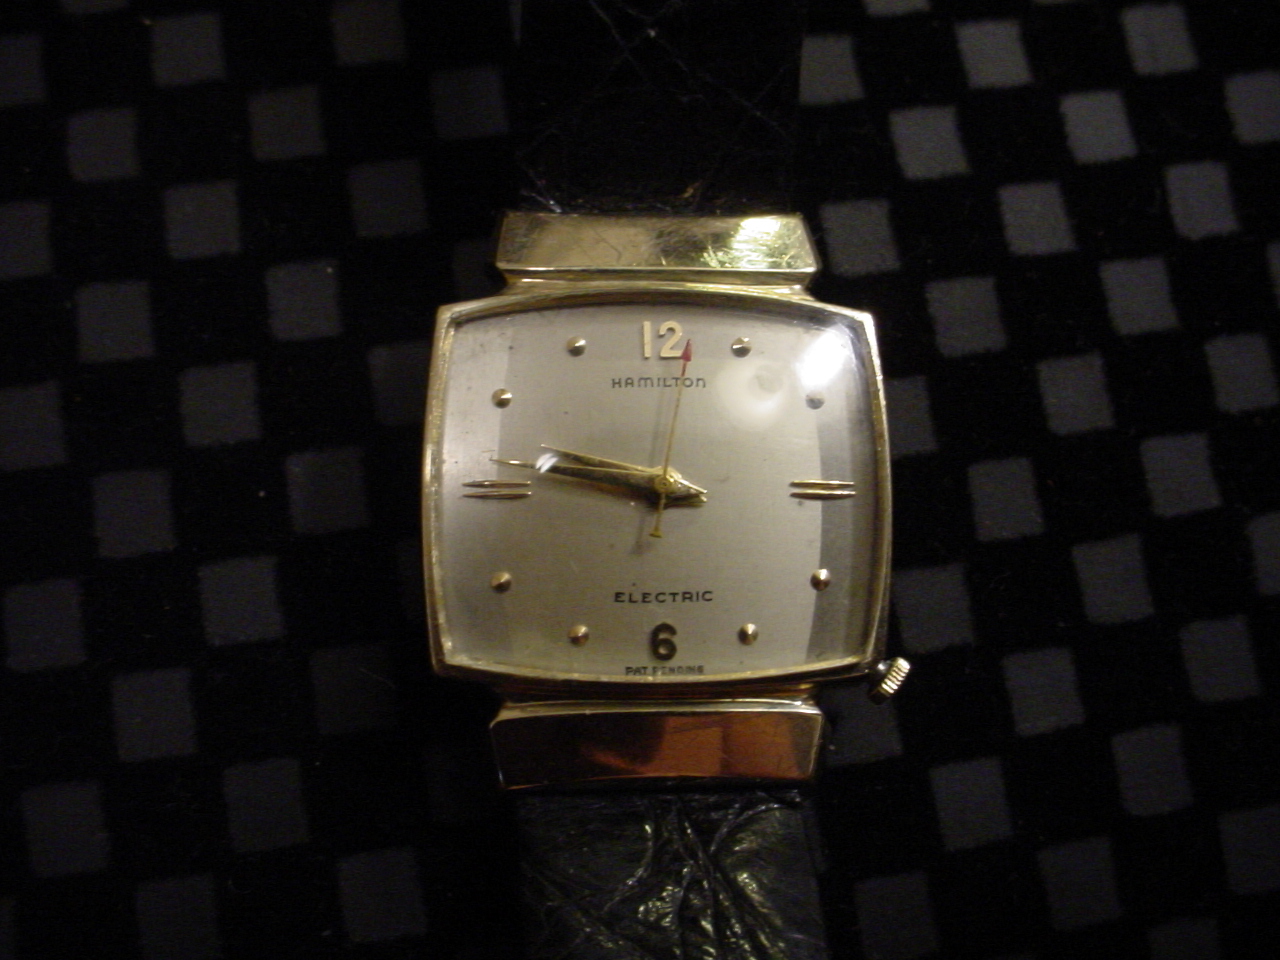
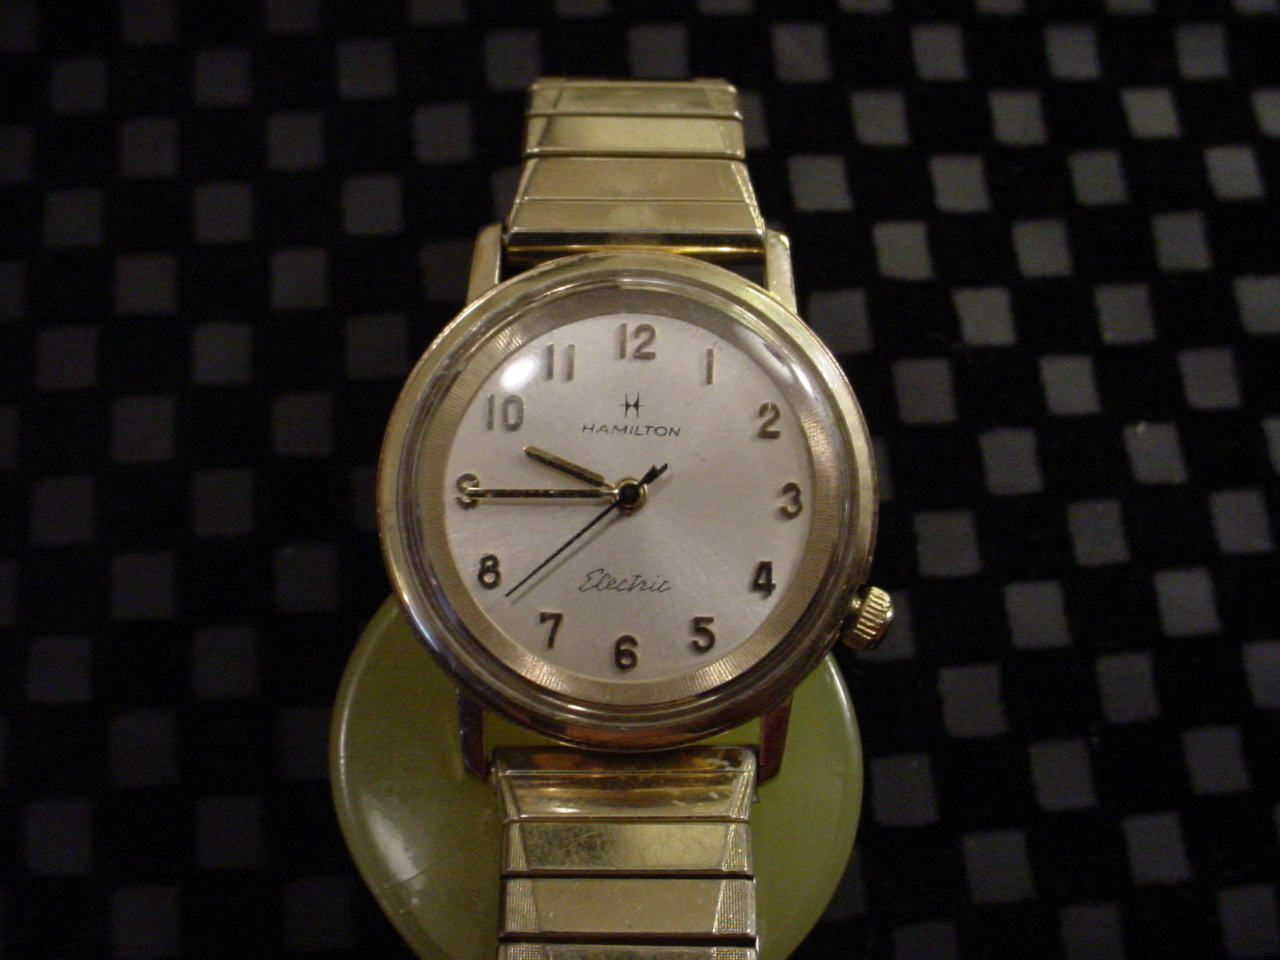
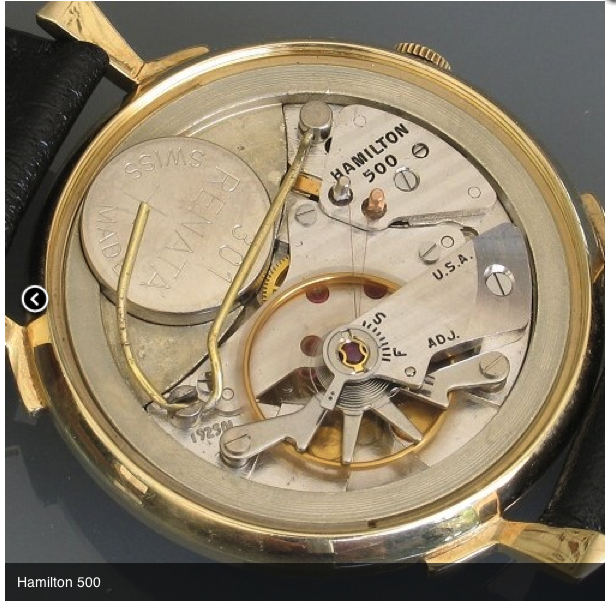
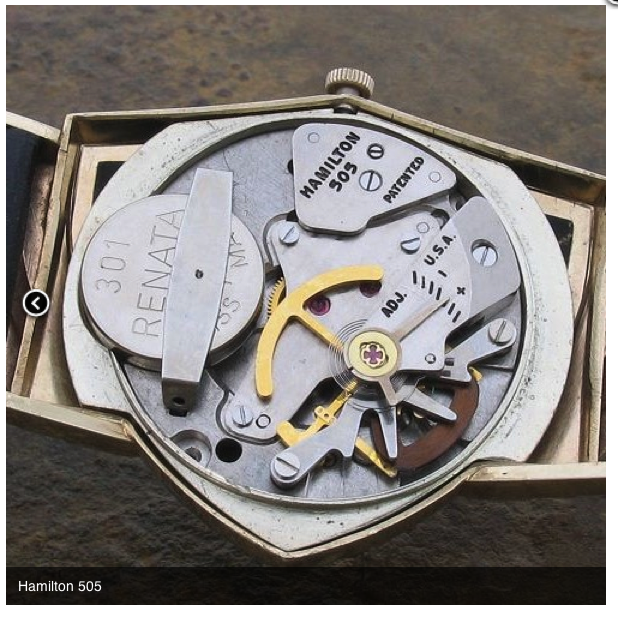
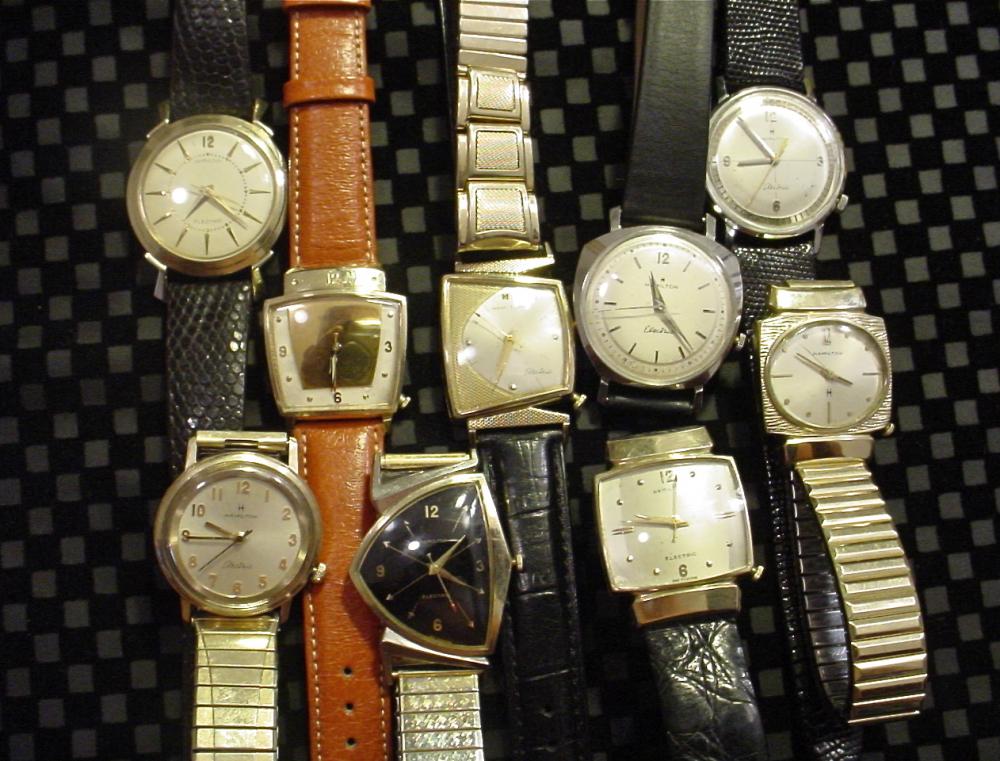
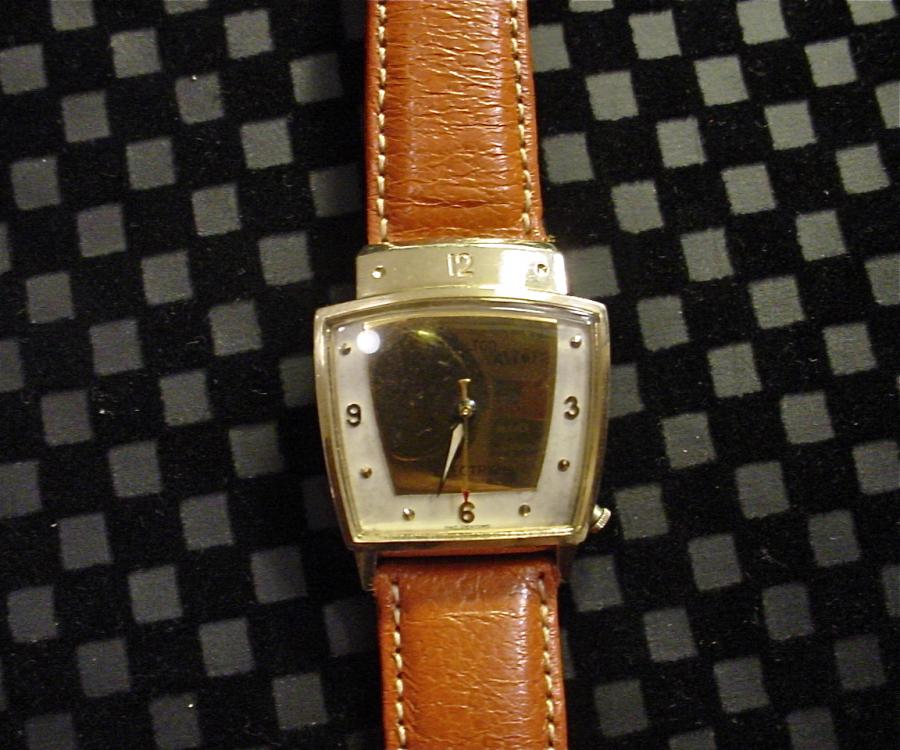
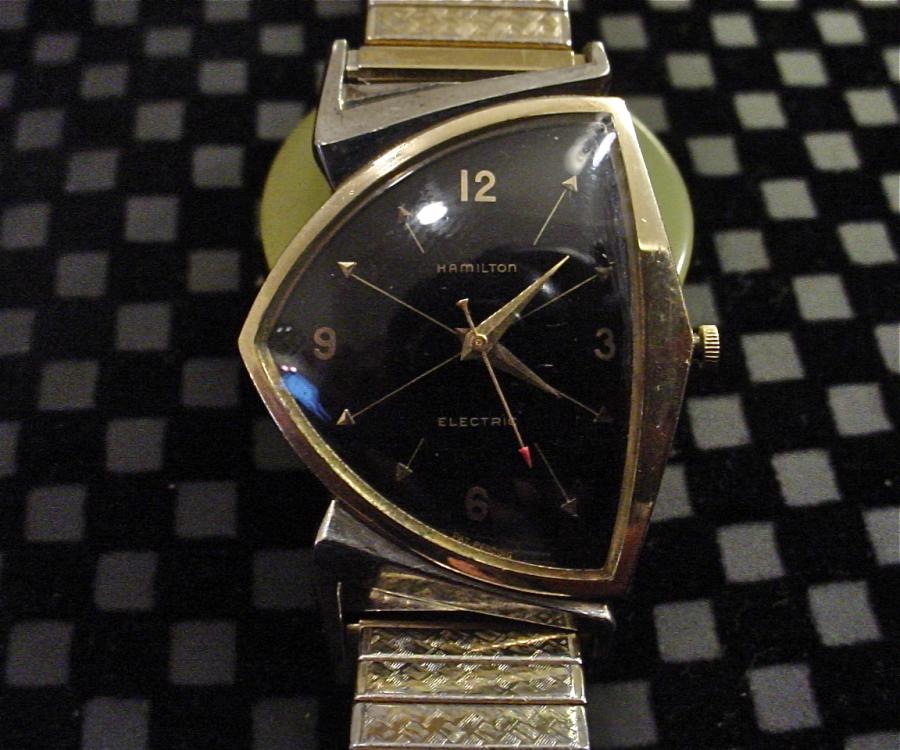
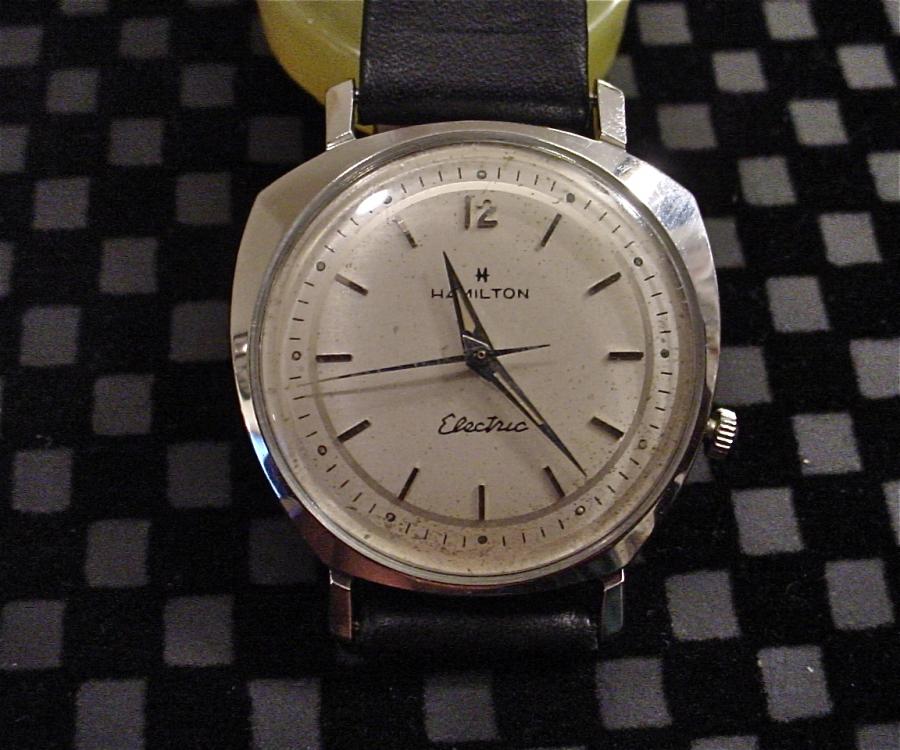
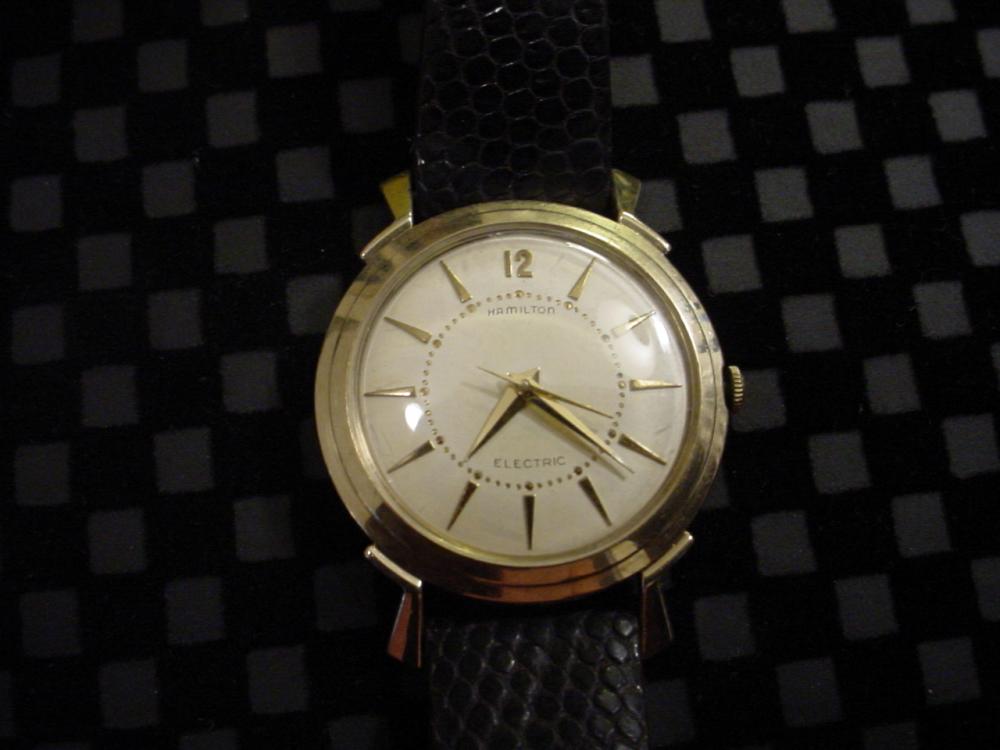
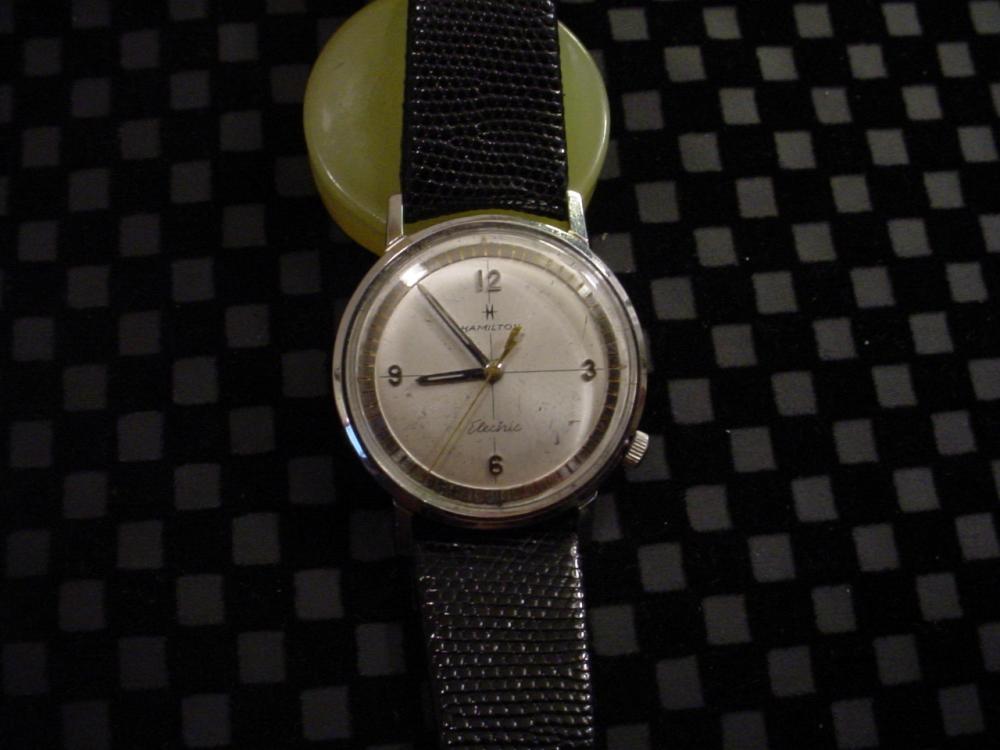
I'd like to share the Hamilton Electric watches I have collected to date . I plan on expanding this collection with a few more coveted models that are just a little more scarce and with that comes the fact that they are also a bit more expensive . .....sigh... Anyway , here we go ....We all are familiar with Hamilton watches , new and vintage , and one thing that has been a constant is their beautiful and interesting designs . I have a few of their more modern and vintage mechanical models such as the X-Wind , the Odyssee 2001 , Pan Europ's , and others dating from the 40's , but I am addicted to the Electric models that were introduced in the 50's and continued up until the early 70's . Hamilton hired a designer named Richard Arbib , who was responsible for designing some classic automobiles of the time , and who also was the creator of some different eye catching Hamilton asymetrical cases . It's interesting that Hamilton only used 2 basic watch movements for all or most of these models . They being the 500 and the improved and less delicate 505 movement . About Richard Arbib : http://electric-watches.co.uk/makers/hamilton/richard-arbib/ He designed asymmetrical cases for the new Hamilton electric watches in the 1950s, including such notable models as the Ventura, Everest, and Pacer. He also designed watches for Tourneau, Benrus, Sheffield and Gucci. He designed boats for the Century Boat Company in the 1950s, notably one of their most successful and expensive models, the Coronado, as well as the Arabian model. The 500 and 505 movements : As you can see , the 500 movement has the very delicate contact springs that deliver the battery power to the coil on the balance wheel through a contact under the hairspring . From the top down starting with the balance cock , there is the hair spring , A gold tab , trip jewel pin , contact roller , the balance wheel with the coil attached , sliding finger block , actuating pin , index roller , index jewel pin , ....and some other stuff .... Needless to say , this is a tricky movement to work on . On to my collection starting with a group shot : Now I'll break it down,.... The Vega Model... It came with what I think is the original watch band because the links match the theme of the lugs that continues through the dial with a dimpled texture . I put the watch on a black leather band so you could see the design of the case better . The Everest Model :....I just got this one . It was not running so I serviced the 500 movement . It is in very good condition because I got it from the Son of the original owner who was a jeweler in Minneapolis that took it from his stock when these watches first came out in the late 50's . Very unfortunately , the jeweler passed after getting this watch and the Son just stored it until he figured it was time to pass it on to someone that would appreciate it..........I do . It came with a black leather watch band and I thought it looked to stark , so I fitted it with this nice Honey Brown Hirsch watch band . The Pacer Model : ....Very popular and the cousin to the Ventura Model , the Elvis watch . I do have a new reissue Ventura with a quartz movement . This one came non running with a 500 movement . Non-running because parts were missing including the trip and contact springs . I spent over 10 hours one Saturday working on it and finally get this watch to run properly . The Pegasus Model :... The Sea-Lectric II Model : The Titan Model :.....similar to the Van Horn model with the difference being that the Titan is 10k gold filled , and the Van Horn is solid 14k . Van Horn was a Hamilton executive at the time involved with the development of these watches . The Vantage Model :...not to be confused with the Hamilton sub-brand watch line Vantage . The Nautilus Model :...One of the many In the Nautilus Series numbered in the 200 , 400 , 500 , and 600 range . These are similar to the Skip Jack and other models . And Last , but not least I have another Nautilus Model . I don't remember the series number off hand , but it took me a while to trace the model number . I haven't seen too many of this model except in my searching to find the number for this orphan . I hope you have enjoyed looking at these watches as much as I have . As I stated earlier , I want to add a few other models to this collection including the Meteor Model . Aloha , Louis


 1 point
 -
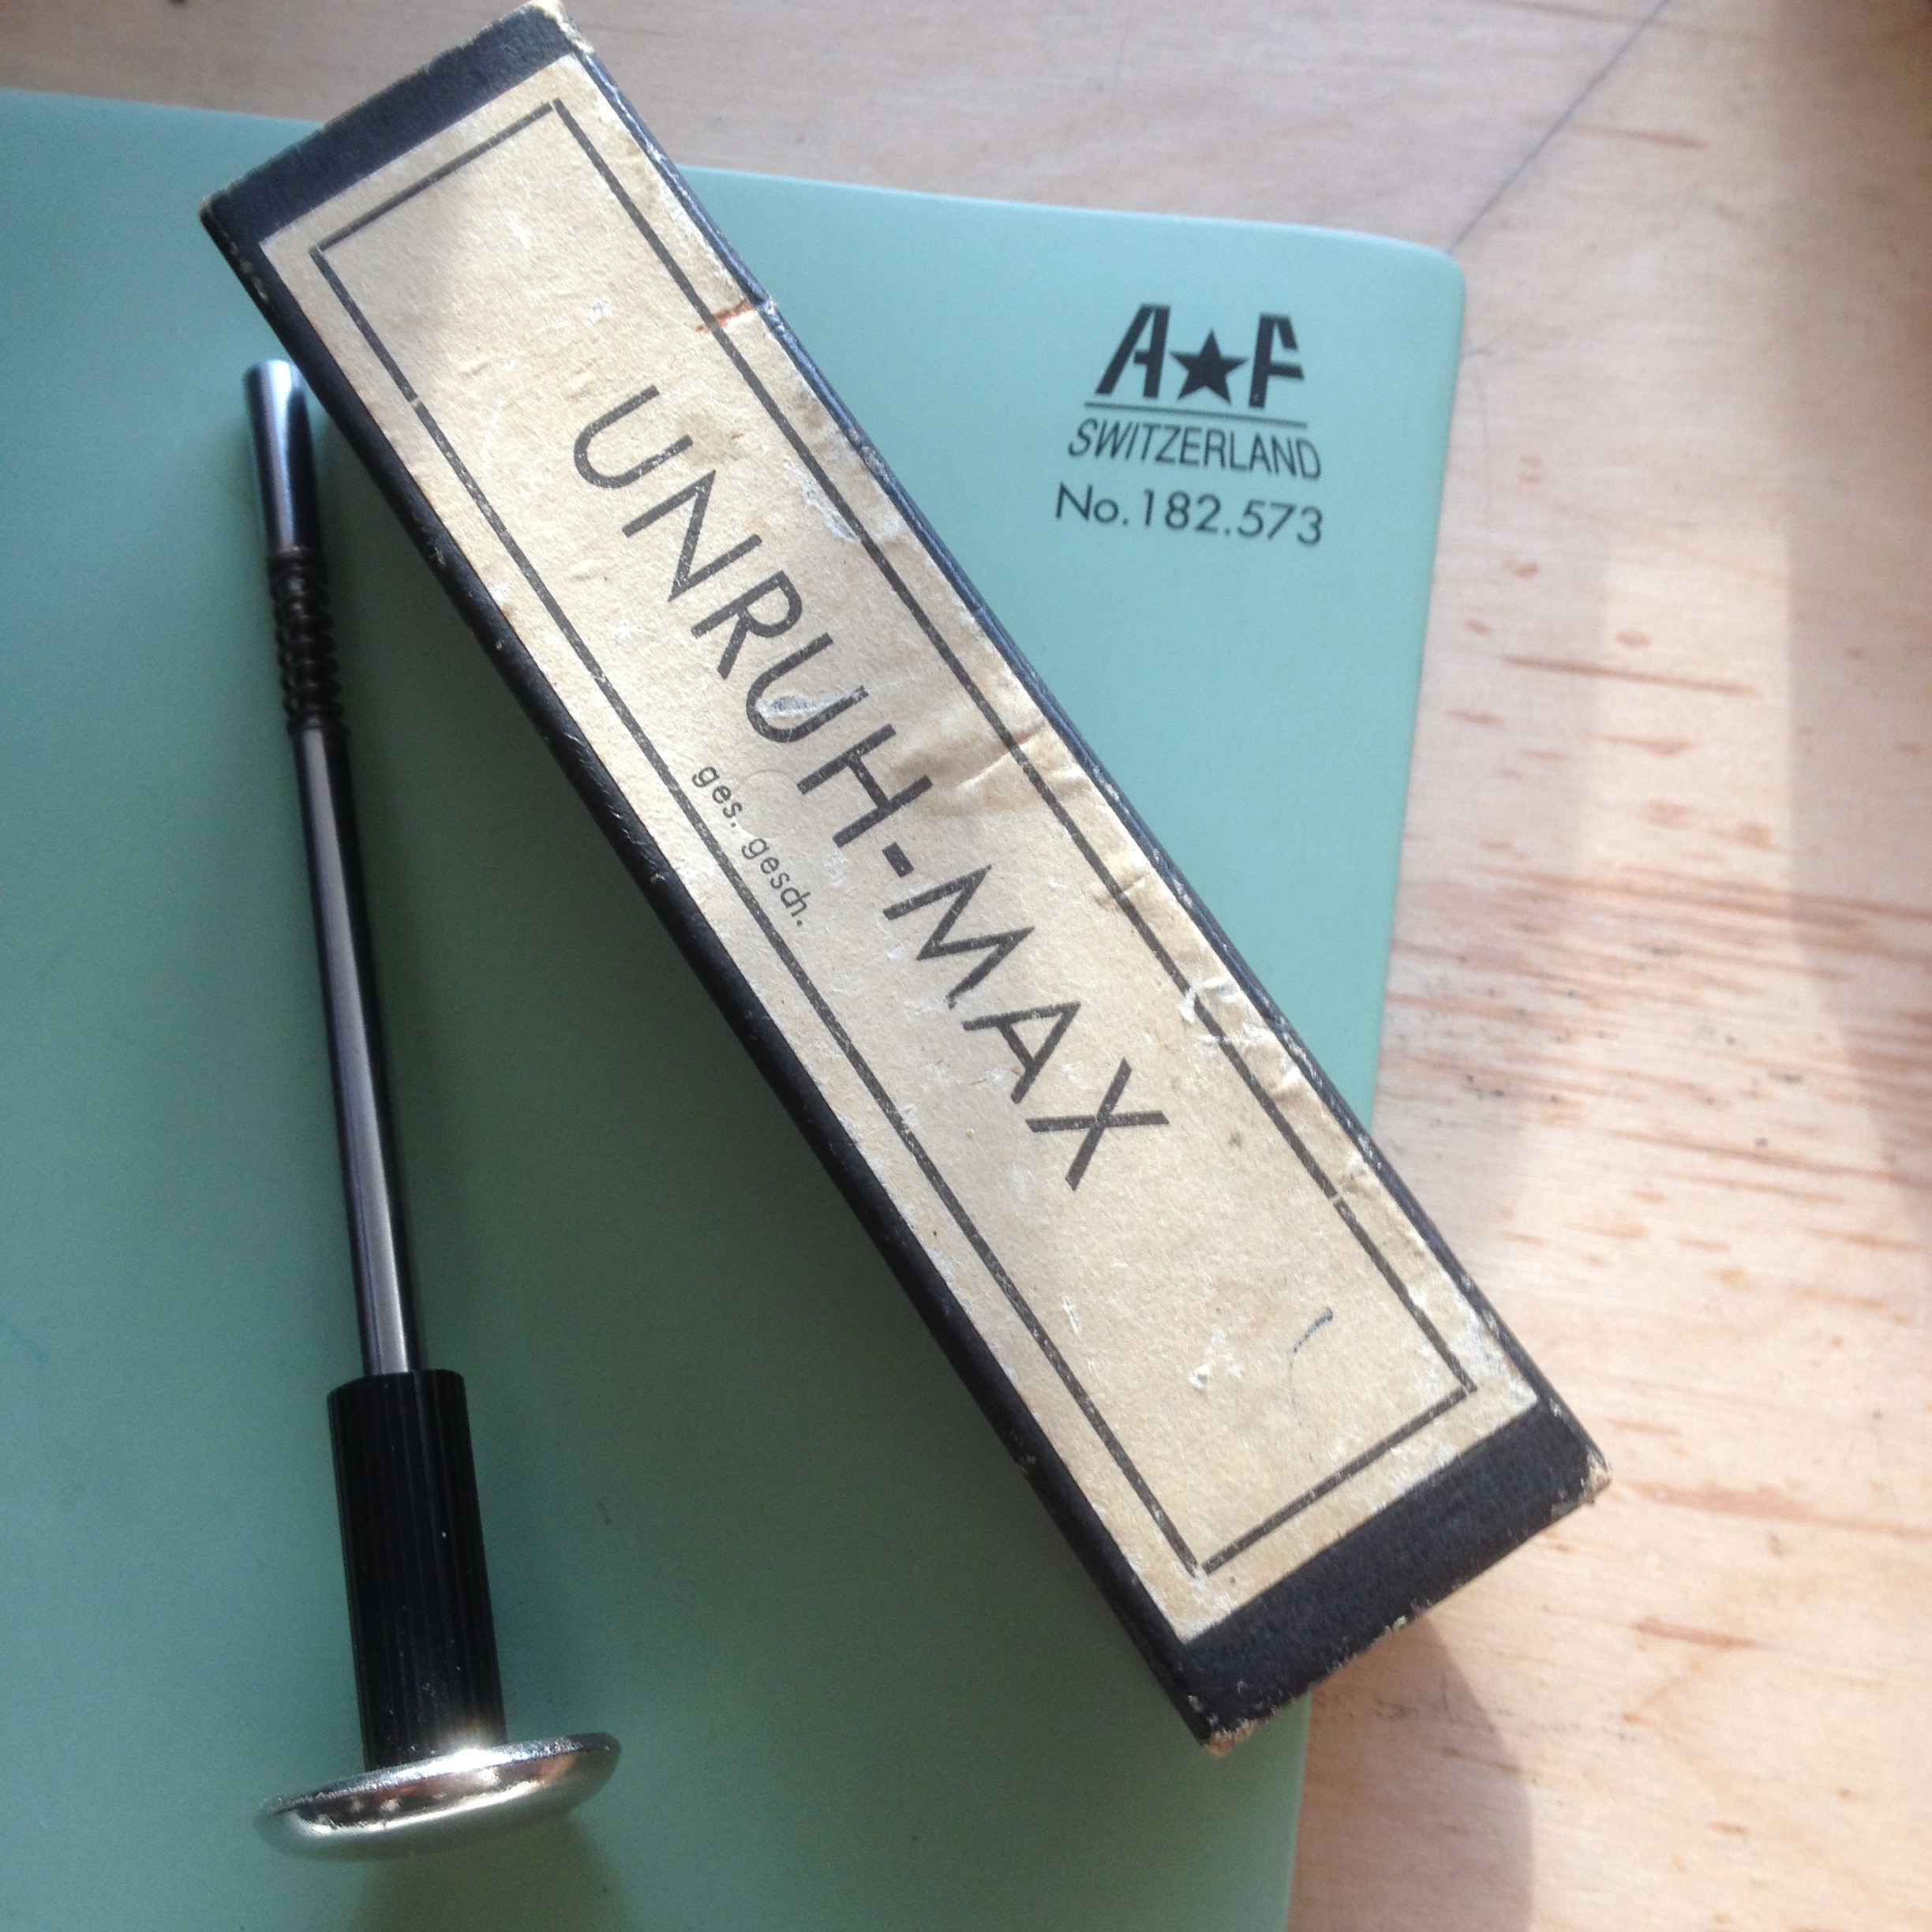
I'm starting my journey into servicing watch movements and need to order some pithwood. I am ordering from Cousins, and have no experience with pith. The indian pith is way cheaper than AF or Bergeon, and they are out of german. How much does the quality matter? Is the indian good enough, or should I go for the swiss? Two other questions: Sticks vs discs. Sticks seems more economical. Are there any reasons, besides convenience to go for discs? Are the sticks easy to cut? Is there some sort of rule of thumb for how long a pith disc will last, or how often it should be changed? Thank you!1 point
-
Don't now why but never use pith wood. There are some small round ones on my oil cups i have used but for cleaning the oiler? Most of the time i clean the oiler in Rodico? The pith wood never is on the table as it so light it always is somewhere else?1 point
-
What a great group of forum members who are only too willing to help a fellow member. Rogart kindly sent me some screws but unfortunately none of them directly fit but I am going to try and modify 2 of them. This may not work so still on the lookout if anyone can help.1 point
-
Where are you based in the U.K there is a repair shop in the birmingham jewellery quarter thats a bricks and mortar place, https://www.creativewatch.co.uk/service-and-repairs/glass-replacement-service All the others seem to be internet based and I wouldnt risk sending a watch to them the web sites look dodgy to me.1 point
-
Never tried them but.... http://www.crystalfit.co.uk/ Sent from my Honor 5c1 point
-
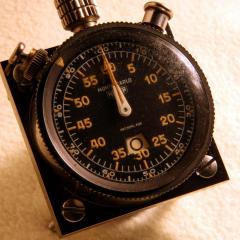
Looks to me like its a travel type clock come pocket watch does the outer egde of the watch fold out and form a stand for placing on a bedside cabinet or the like ? could be more valuable than you think.1 point
-
Now we have time on computer, laptop, smart phone, and sometimes we can see the time on some buildings. Yes Rolex is of pure quality as Vacheron Constantin and some other brands, However, in view of what I list above, it's too expensive paid $ 12,000 for a watch today. True that this is only my personal opinion. I hope it is gold 24 Karats1 point
-
Douglas , good choice because it's a simple movement1 point
-
Bergeon has branded pith wood? I think I've given less thought to pith than any else when it comes to watch service. I bought some cheap sticks that came from Atlanta if I remember correctly. They'll last me for years and seem to do the job just fine. I cut off a small disk and use it primarily to clean tools or hold oilers and needles when not in use. They're a good place to set a balance wheel when you're not using it too. Answers to your questions: Yes, sticks are pretty easy to cut They last a long time in my experience. I change them out when the whim hits me.1 point
-
Hmmm, better than my Rolex Are you sure it needs a service? I sense that you are falling in love with it ..... Perhaps leave it for a while till you have more experience? Plenty of other (cheap) trainers out there ....1 point
-
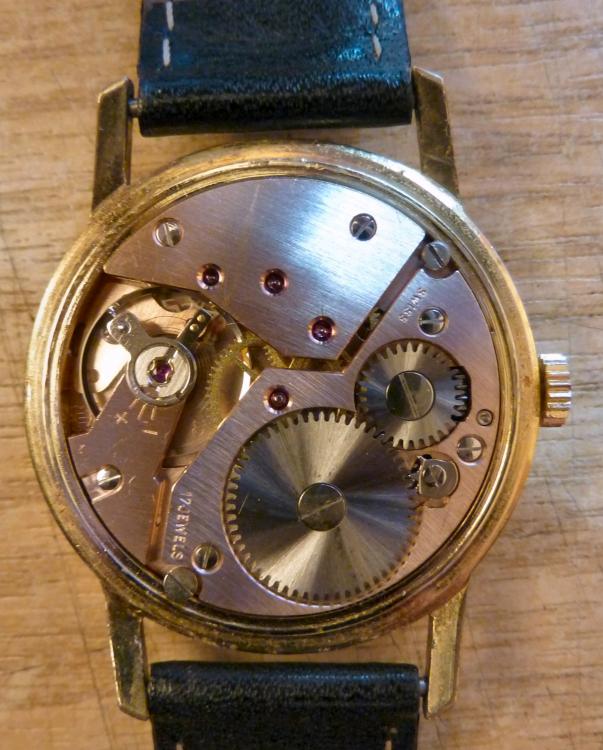
That's a good price !! I guess you have seen on that website that a nearly similar, or similar, movement was used by Rolex. Can't be that bad. The one I just serviced was very nicely polished on the back (even with blued screws), but crudely finished underneath. Money had to be saved somewhere. Chances are yours has a good finish all around. That you received a next to "freebee" is even better as a starter. Take your time, and the first watches will be under your belt1 point
-
From a quick search the name was first registered on 10.2.1927 to Schein & Engel & Co. f¨r: Banner Watch Co If you need to look up names and trademarks this site is excellent : http://www.mikrolisk.de/show.php1 point
-
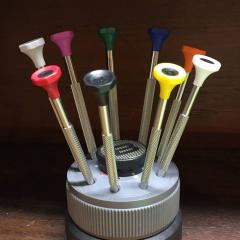
Hello PD Although I am not advertising for them the Bergeon screwdrivers are good but expensive. I bought them one at a time as the need cropped up. You can however, buy the copies or clones if you like,from the bay or red rooster, Anchor or the like and just purchase the Bergeon replacement blades and stick them in the clone drivers to save some cash. Most members will agree that you need good drivers and tweezers. My lamp oil is getting a bit low so I have numerous magnifying devices including the headgear type, these are essential for me. New tools are like new toys for the likes of myself. With reference to your amusing handle, cling film may be a necessary purchase. However, a name or pseudonym may spare some blushes for the faint hearted [emoji6] Welcome to the forum. Cheers, Vic1 point
-
I dont know if this has been posted before but the Patek in this article fetched £9 million https://www.bloomberg.com/news/photo-essays/2016-10-20/-3-million-steel-patek-philippe-among-star-watches-at-swiss-auction1 point
-
Just to add an important point. Normally removing a balance via punching it out (I use a Platax tool) is OK providing the rim of the balance is securely held and that the balance staff is not made of the old style metal. This is important as the hole that the staff is held by is not distorted/stretched and the rim of the balance is also not distorted during removal the process. I have read in a few BHI reports that some of the old style staffs where made of superior metals. If the staff does not show signs of moving with gentle taps you will have to remove the rivet using a graver & lathe to remove without causing unnecessary damage.1 point
-
There is another tool that can be used & I have used it with pocket watch staffs. It works by placing it over the old staff & pressing firmly on the balance rim and when pressing the plunger (which is spring loaded) it shocks the old balance staff out. The shaft is the same diameter as a staking tools punch and it is recommended that it is also used with a staking tool. I must admit I have not used it for a few years now but it does work but a bit crude. The bottom line is use the correct tools if available.
 1 point
 -
Perhaps this may be of any use? http://linuxfocus.org/~guido/molnija-pocket-watch/ I just serviced one, very nice and easy to work on; great "starter";
 1 point
 -
If it were me I'd attempt to improve -- or if there were no way to adequatly improve -- replace the hands and leave dial as is.1 point
-
Yes that's a good tip, a large polybag with small holes for the tweezers works well1 point
-
The proper way would be have the dial restored which will be very pricey. wis1971 said looks perfectly exceptable and I agree, a watch of that age isn't going to look like new, its perfectly readable.1 point
-
As already stated the method of using denture cleaners is only good for enamel dials and even then extreme caution has to be used, if you tried it on the dial you have jdrichard I fear you may end up with a nice shiny blank disc. I've said before old watch should look old and oxidisation on the dial is better than having a ruined dial. The picture of the dial you have shown looks perfectly exceptable to me leave it and enjoy you cant easly undo any damage you do by trying to clean it, I would as a collector look upon a watch of that period that had a mint nice shiny new looking dial with suspicion.1 point
-
Endeavor, This video steps through the process of removing a staff with a staking set. david1 point
-
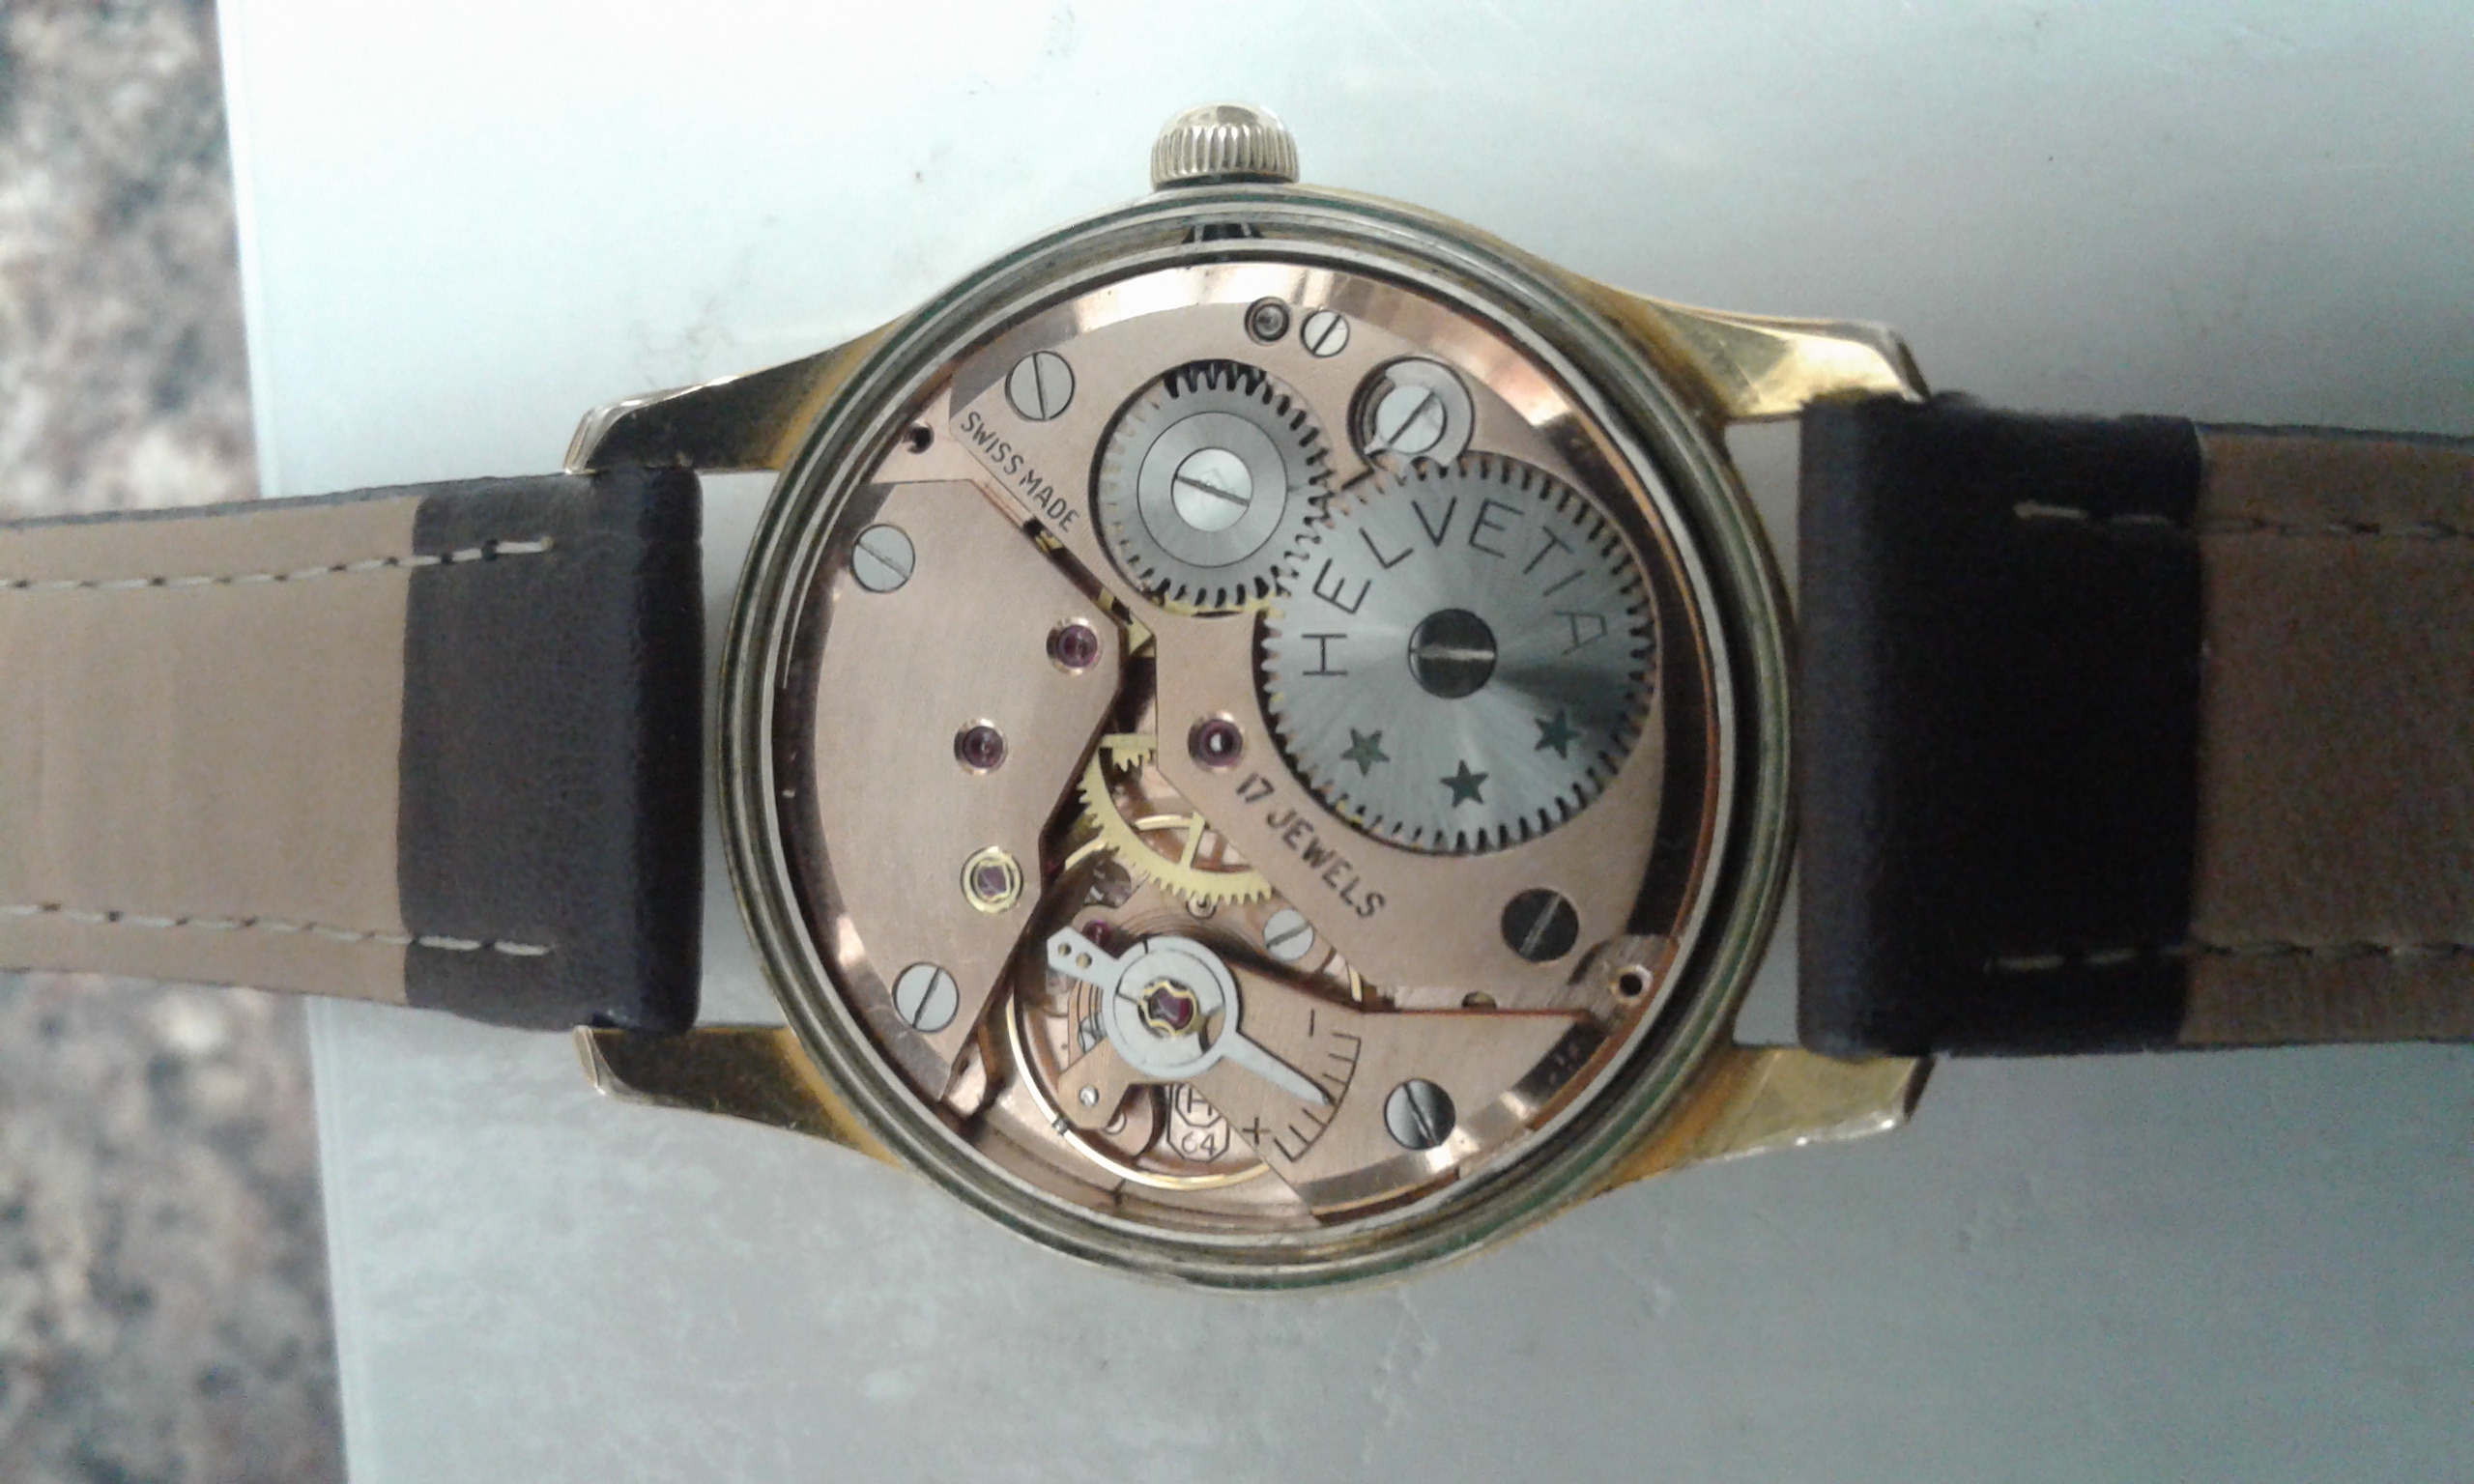
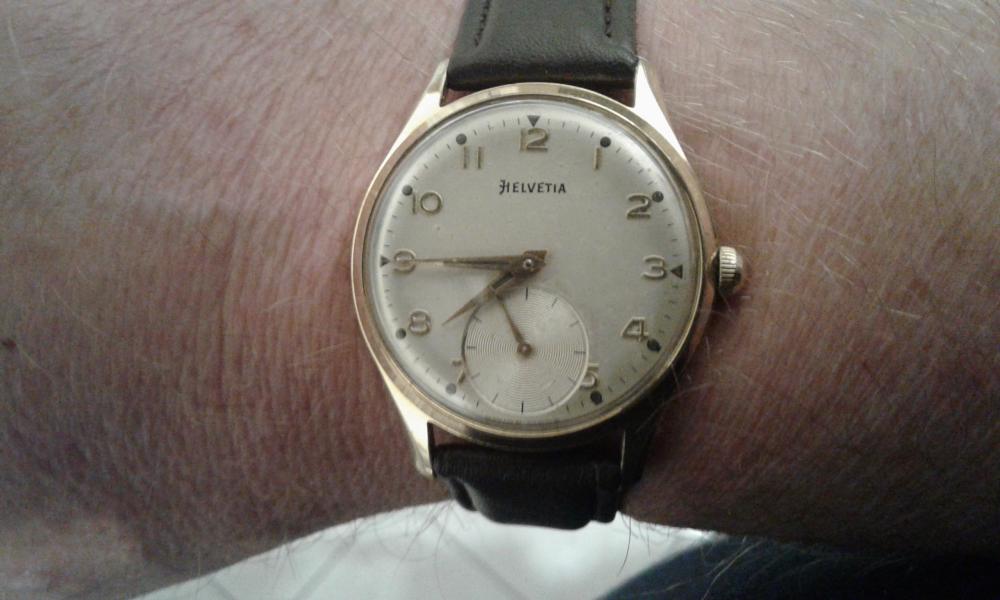
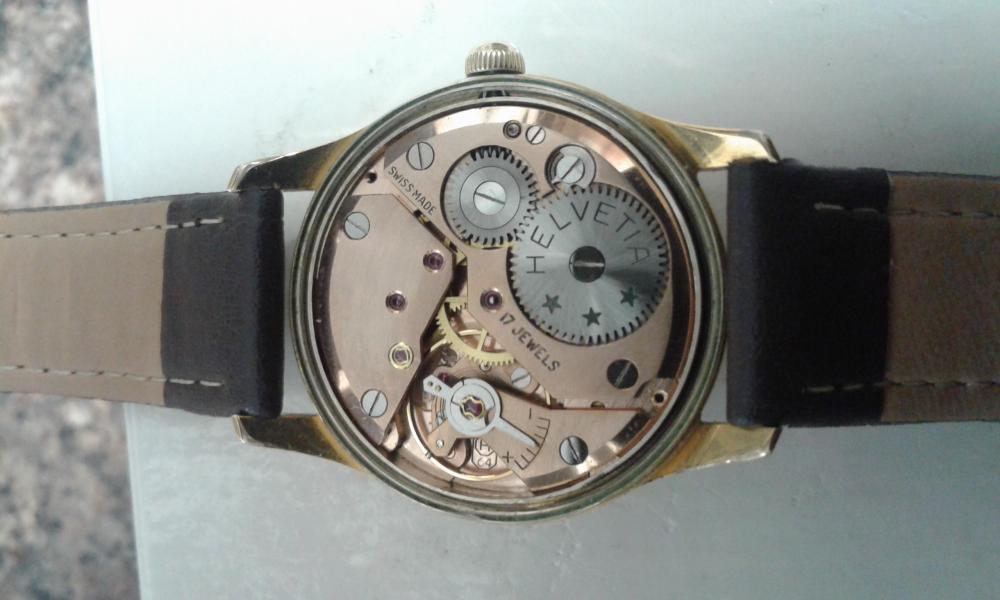
every helvetia i've seen has been a great looking watch. this is no exception. that is very nice.1 point
-
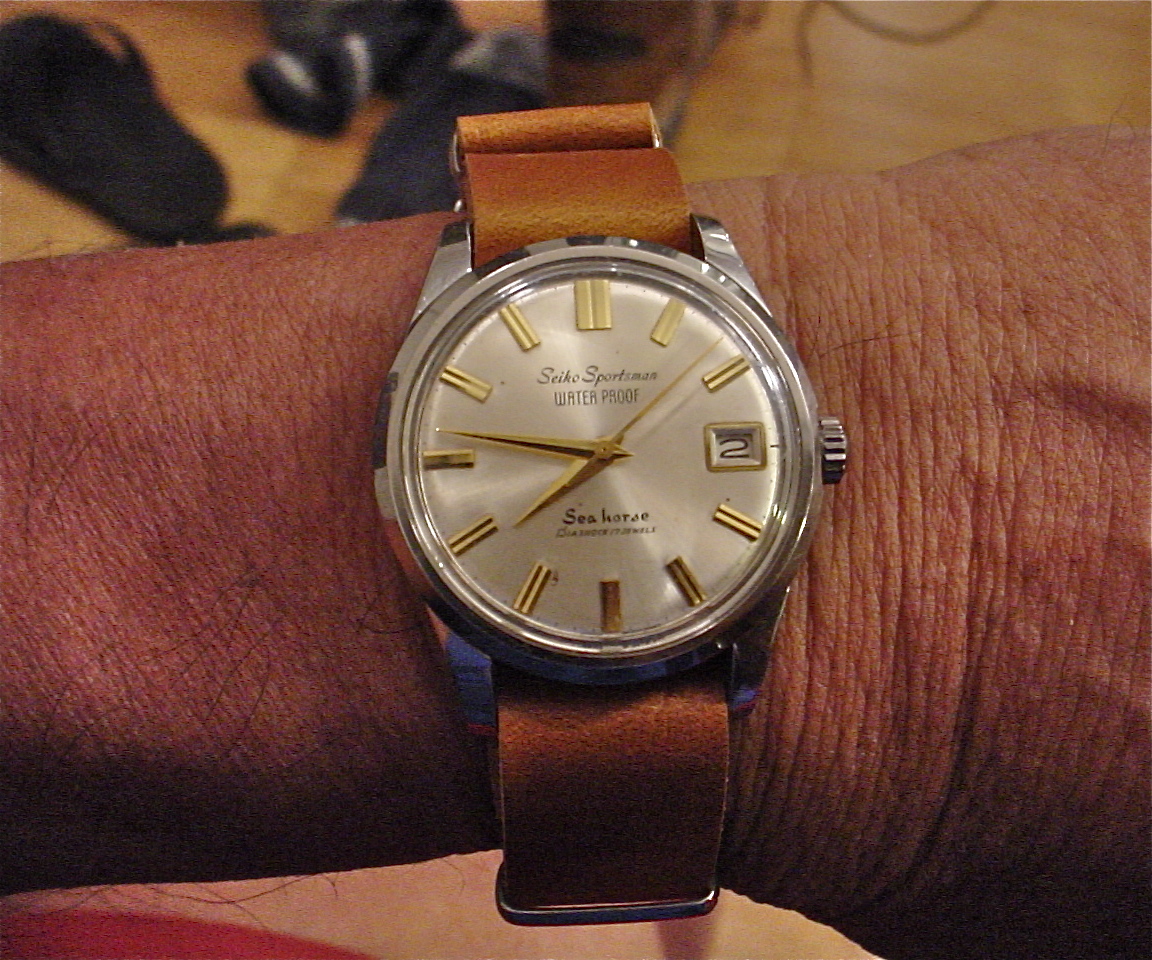
louis - you don't see too many of them (seiko) in that combo - stainless case and gold finished dial. i love that look.1 point
-
Thanks guys for the great answers. @ftwizard and @oli I think you've cracked my problem that I struggled to explain well. I will follow the advice and I've read somewhere (this forum maybe?) that when one is a beginner as I am that when manipulating diashock springs, do so inside a large clear plastic bag where possible to prevent it leaving the earth's atmosphere.1 point
-
Well @Marc I've had something similar on for the past week. The movements are very similar I know the H65 and H66 were the Unitas 6310 but the H64 is very similar indeed.
 1 point
 -
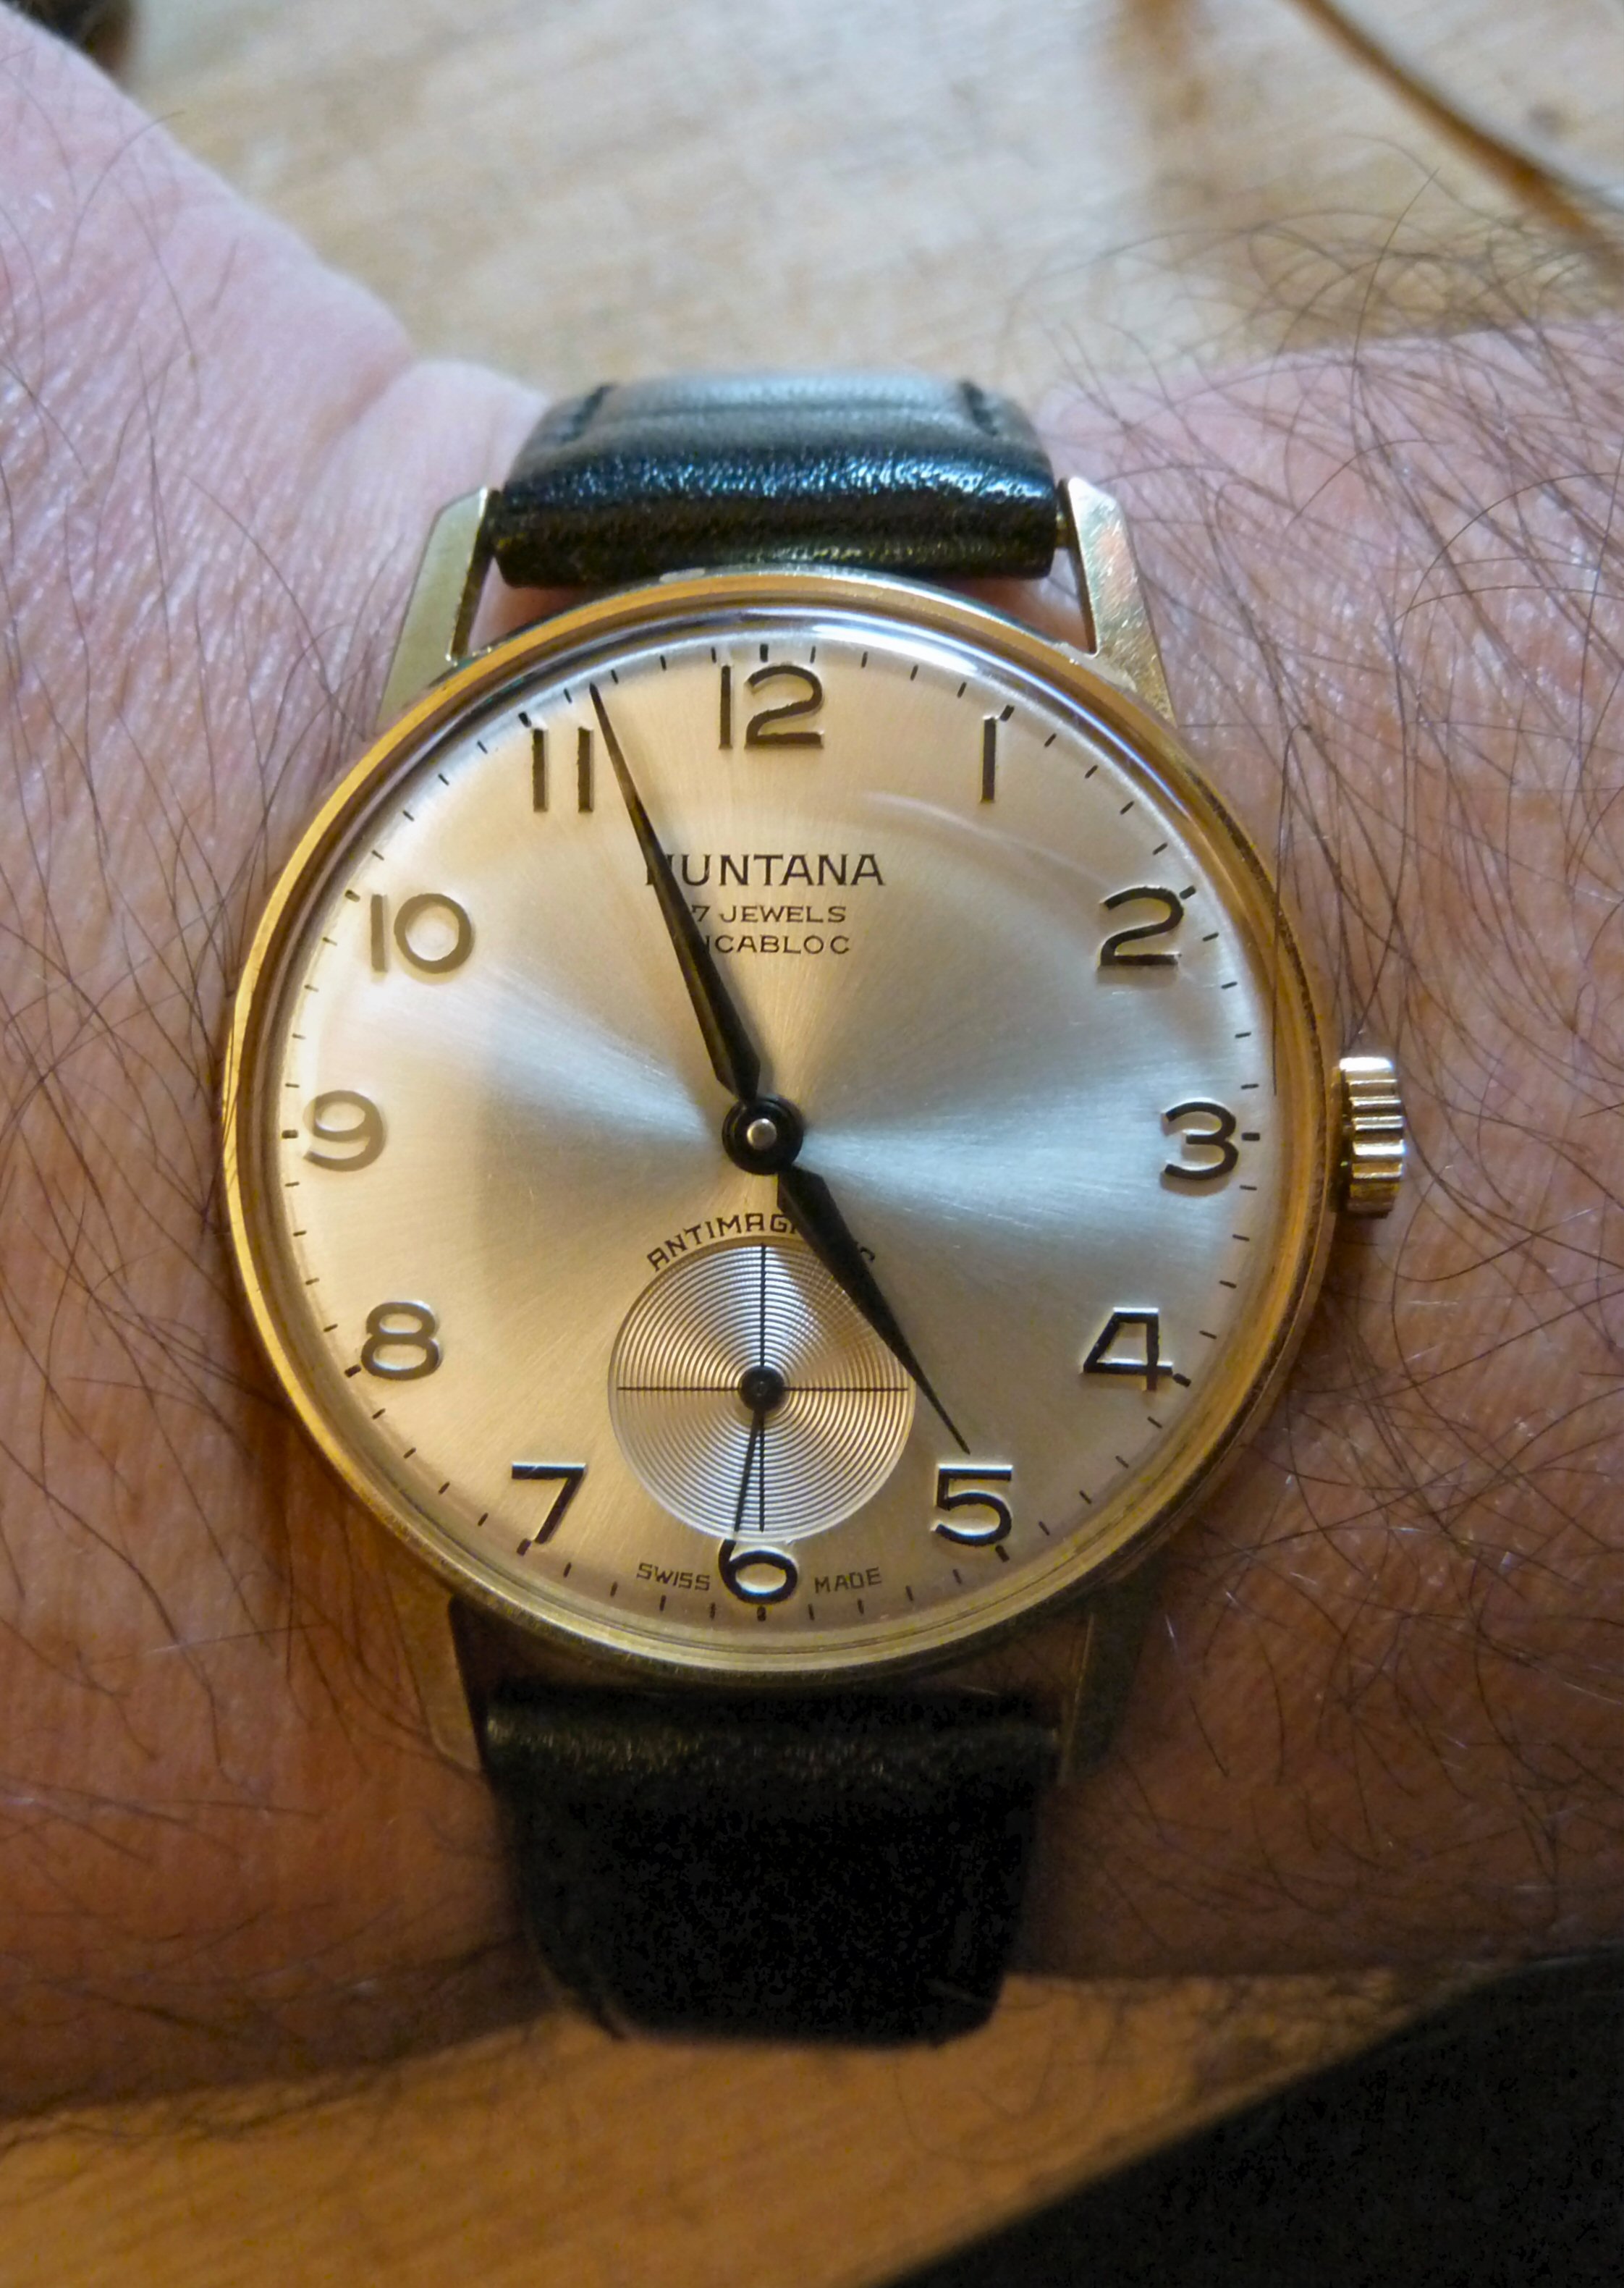
Got my Huntana on today It's been getting quite a lot of wrist time lately. At 34mm diameter and just 8mm thick it is just such a comfortable watch. The thin bezel makes it wear bigger than it is and the design and layout is so easy to read. It has a Unitas 6325 inside which is a lovely movement. A nice easy size to work on, simple, bullet proof, consistent, and reliable. This particular one is also the loudest ticker I have.

 1 point
 -
Today I'm going with a vintage Seiko Sportsman Seahorse I haven't worn for a while ..
 1 point
 -
The simple answer is no. It's the one part of a watch movement that I wouldn't recommend trying to repair without the correct tools. You first have to remove the hairspring and roller table then either cut off or break the riveted area where the balance is located on the shaft. This is where you need a lathe, staking set or platax tool to do it accurately and safely. The new shaft then has to be fitted precisely aligned with the wheel and then riveted, this you will need a staking set to do correctly.1 point
-
I find watch price guides to be of dubious use any way, the well worn phrase its only worth what someone is willing to pay comes to mind but it does hold true the best reliable guide I find nowadays is Ebay search for previous auction sales (not buy it nows people list at such unrealistic prices its never a good way to determine price) and see what has been bid on a Item there are so many factors to price such as condition, rarity, desirability. The Shugart books are good to have for model identification and serial number information but it would be impossible to produce a book with every model ever produced it would have to be the size of the encyclopidea britannica to do that. I have over the years built up quite a collection of books on individual companys or individual watch types such as military watches, chronographs and automatic watches it has been expensive but worth the investment to gain knowledge. So the answer IMO is no you will not find a one size fits all watch book for pricing watches1 point
-
The price guide books only really cover the high end watches and only give guide prices. If by any chance you think you have a rare/valuble watch or clock in the Uk "Bonhams auction house" have specialists who can advise & sell. However you could try this one that could be more comprehensive . "Wristwatch Annual 2016" by Peter Braun or this one to be found on the Bay http://www.ebay.co.uk/itm/Vintage-A-C-Becken-1949-Jewelry-Diamonds-Tools-Novelties-Catalog-Price-Guide-/371867720873?hash=item56950b1ca9:g:kOgAAOSwA3dYkpqW1 point
-
You got nothing to lose. Go for it!1 point
-
Hello Vic Agree with you ...I will try to work on it with no shacking hands and at the end the learning it self will be a success.. Regards Moises Sent from my iPad using Tapatalk Pro1 point
-
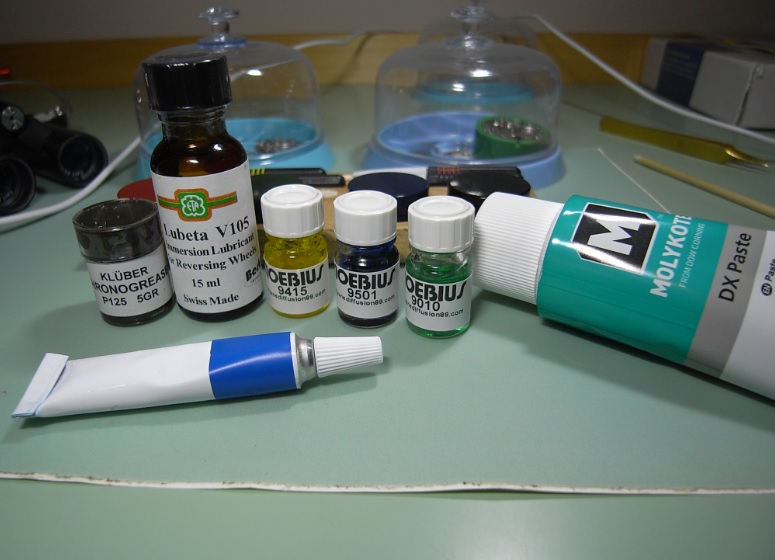
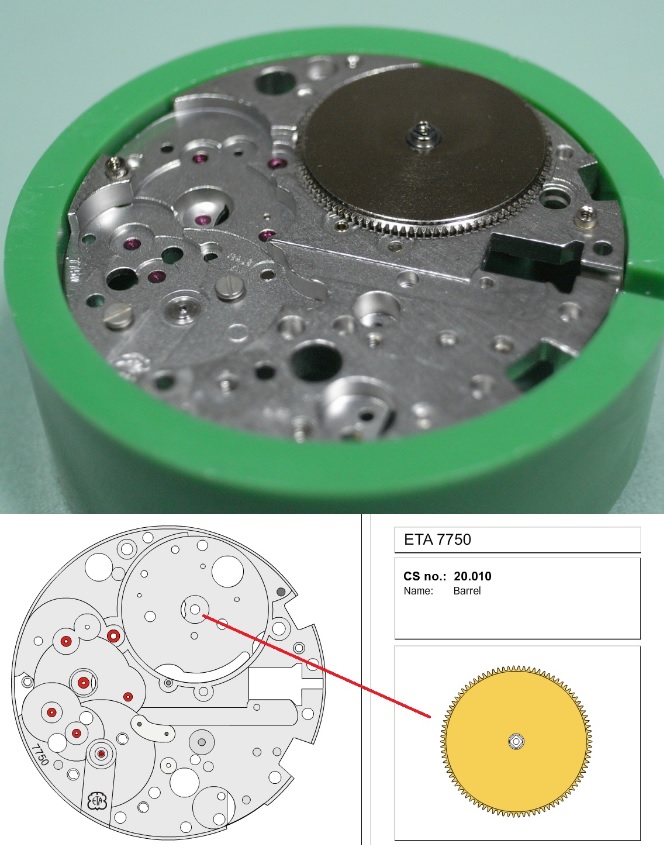
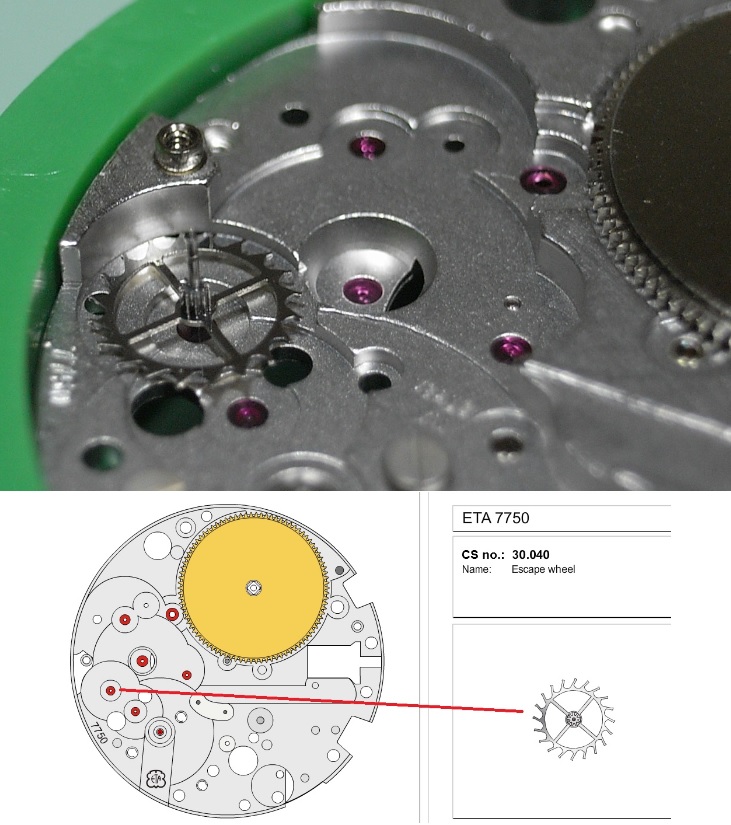
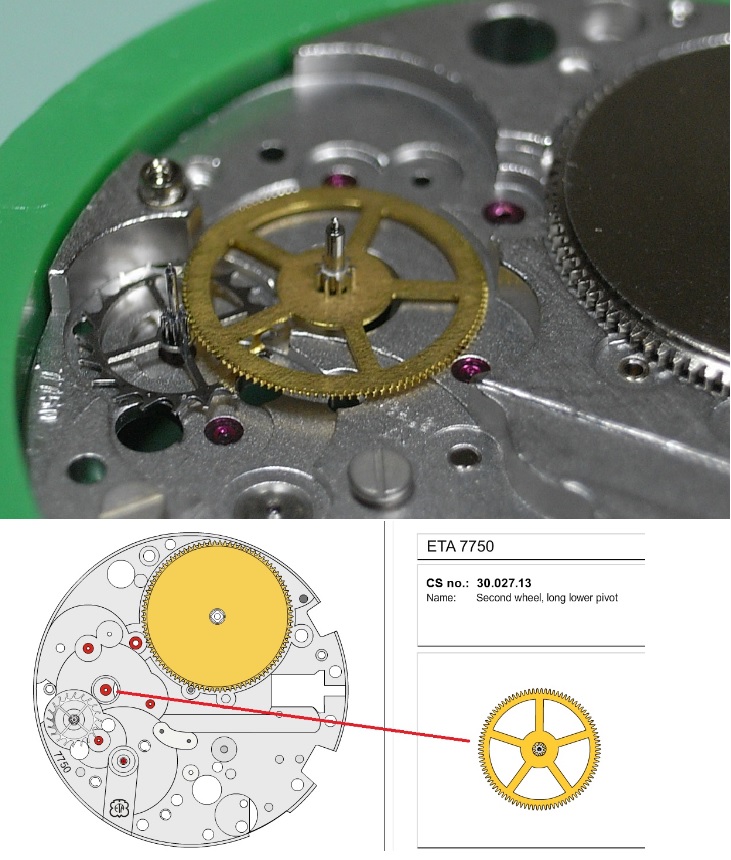
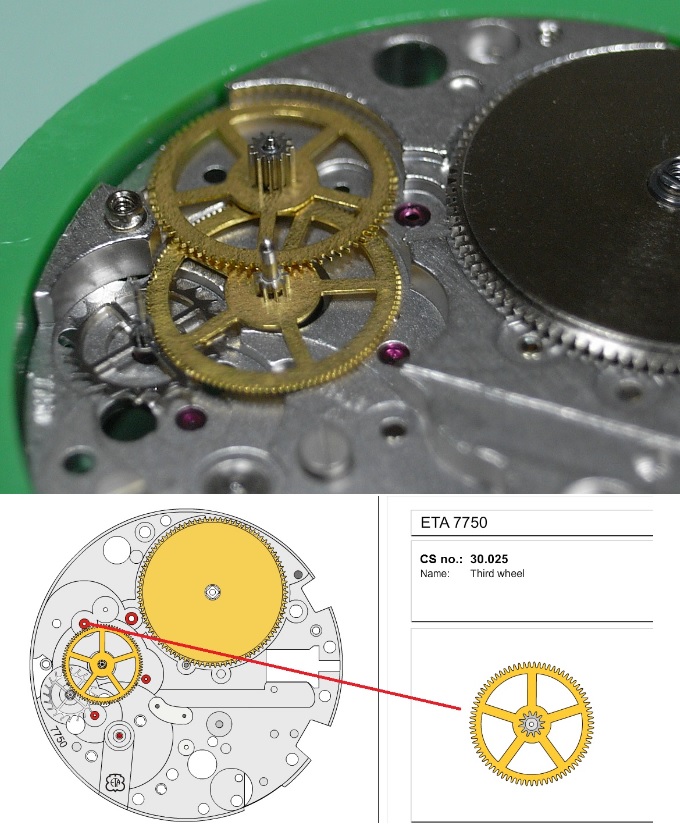
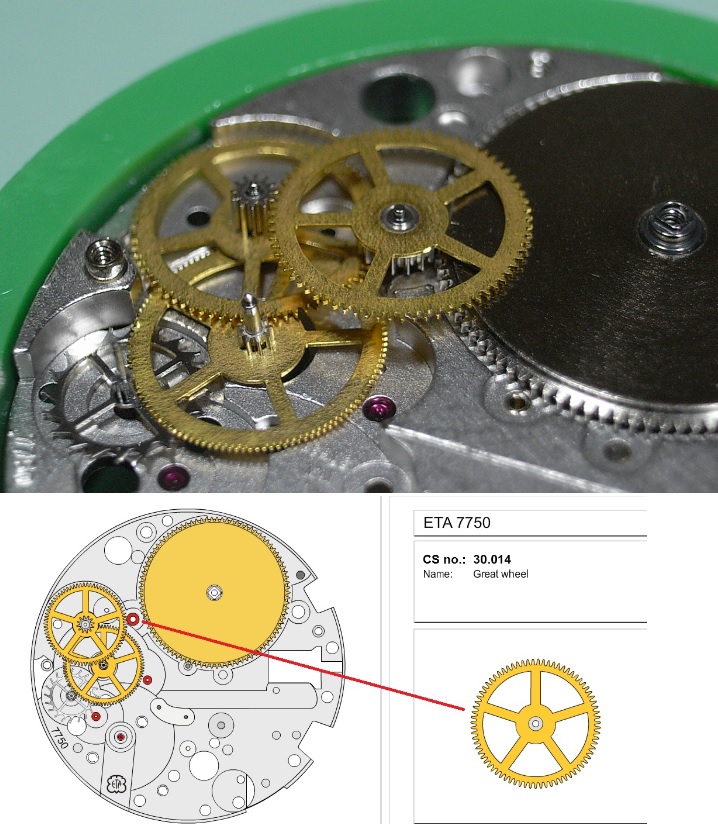
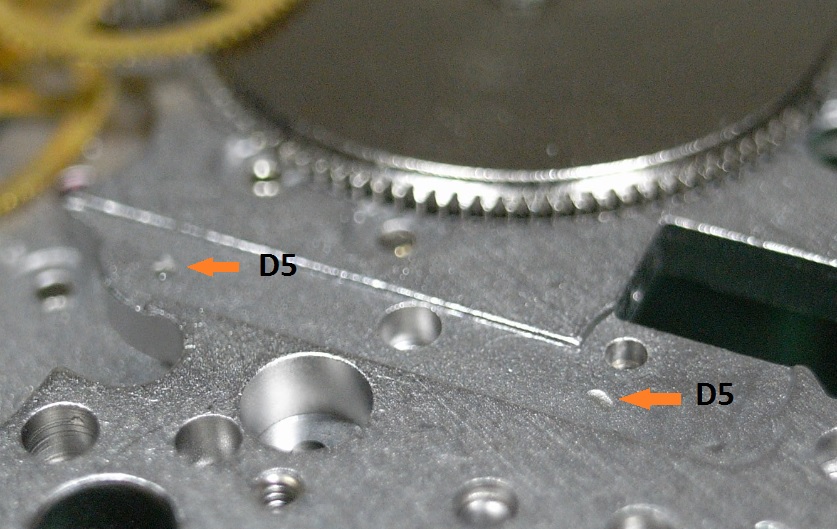
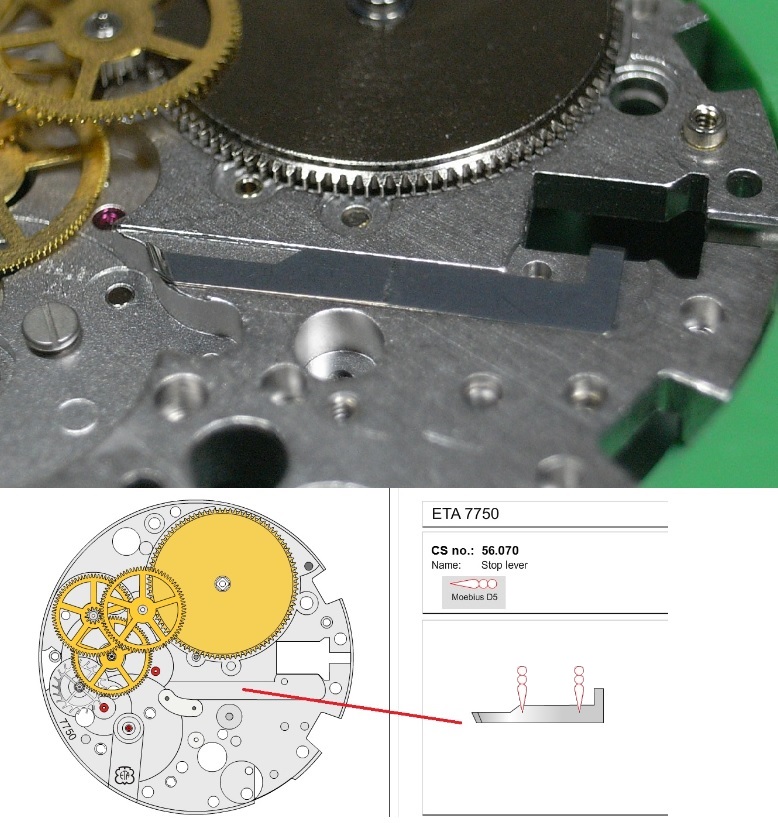
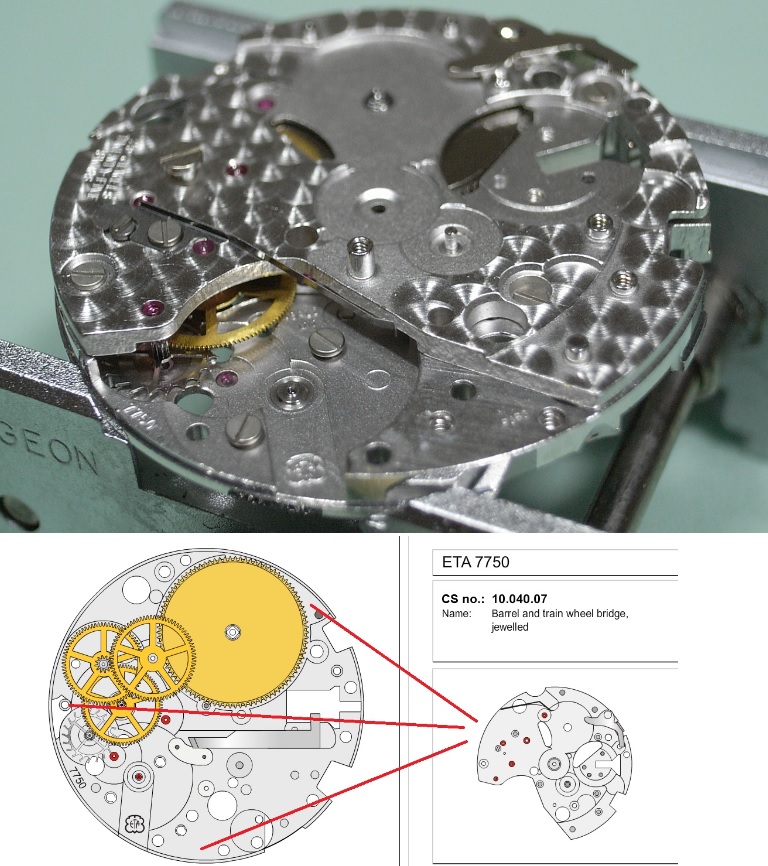
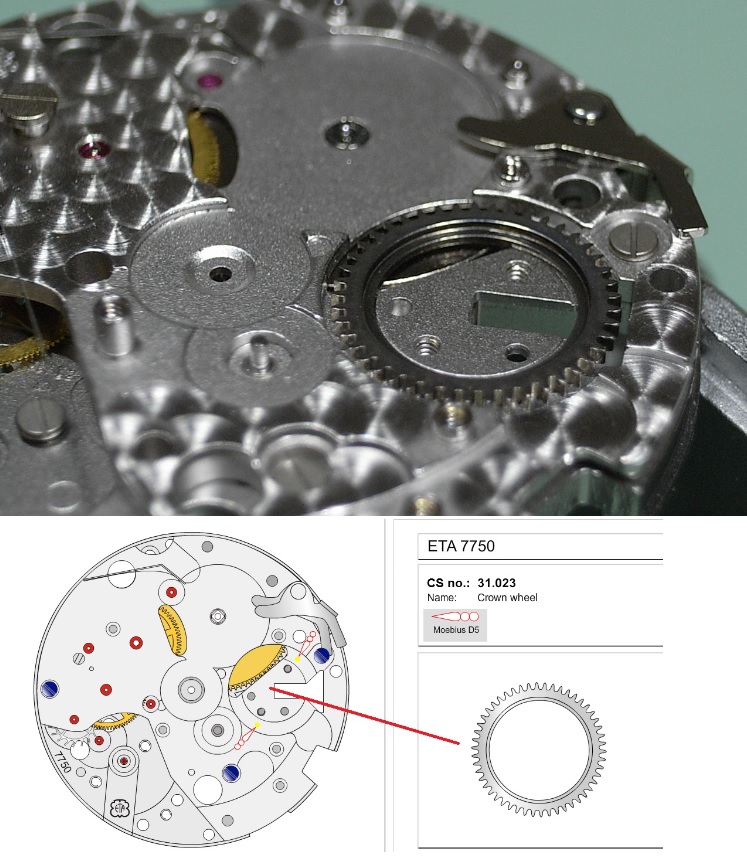
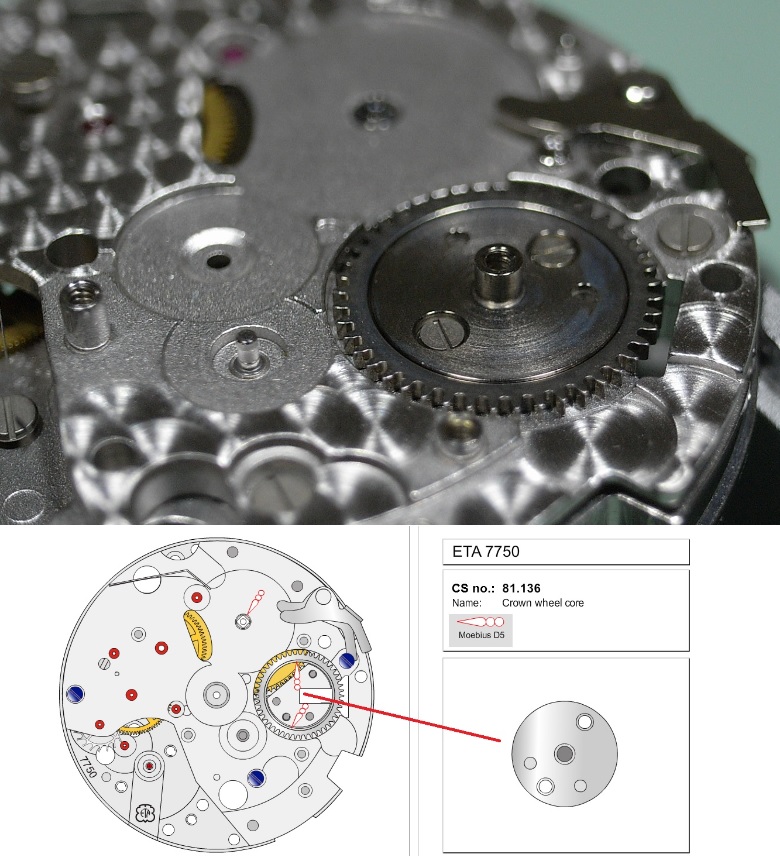
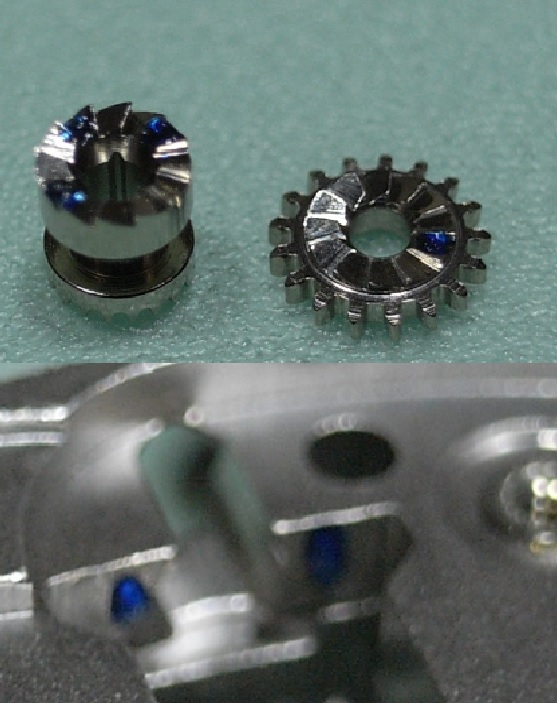
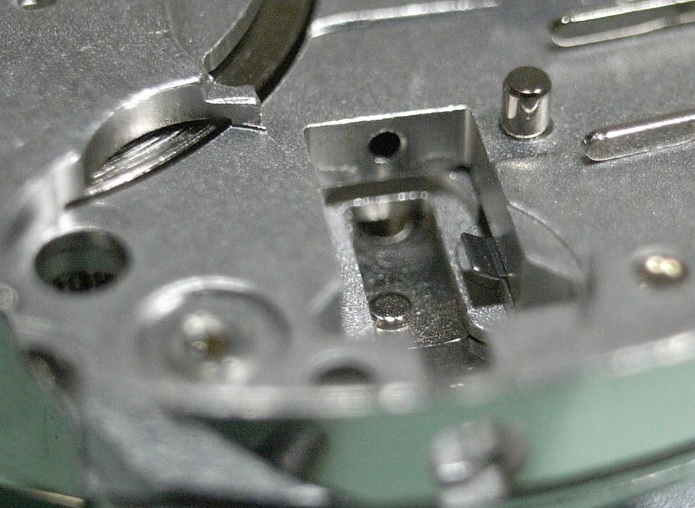
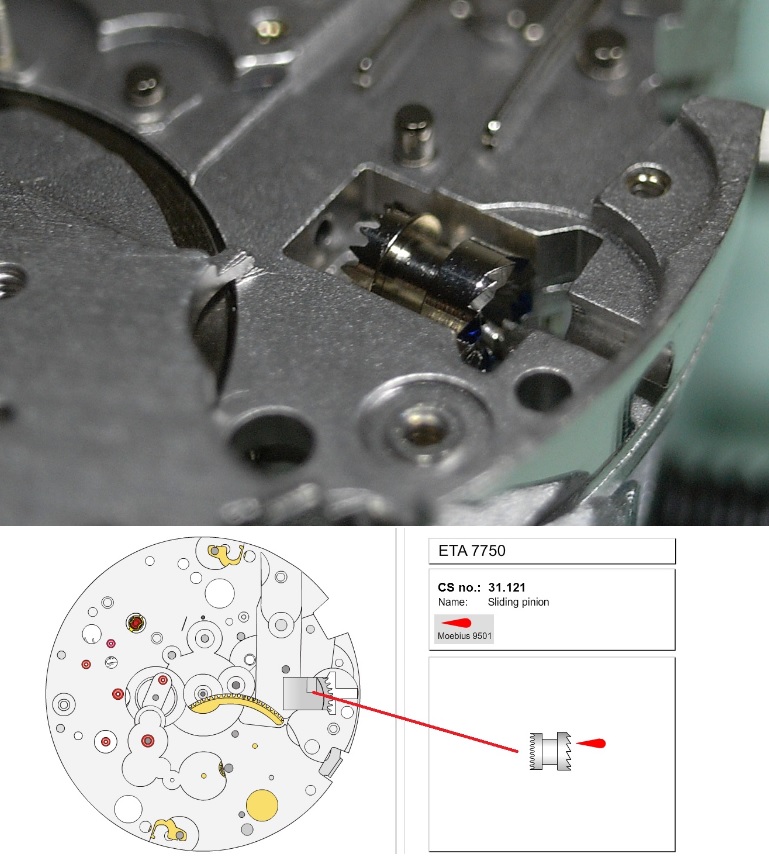
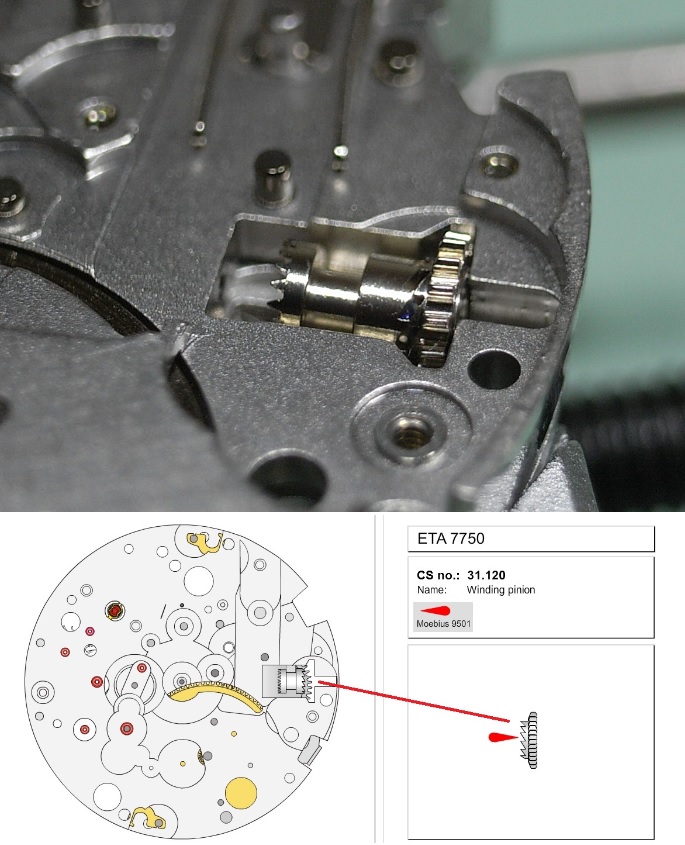
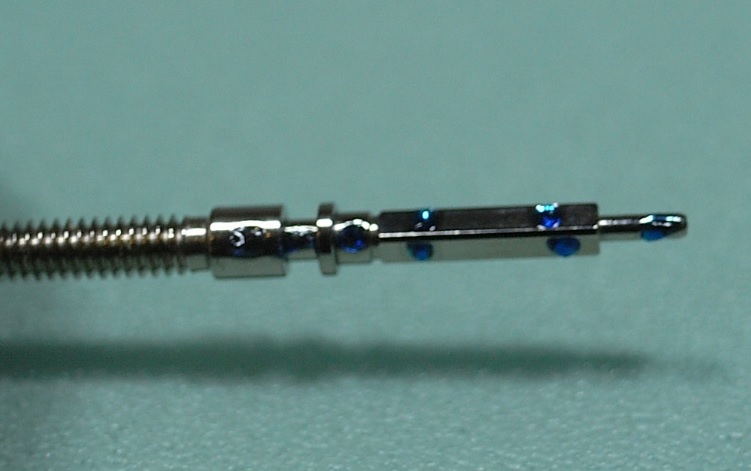
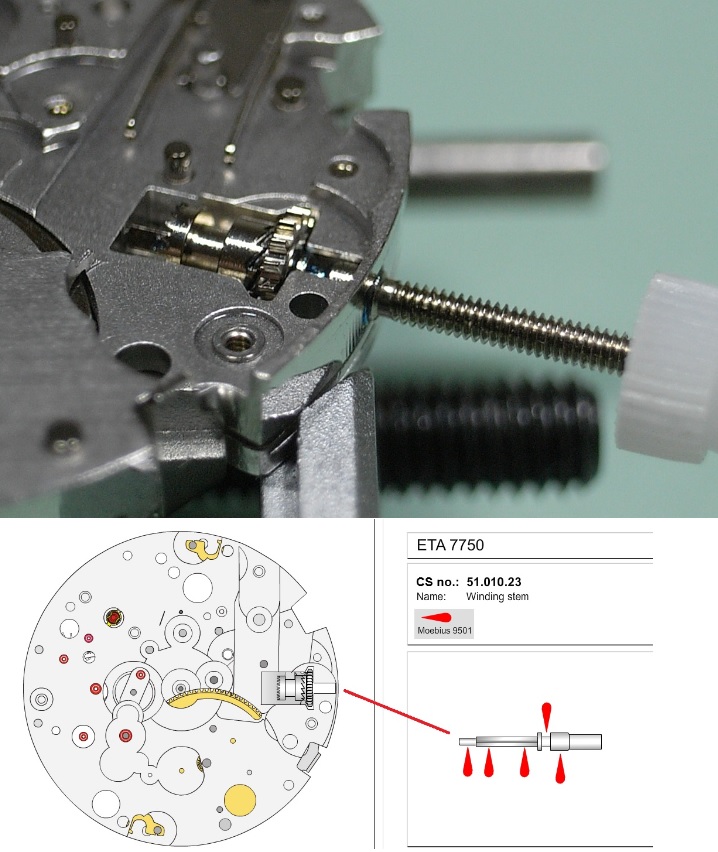
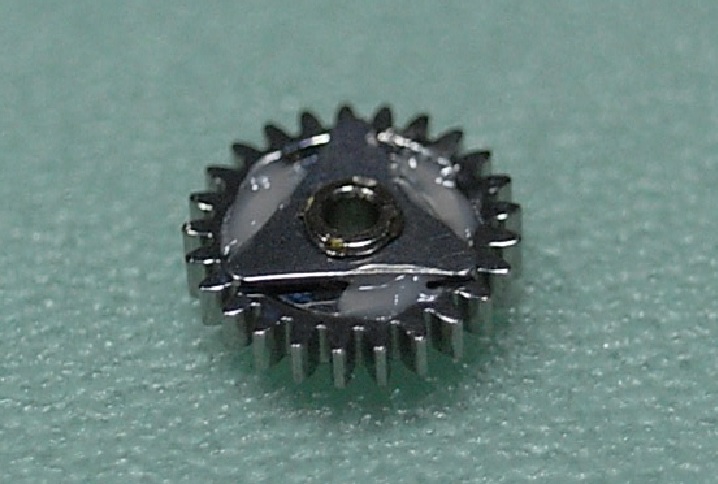
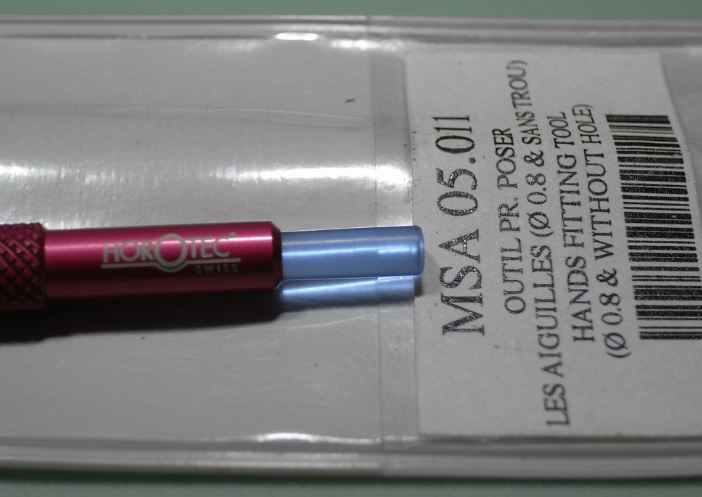
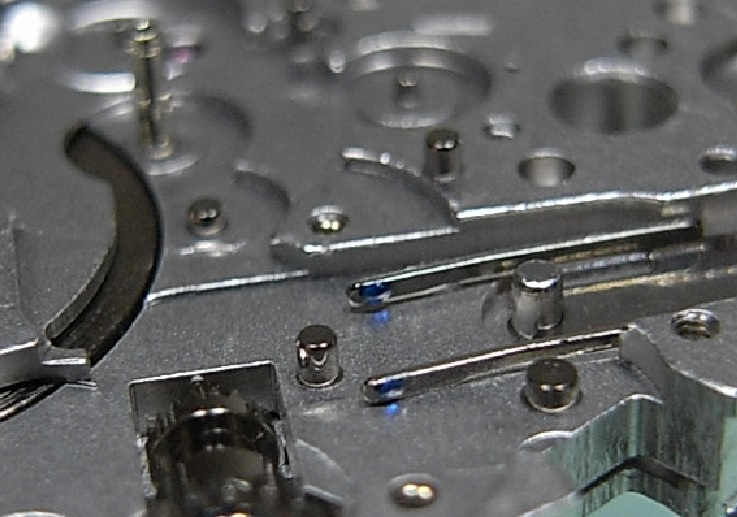
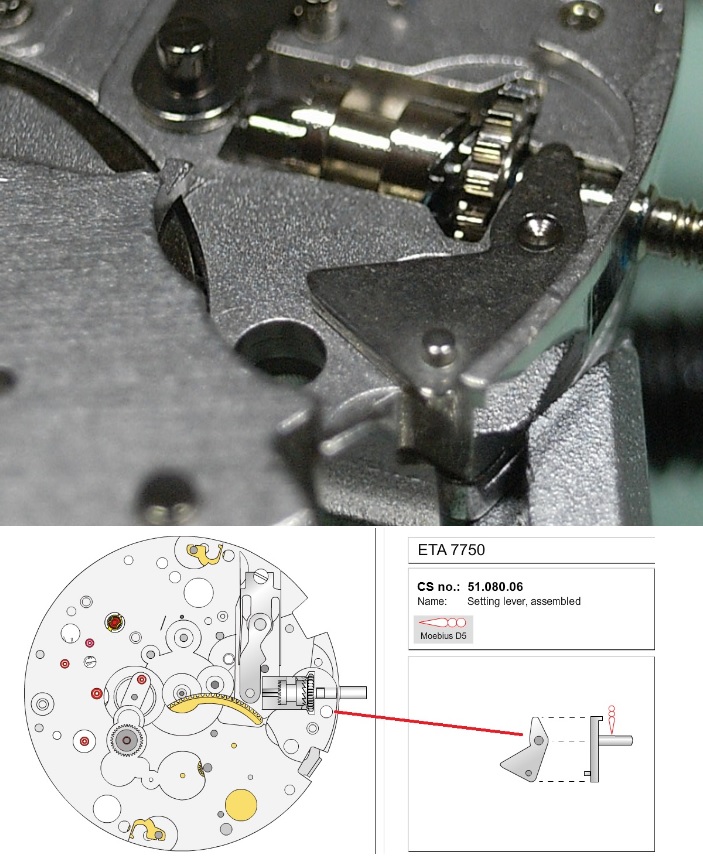
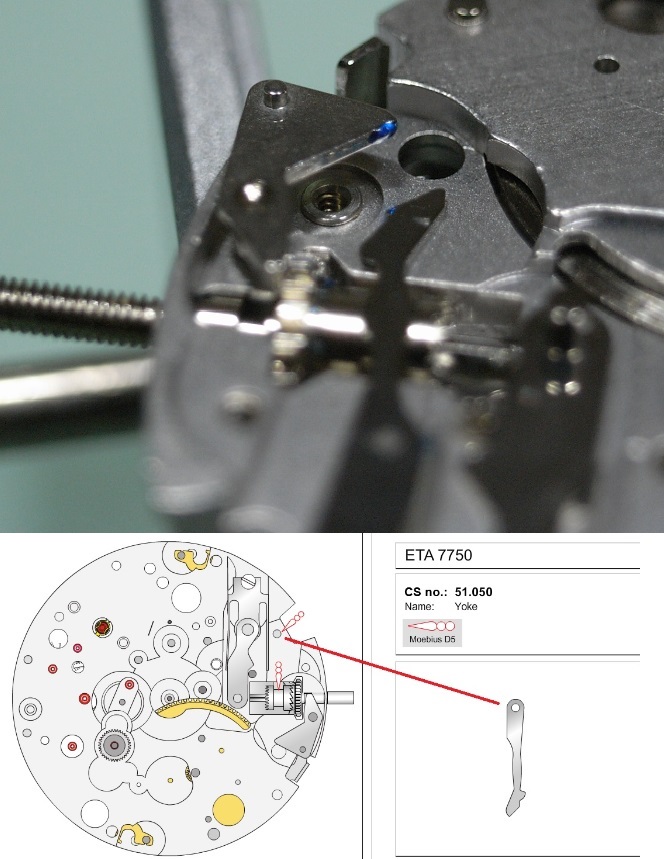
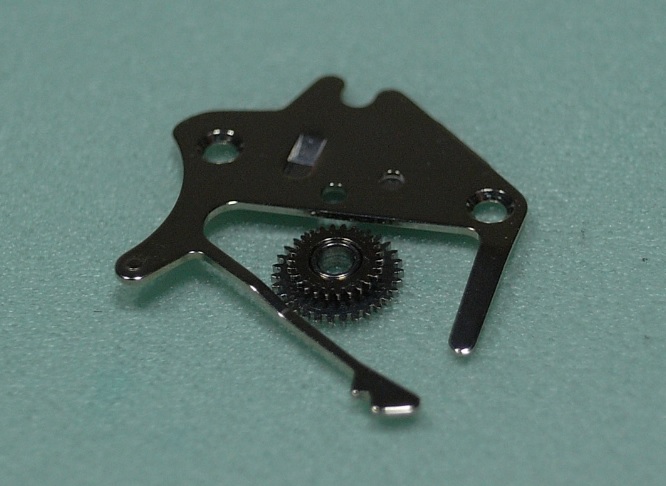
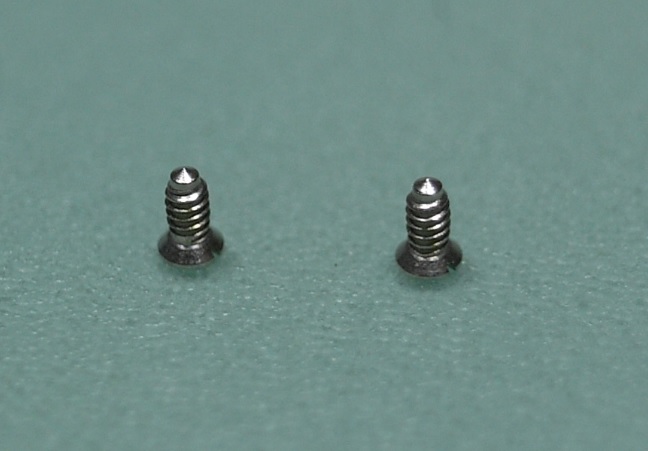
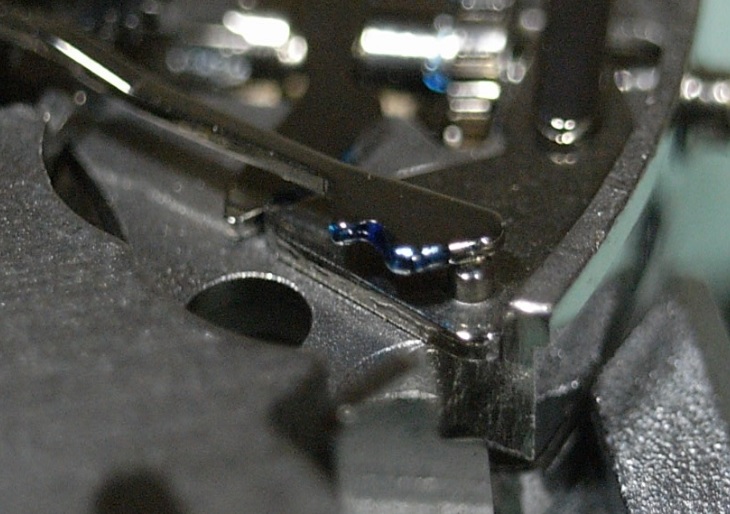
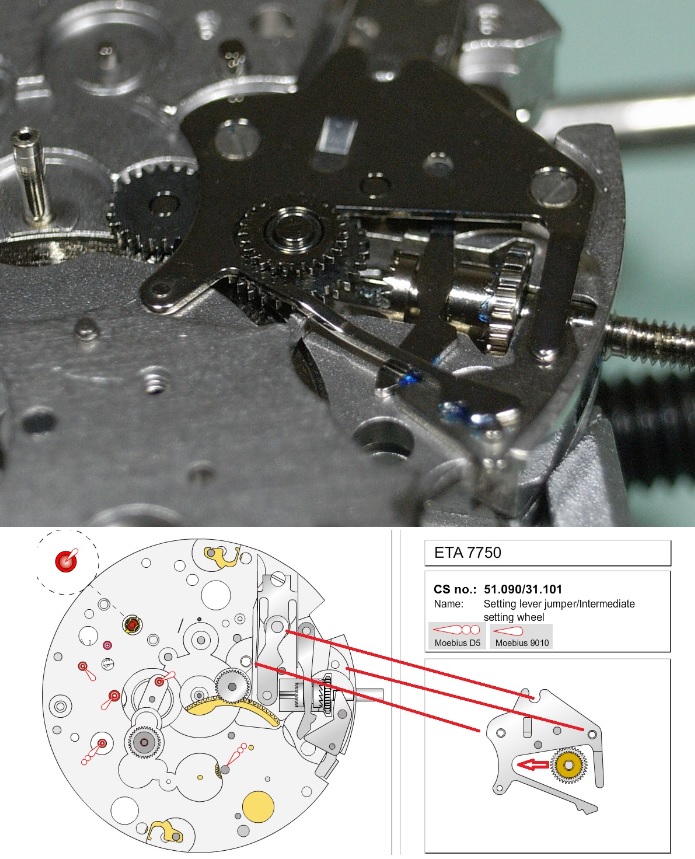
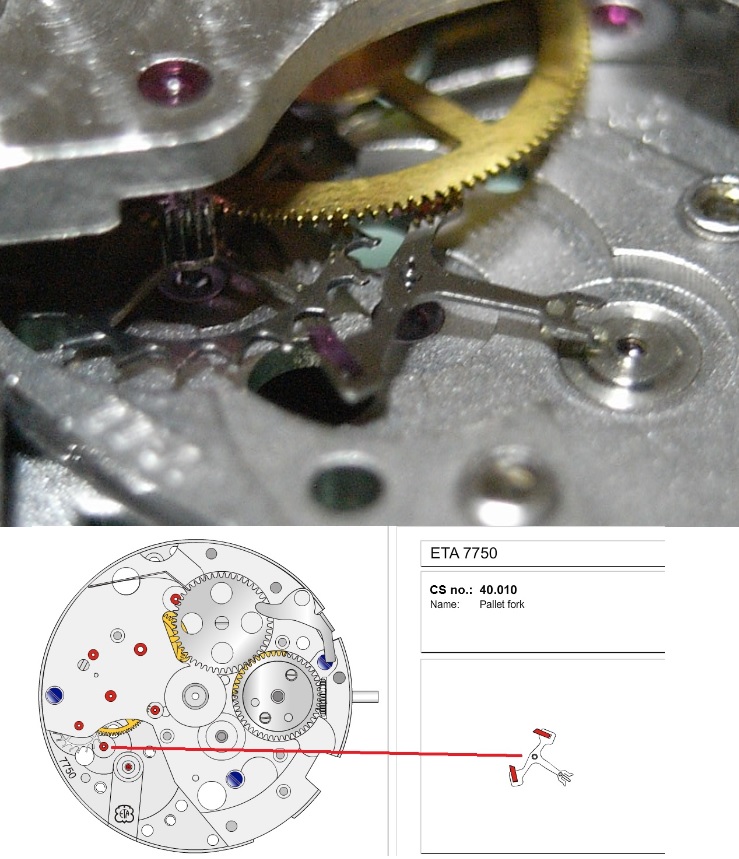
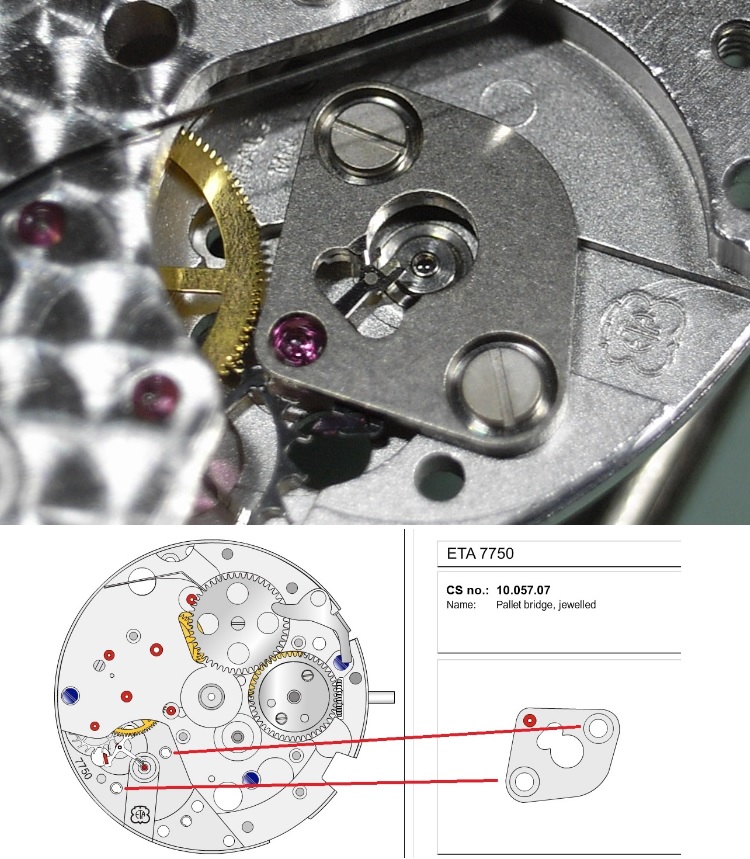
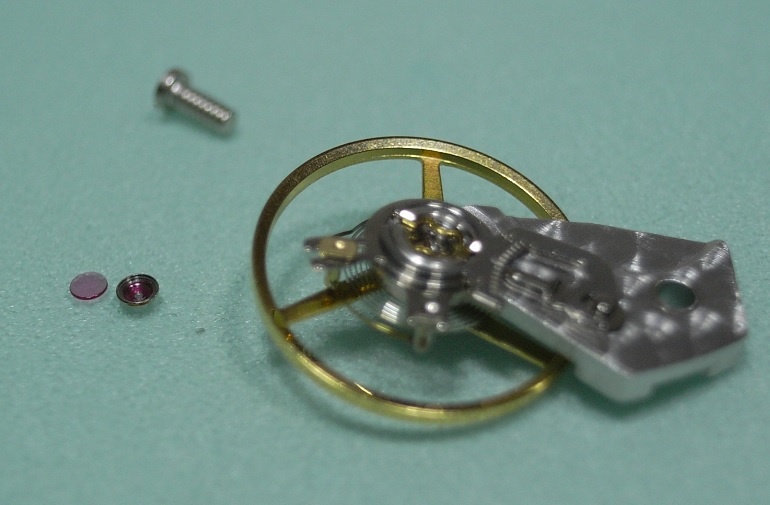
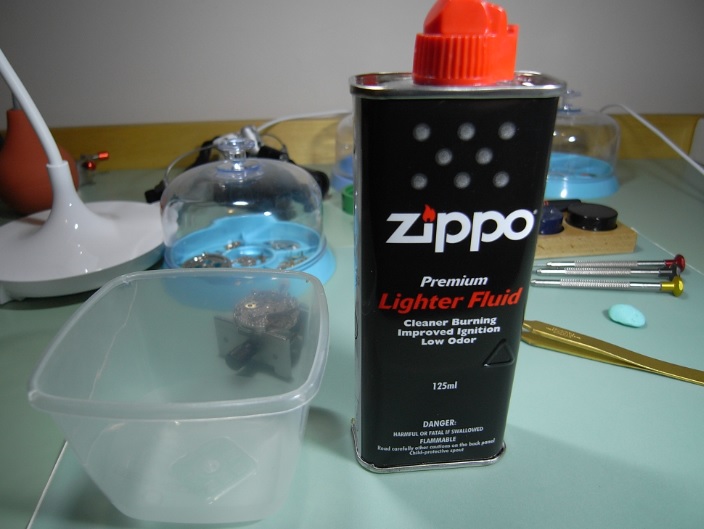
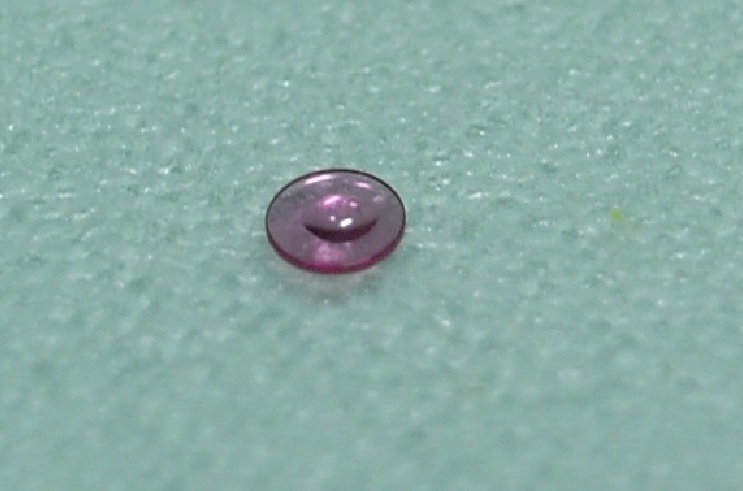
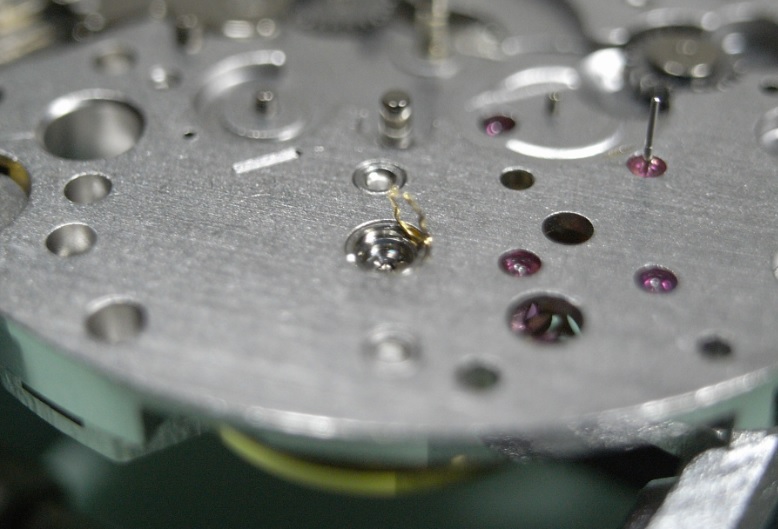
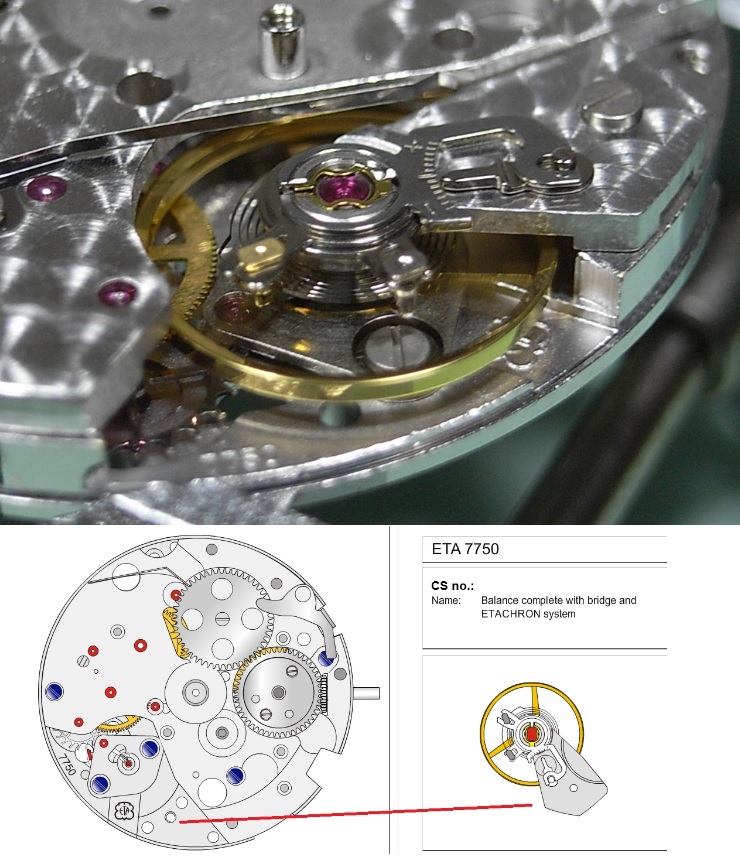
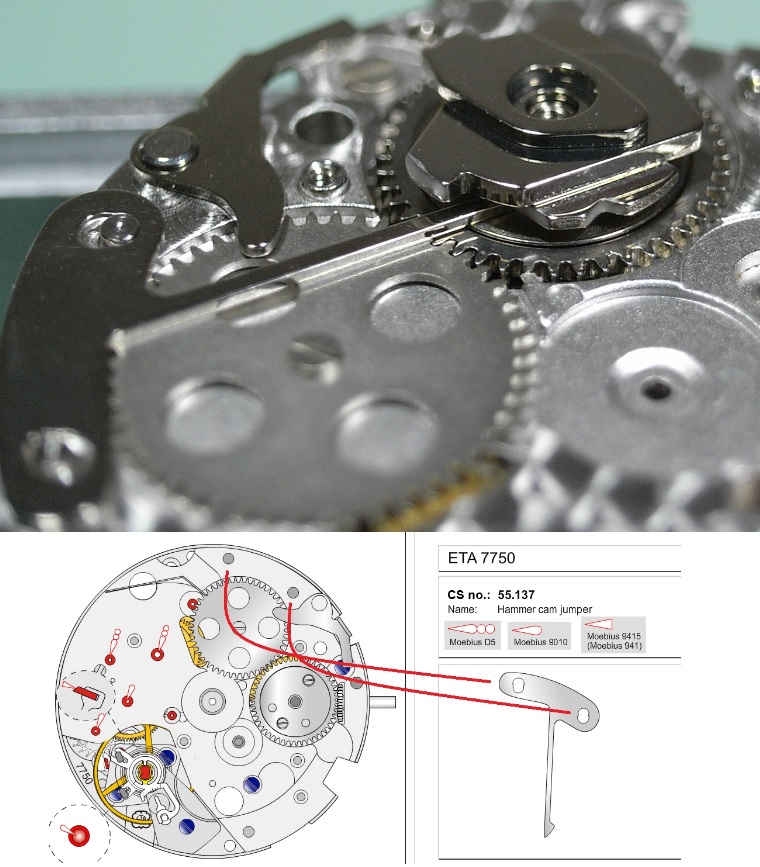
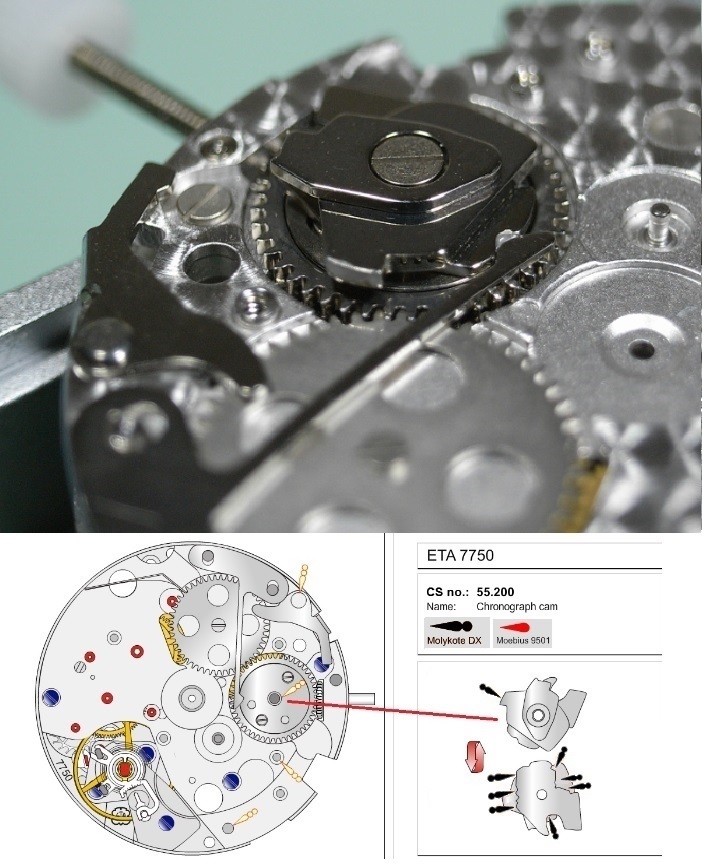
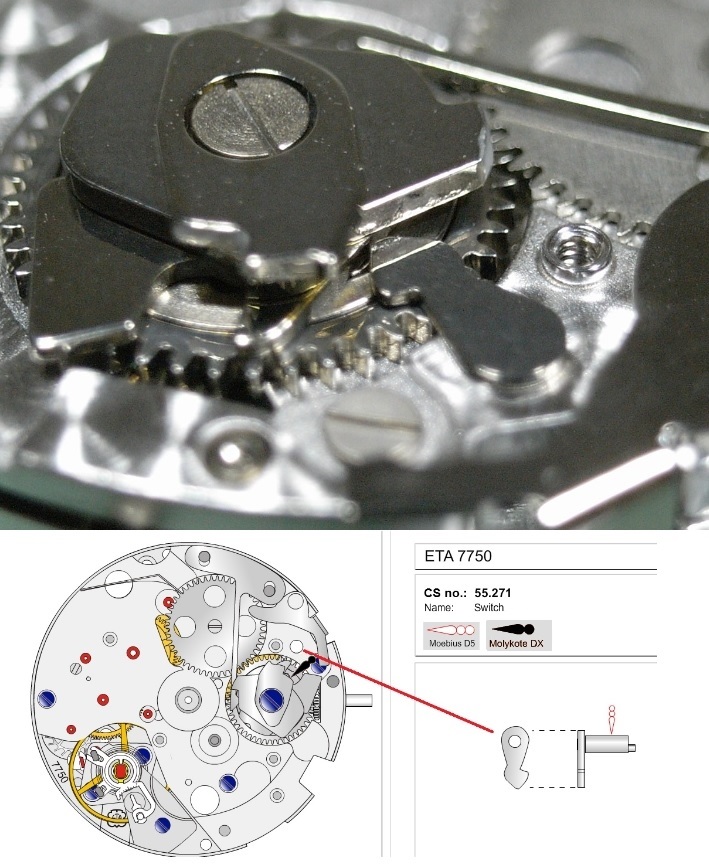
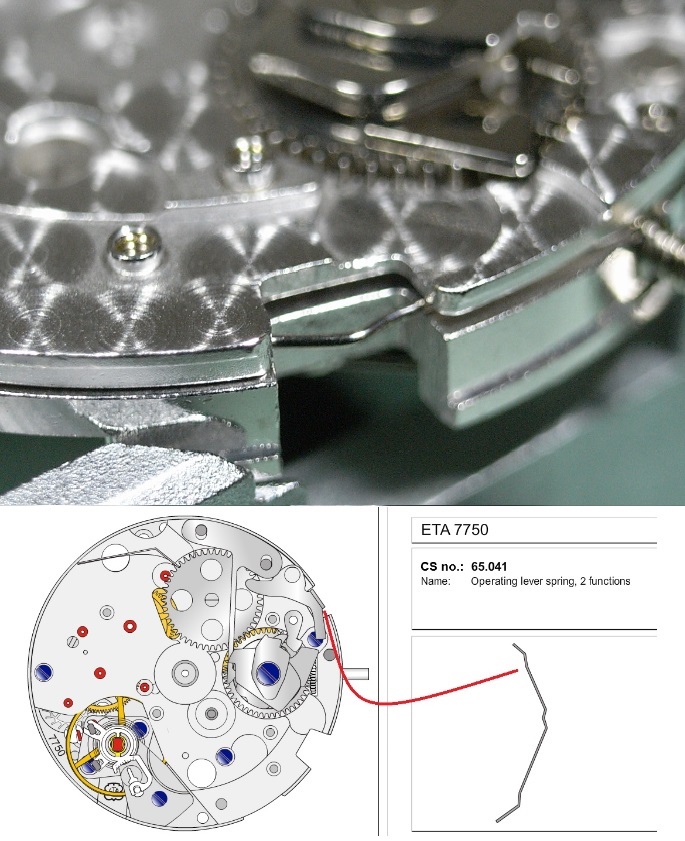
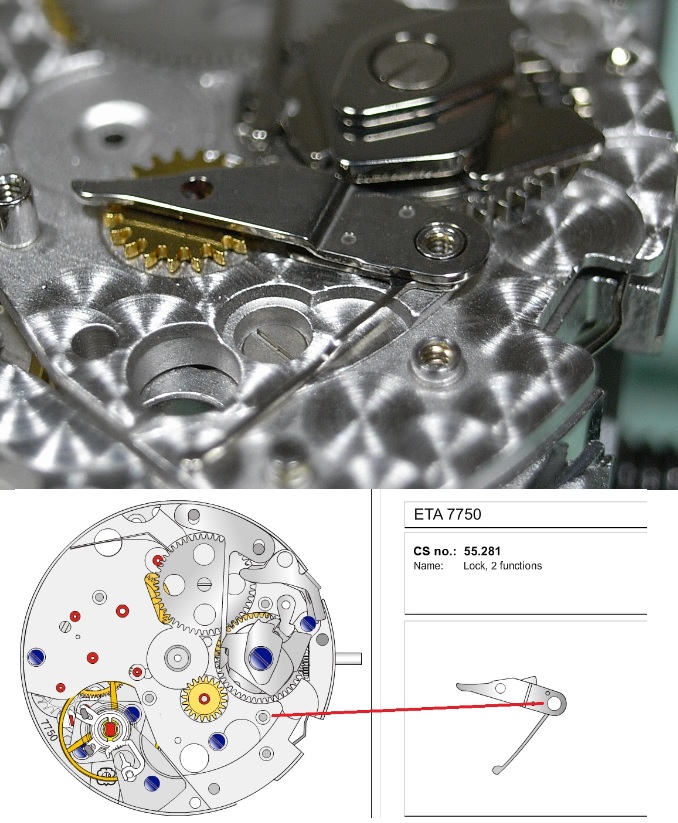
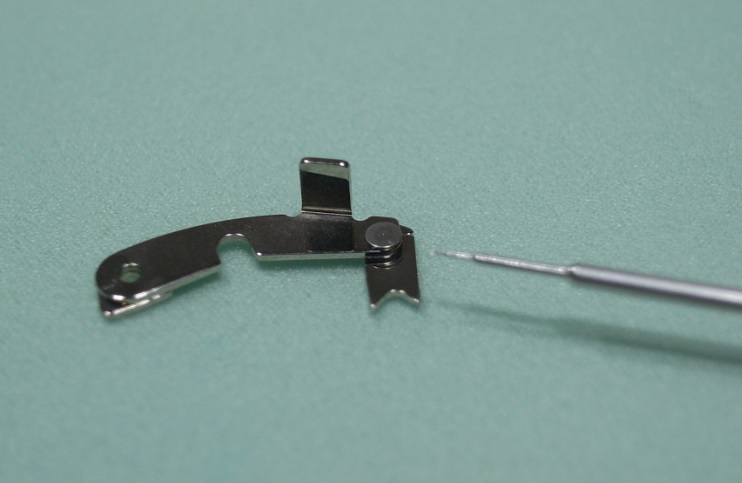
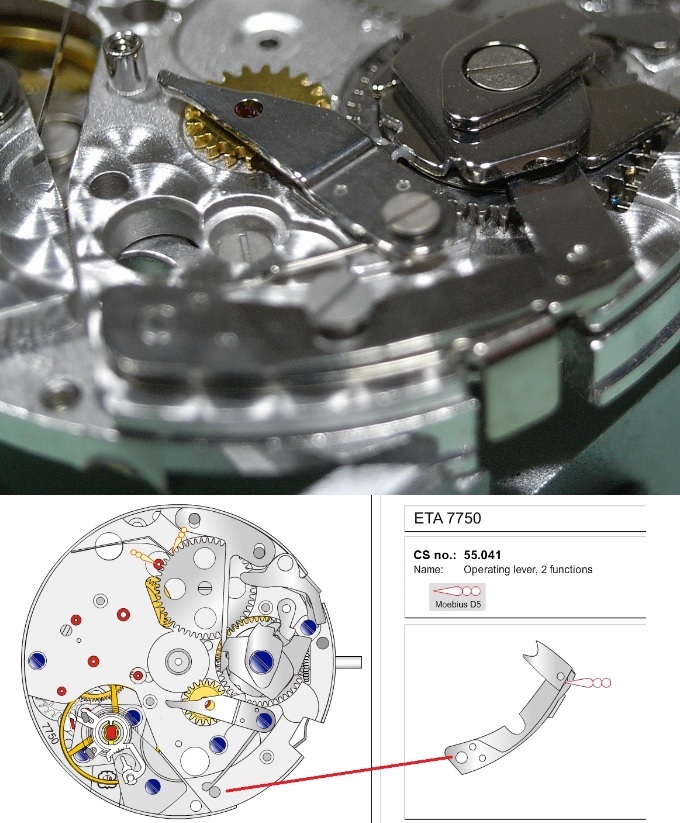
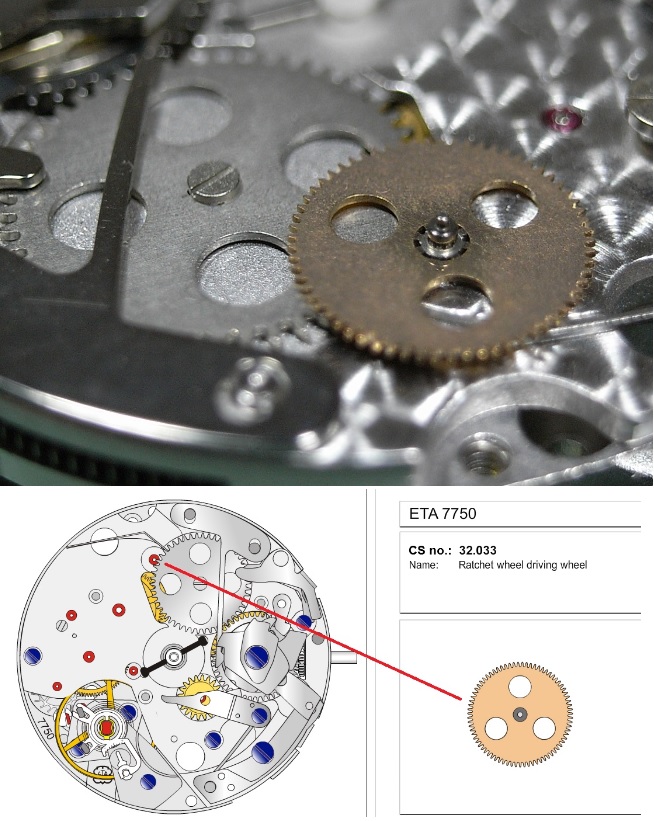
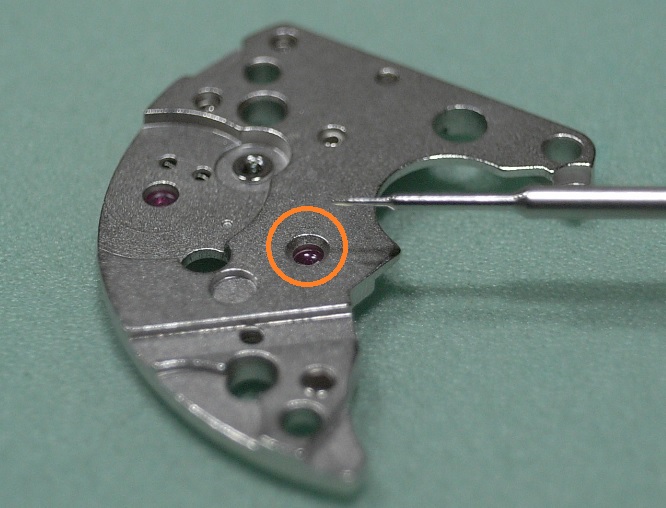
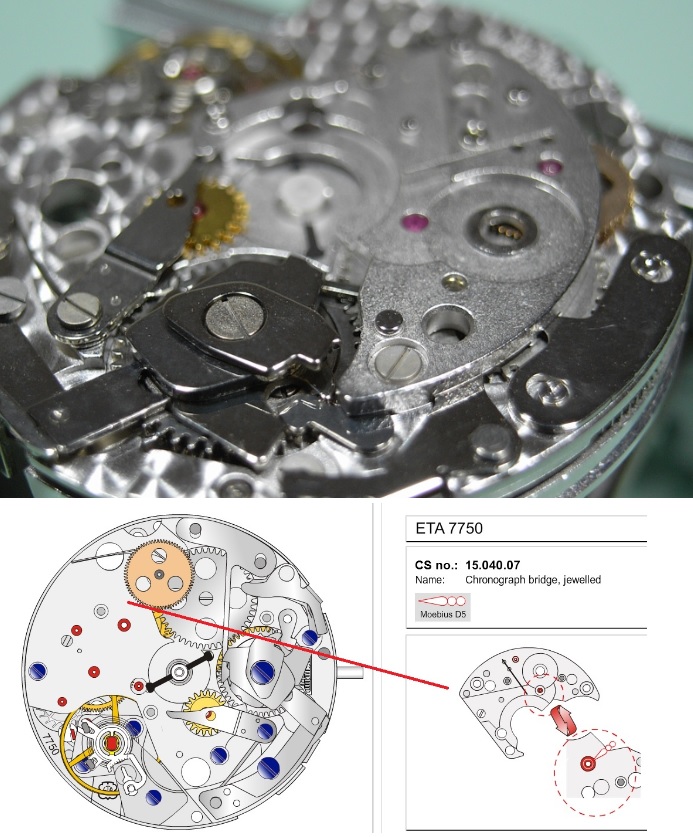
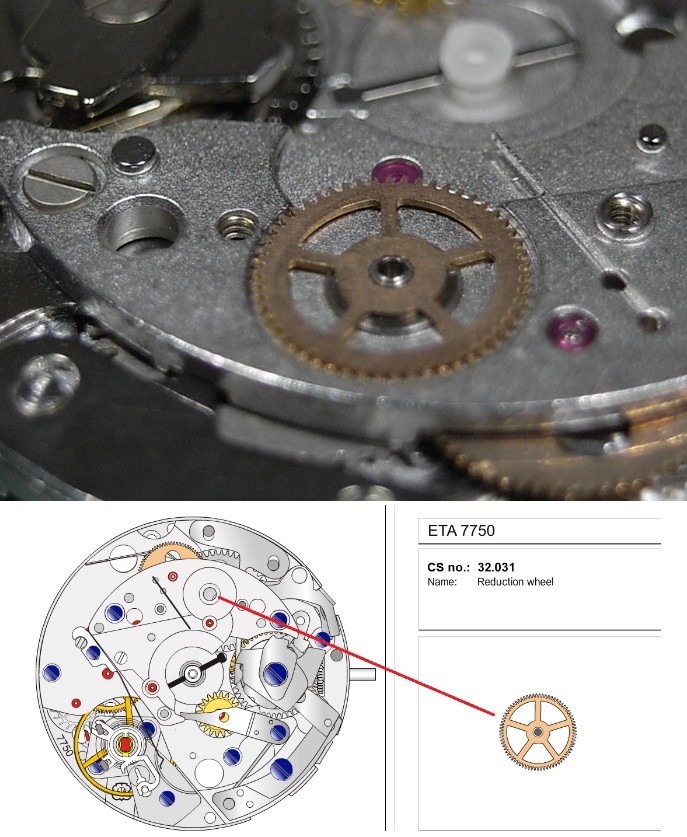
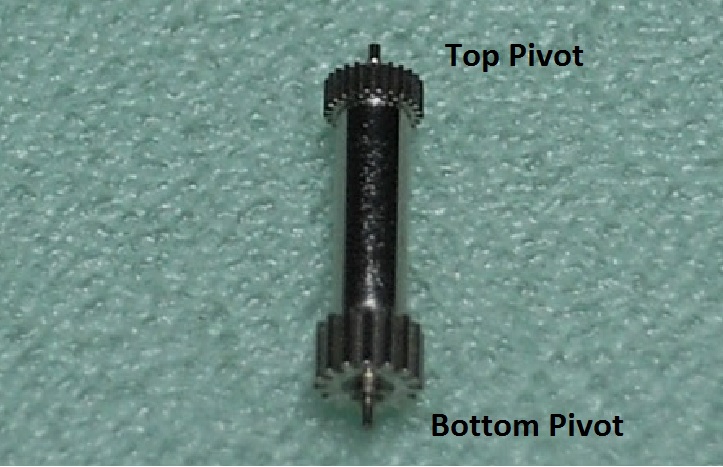
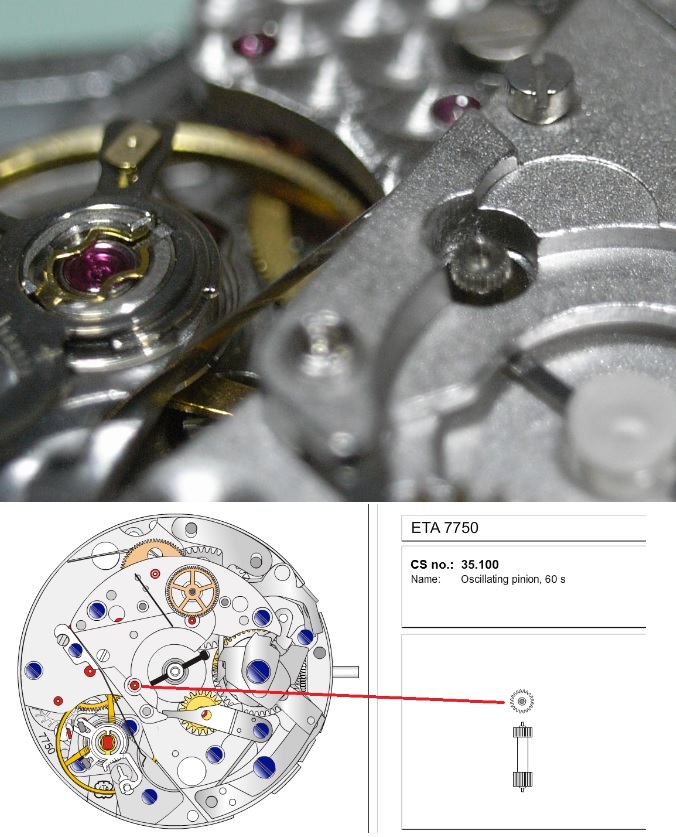
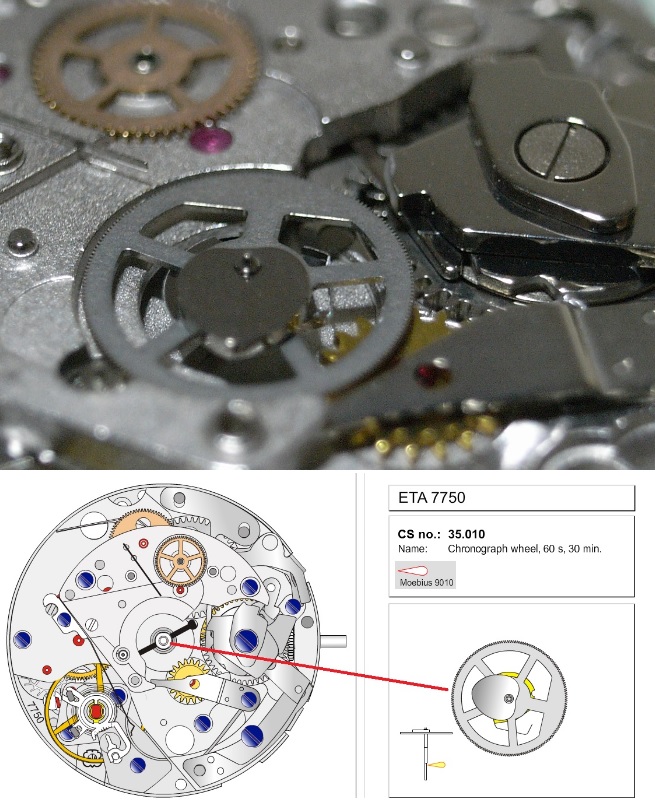
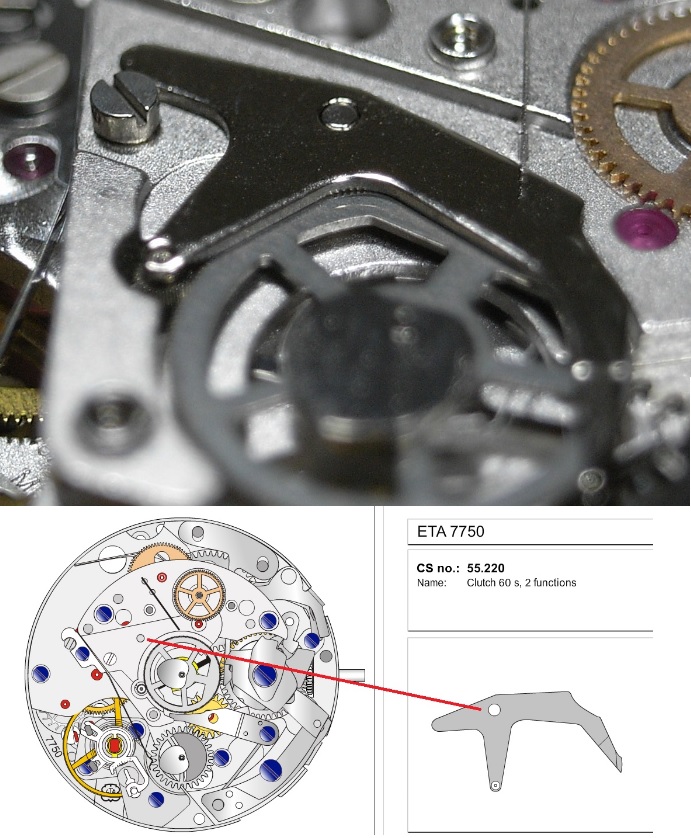
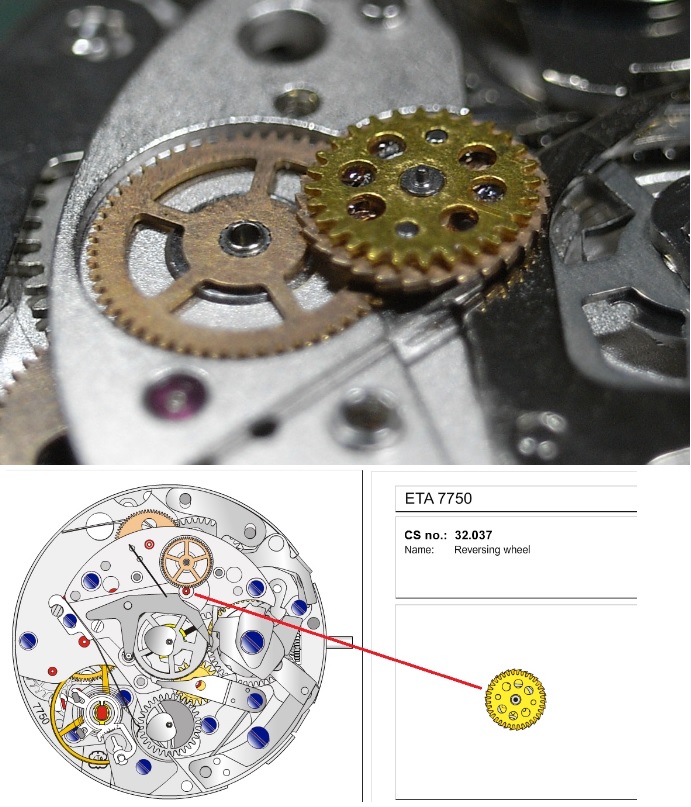
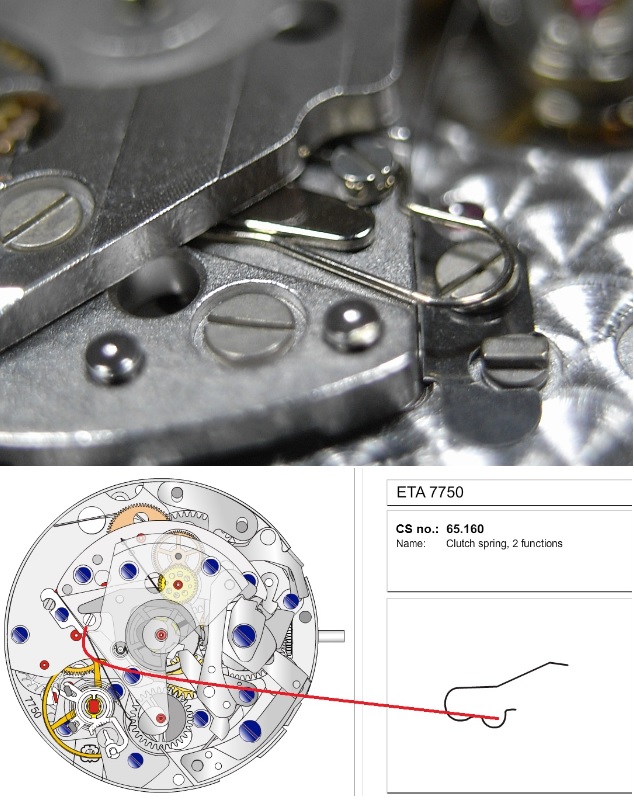
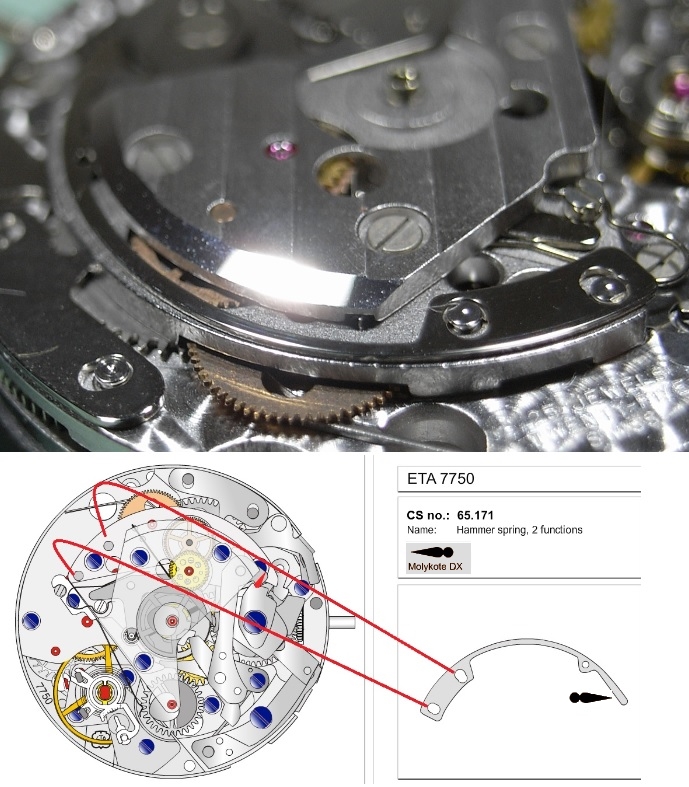
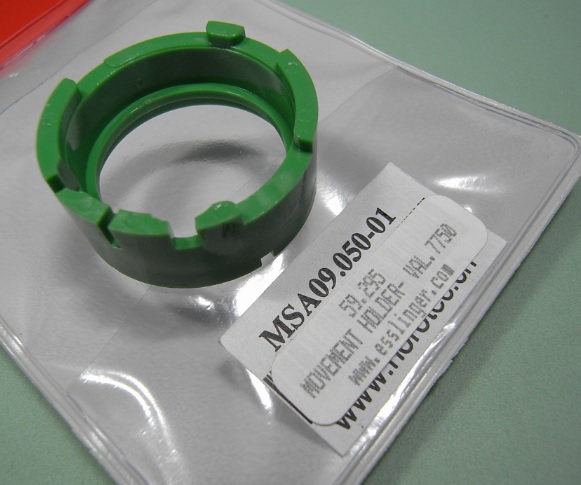
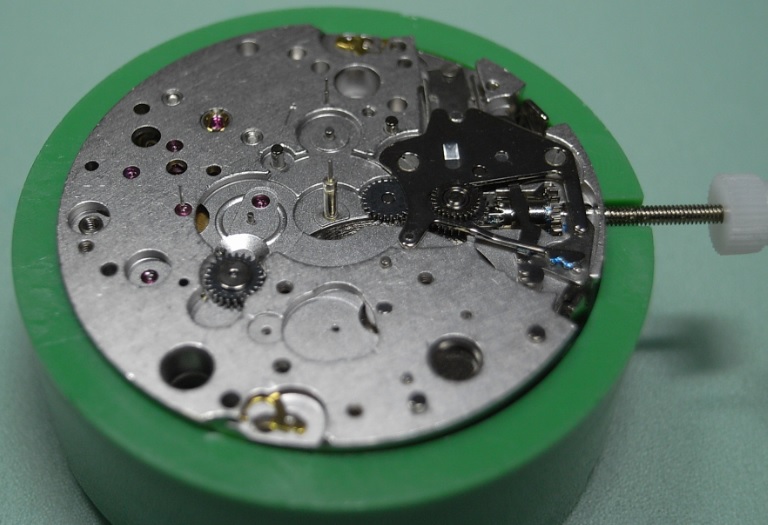
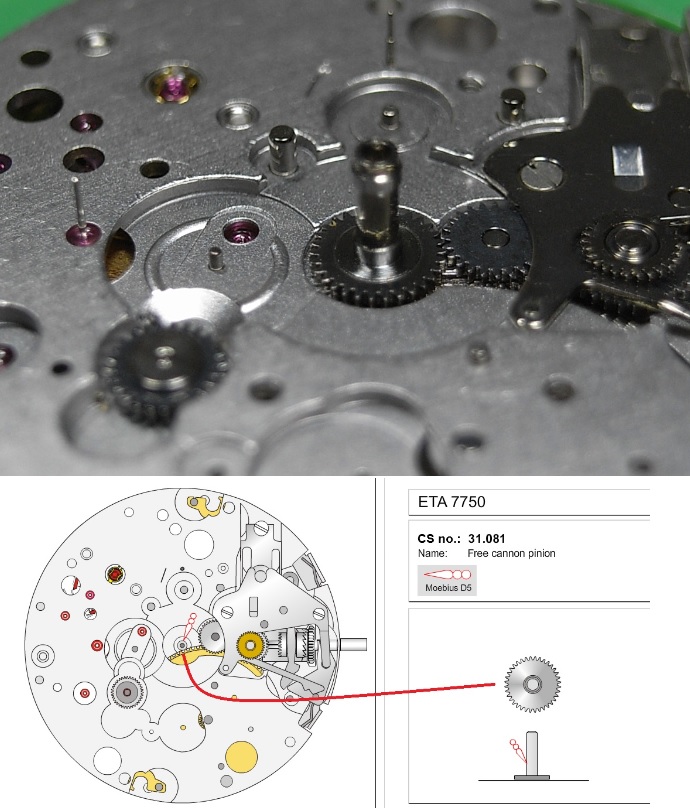
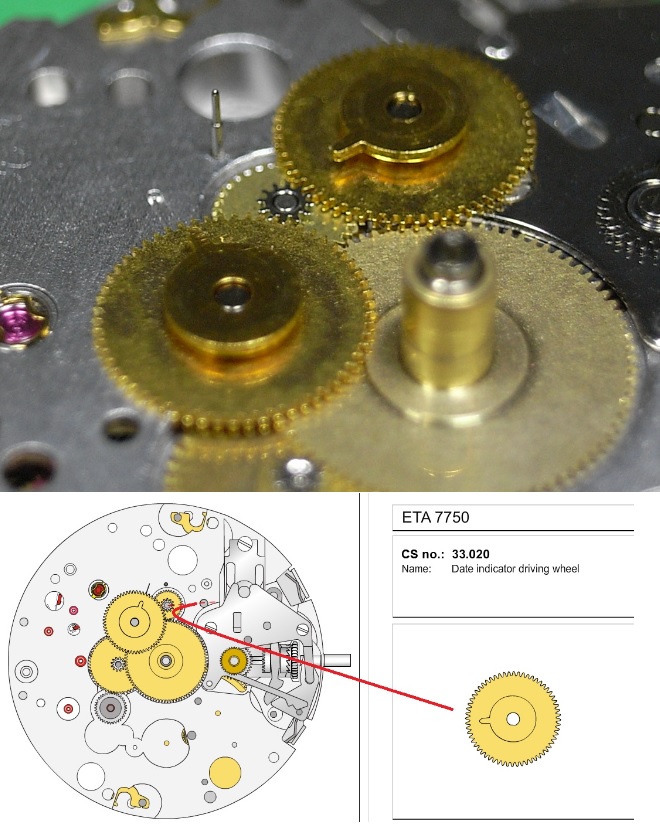
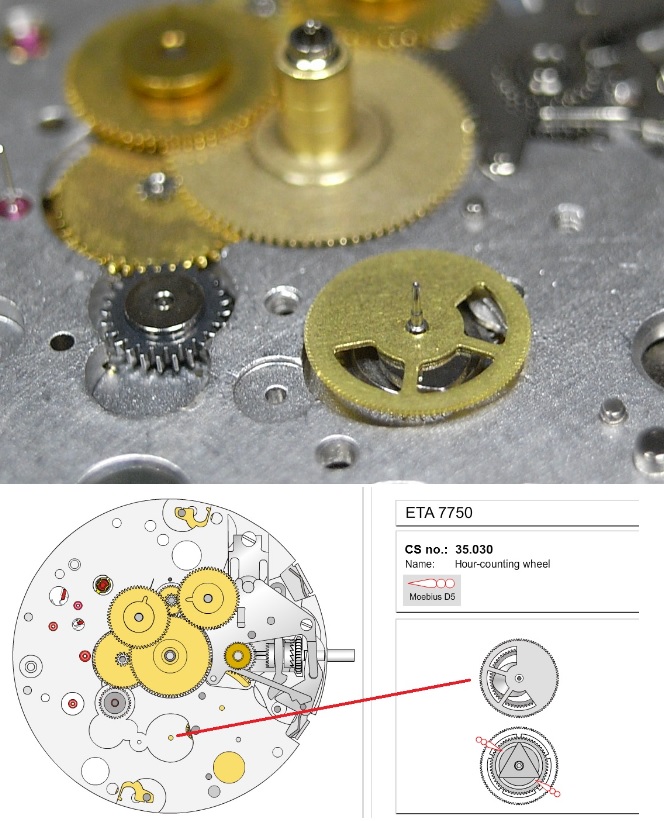
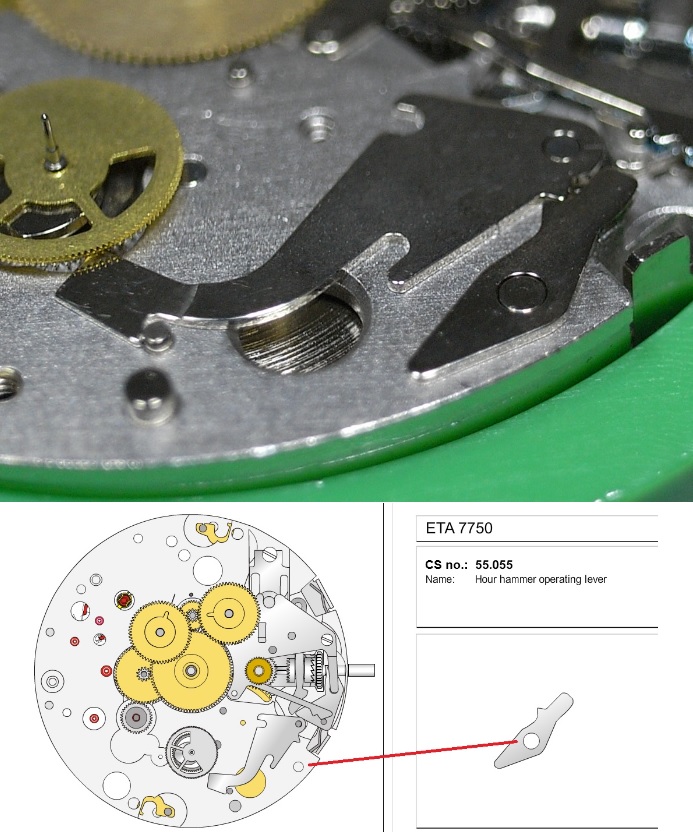
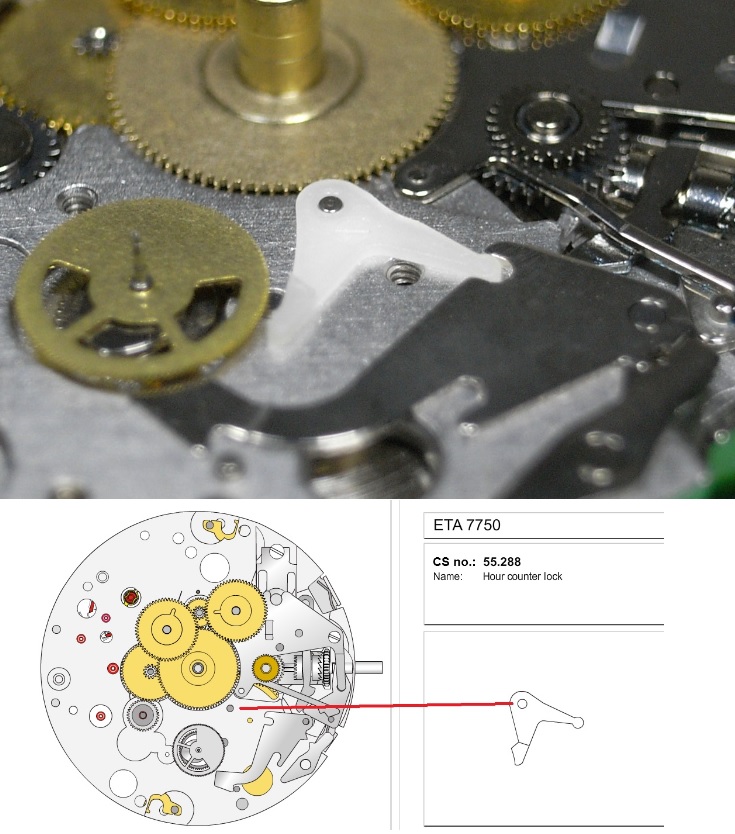
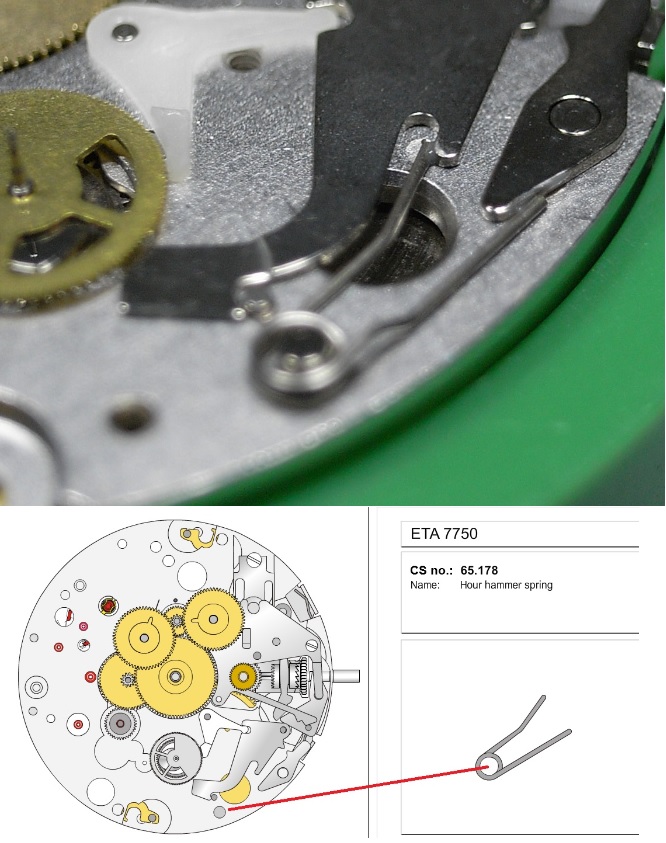
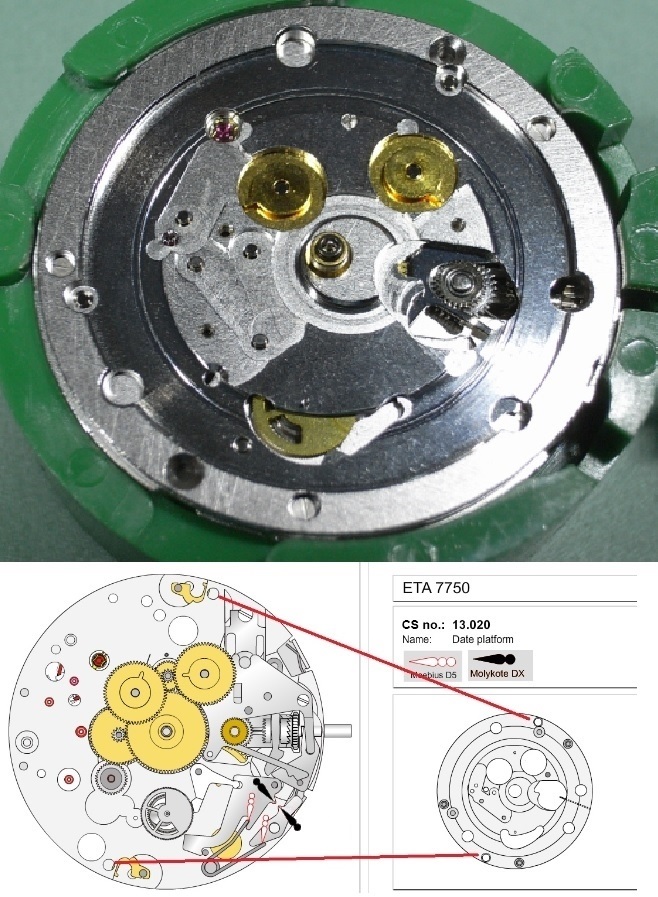
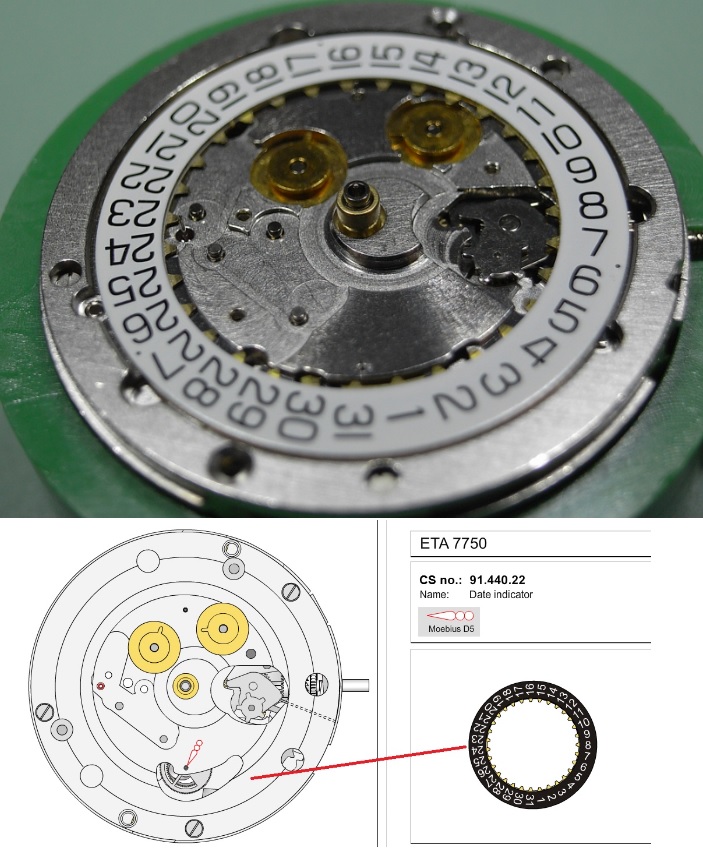
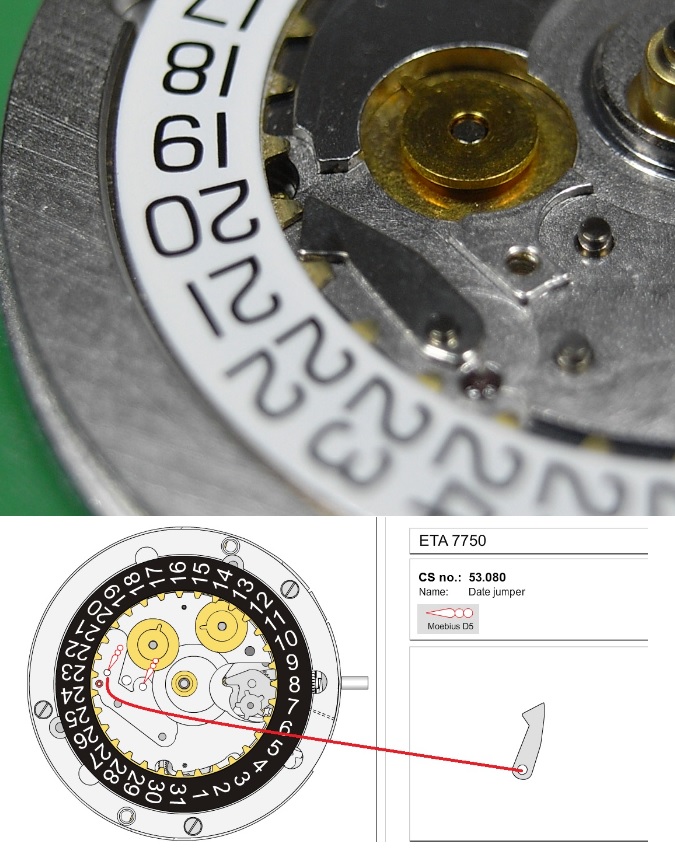
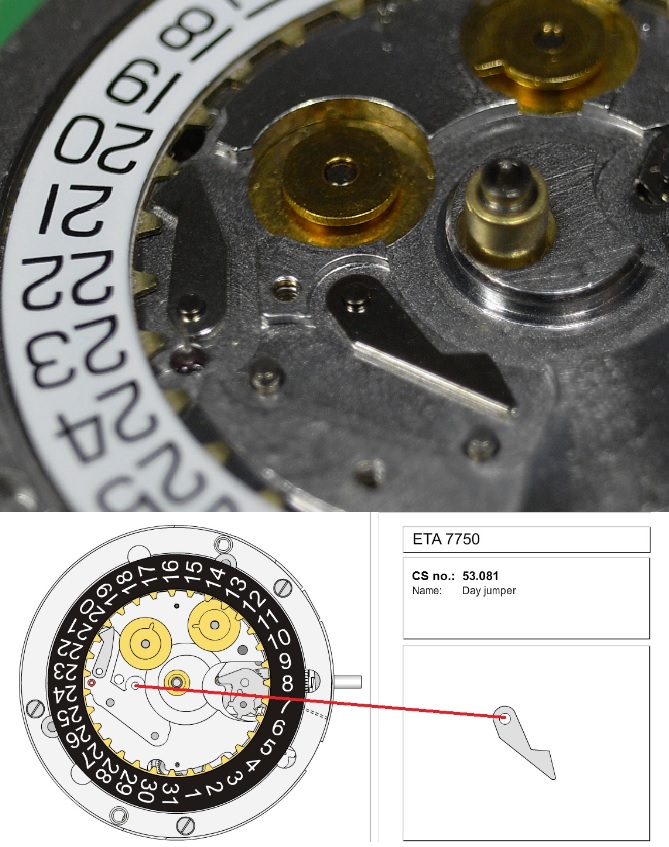
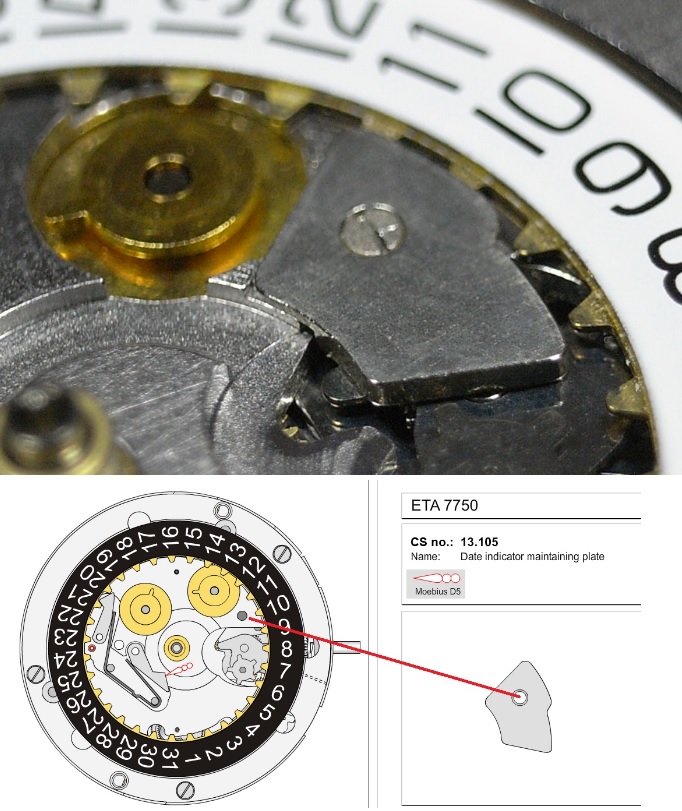
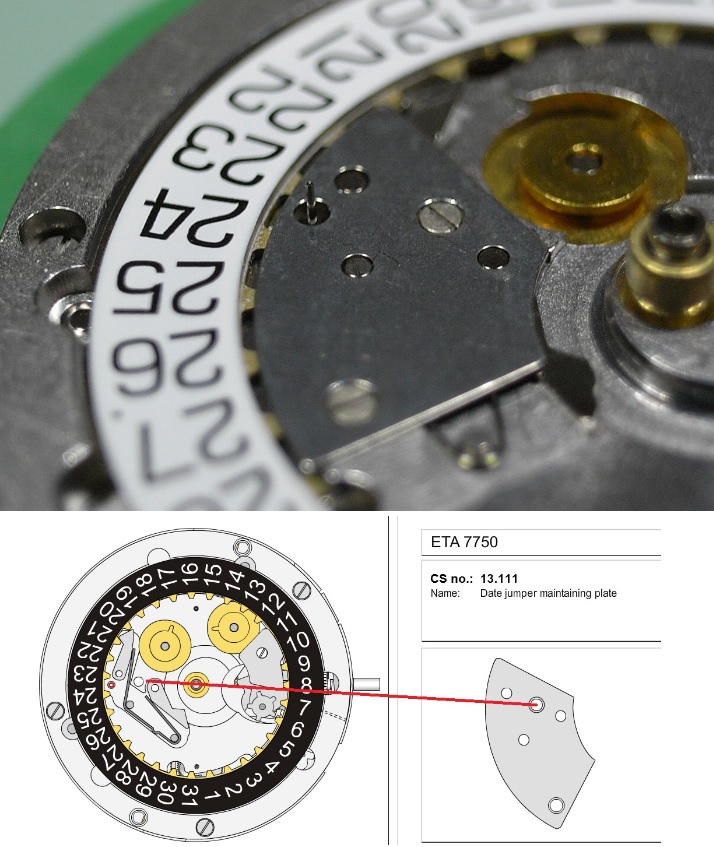
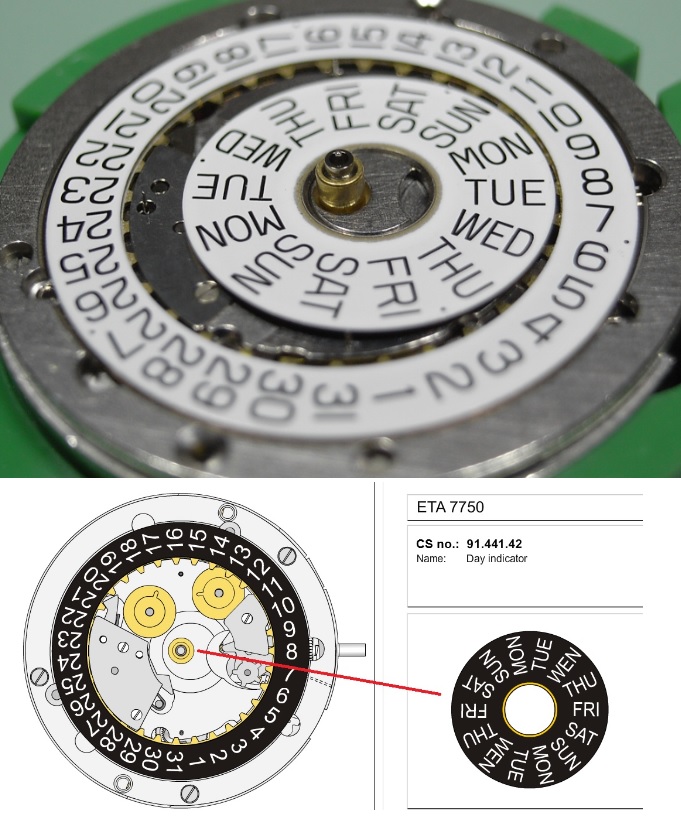
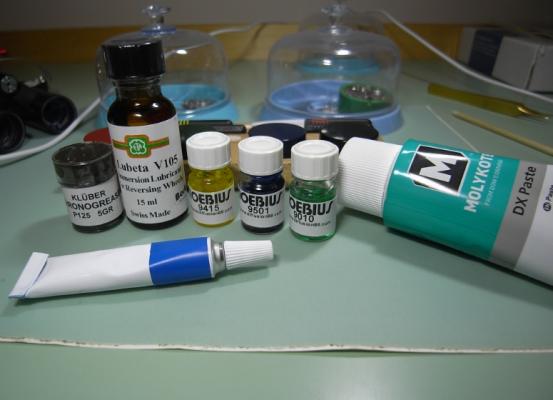
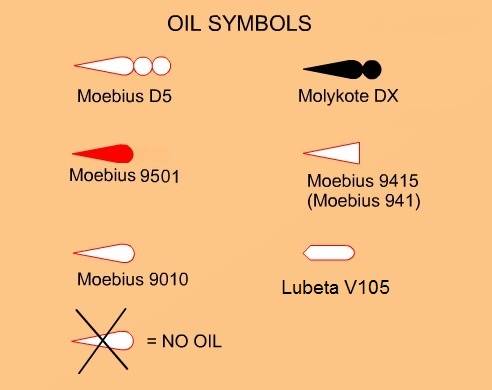
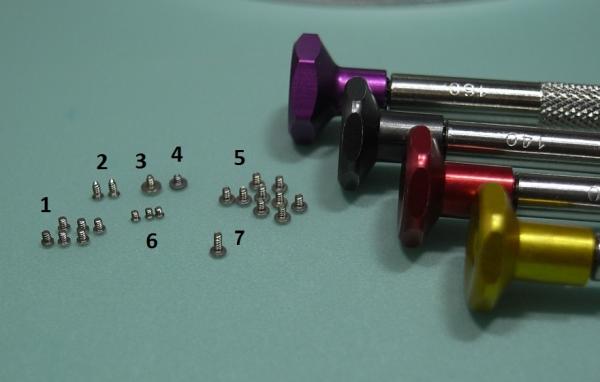
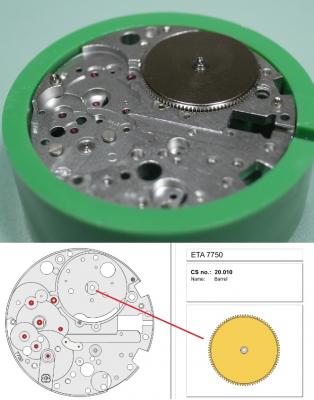
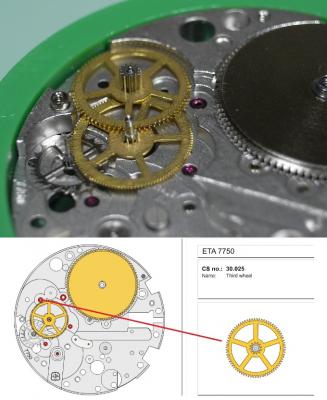
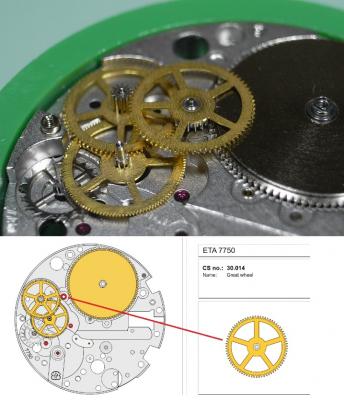
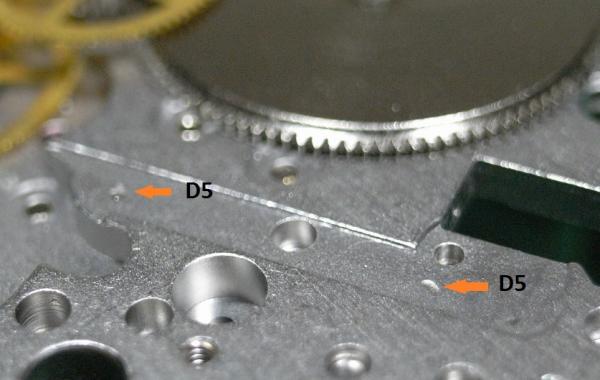
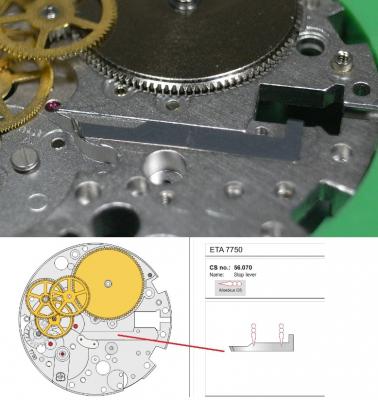
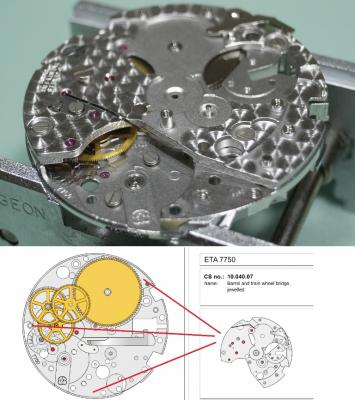
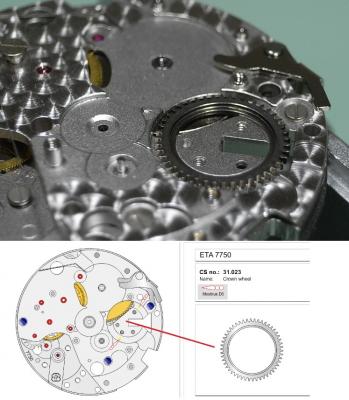
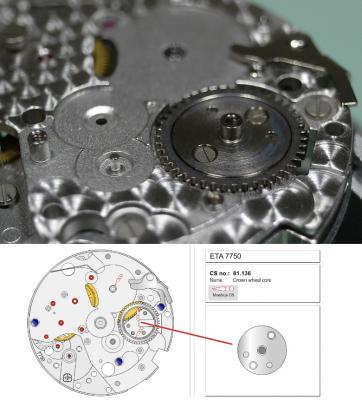
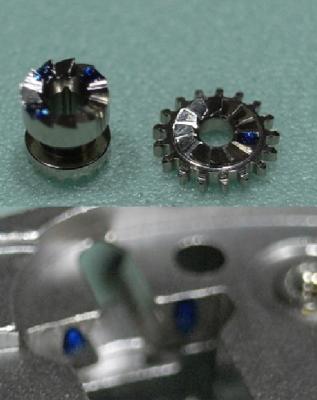
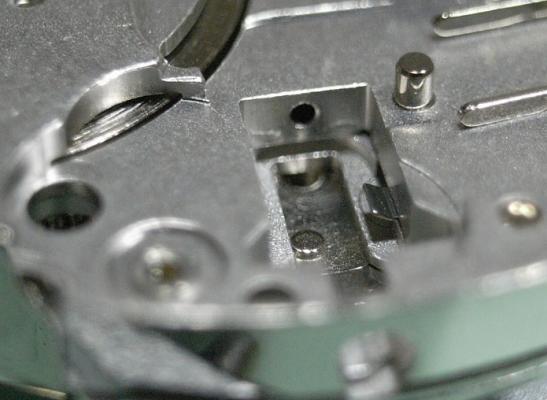
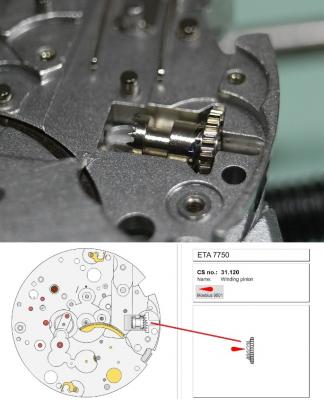
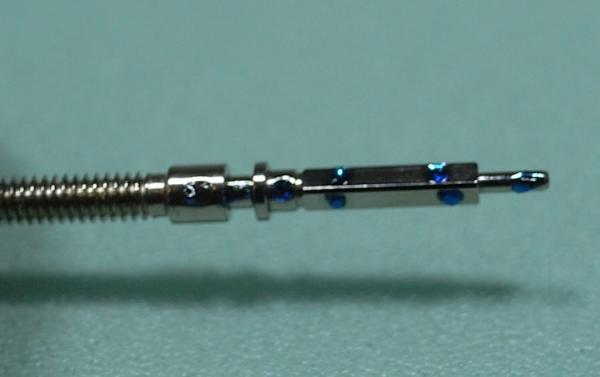
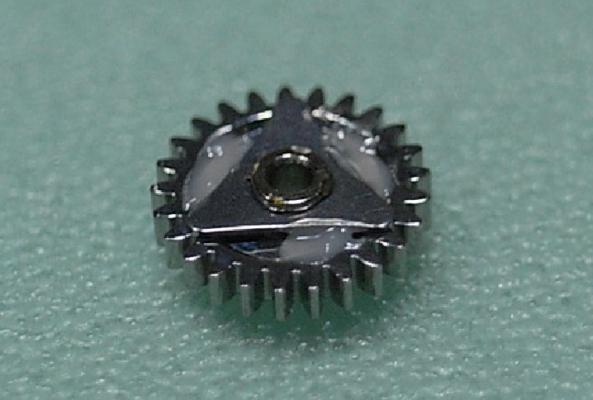
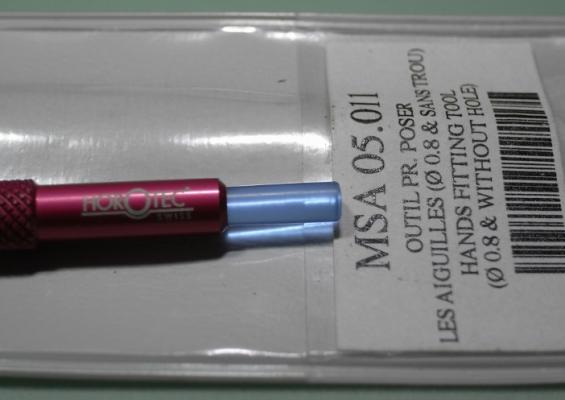
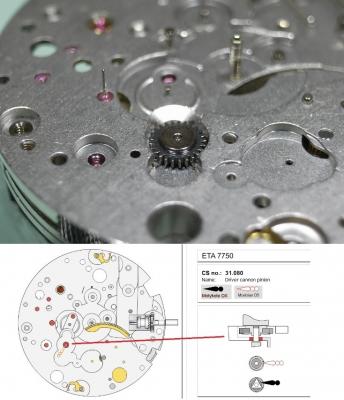
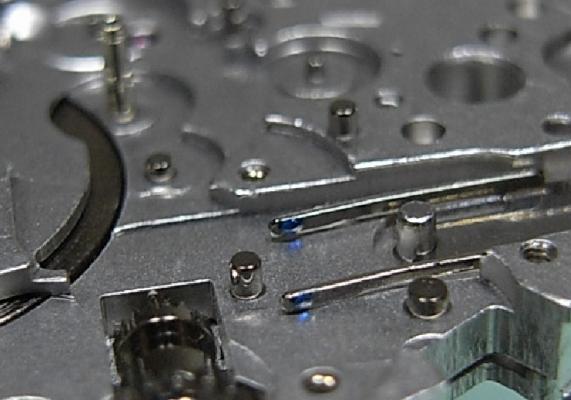
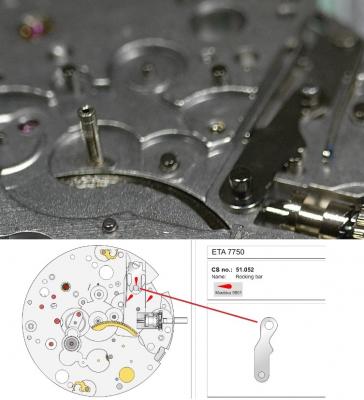
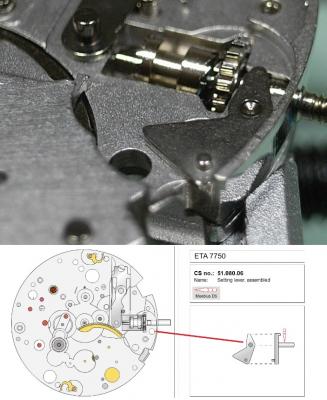
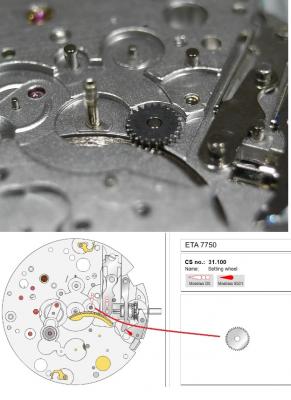
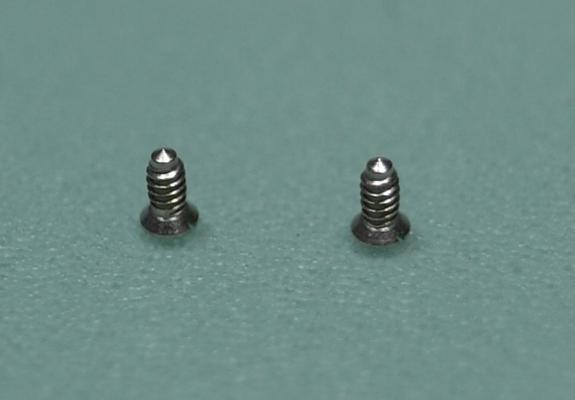
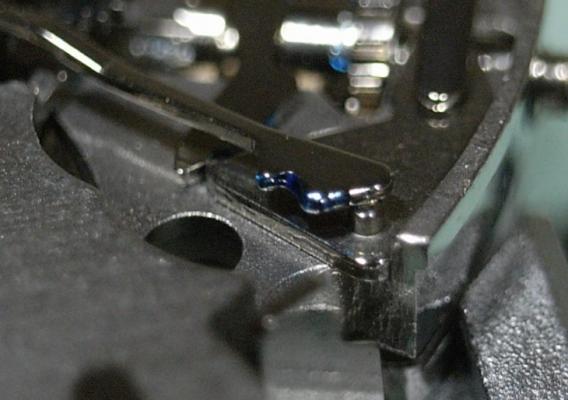
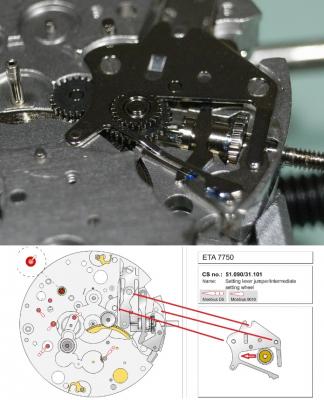
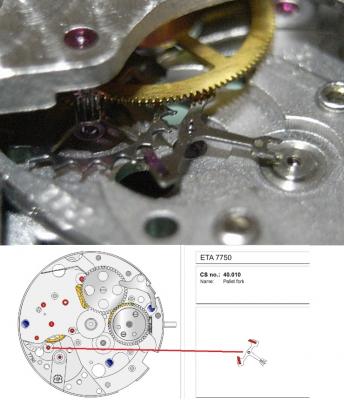
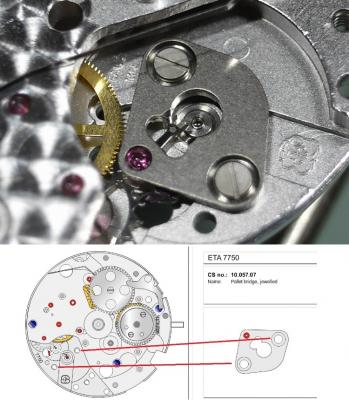
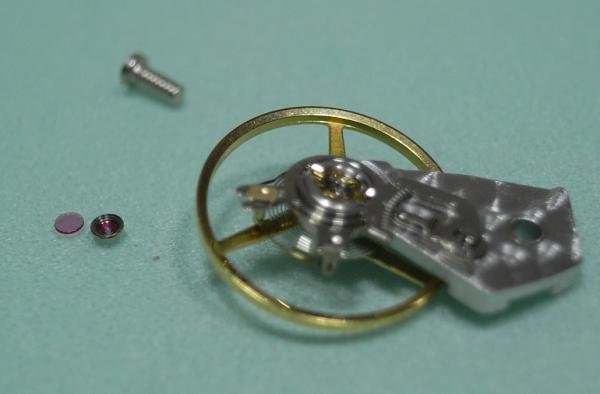
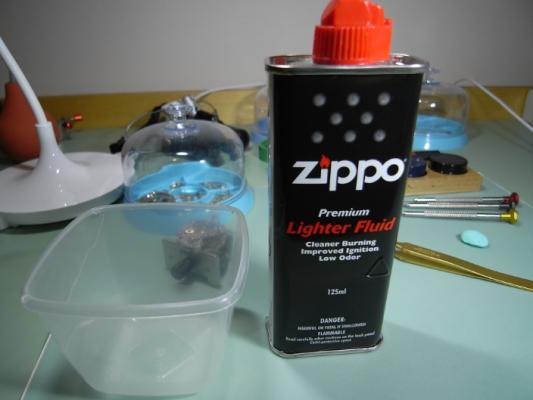
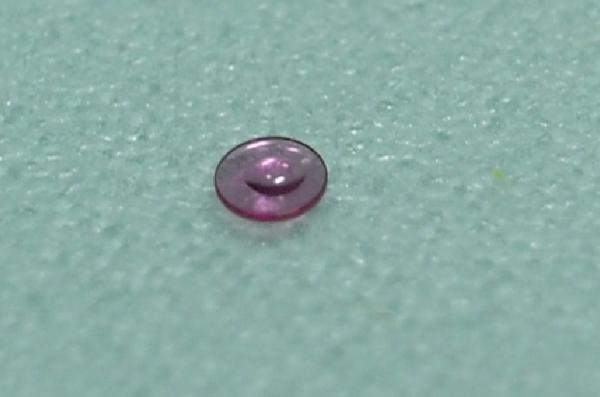
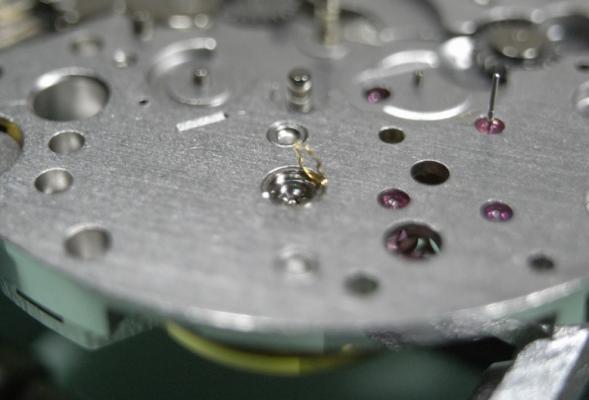
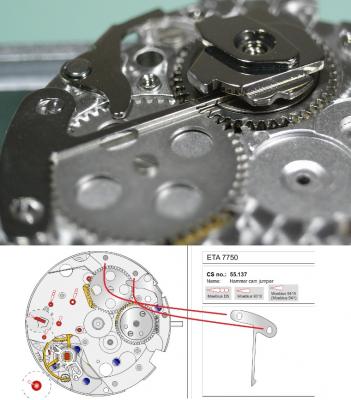
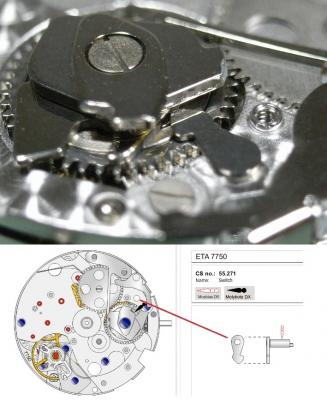
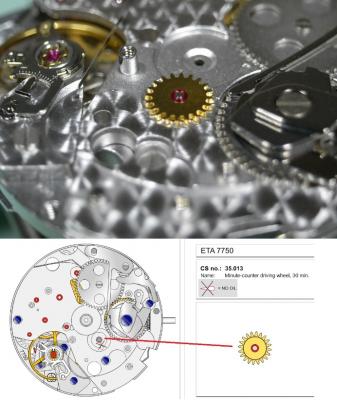
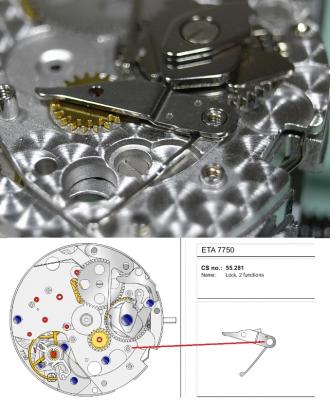
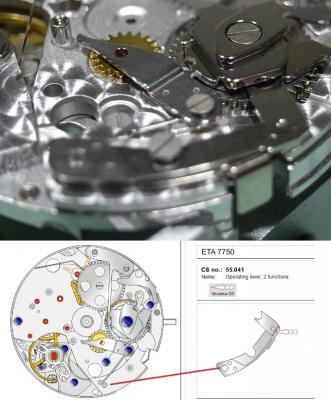
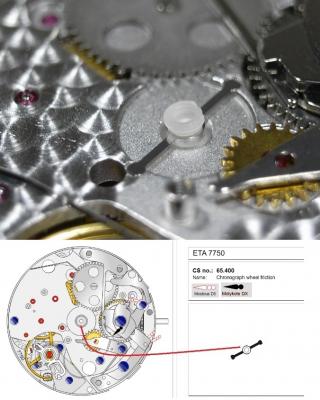
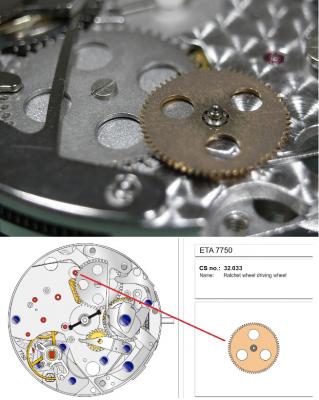
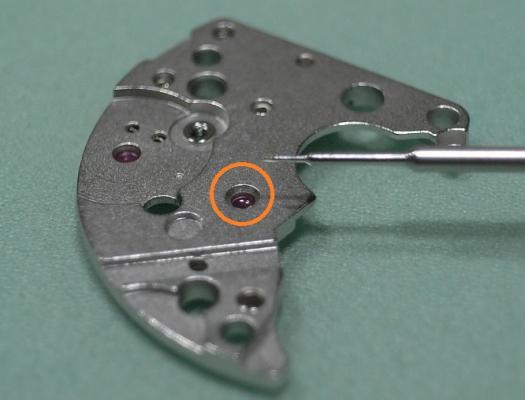
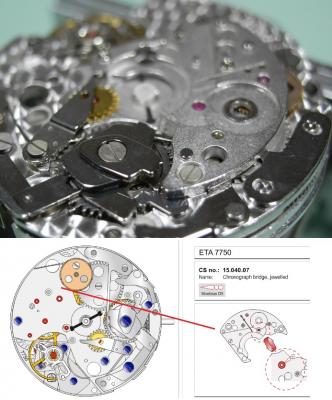
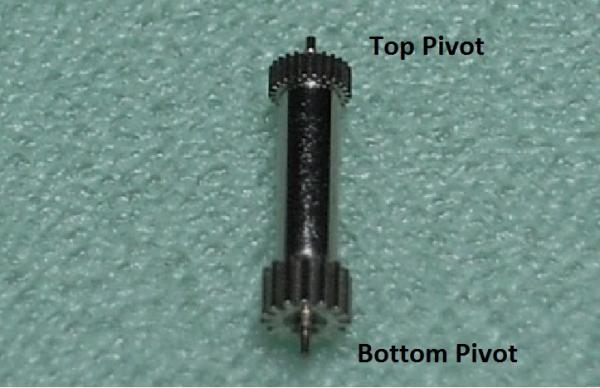
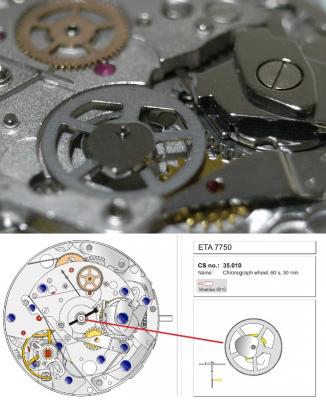
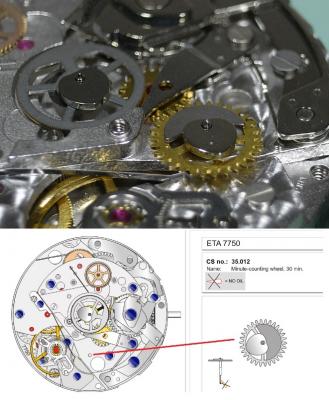
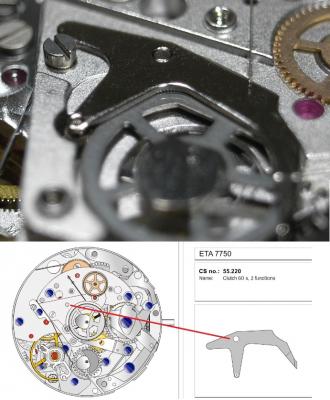
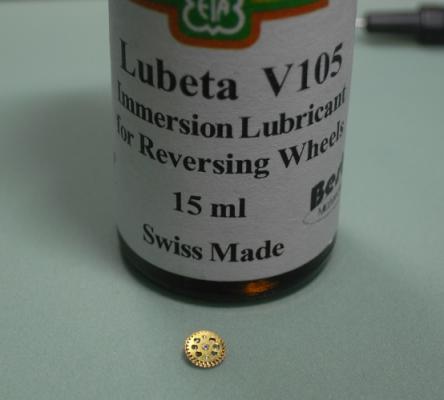
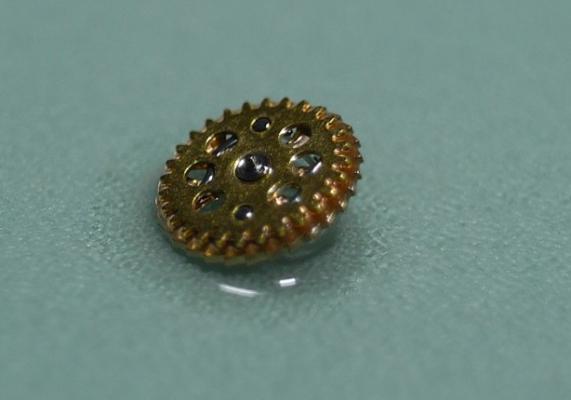
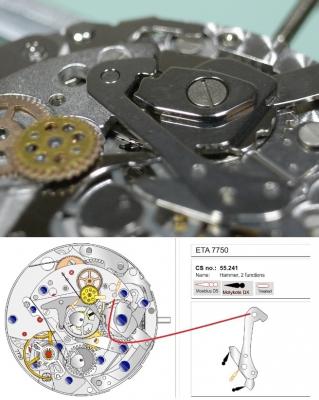
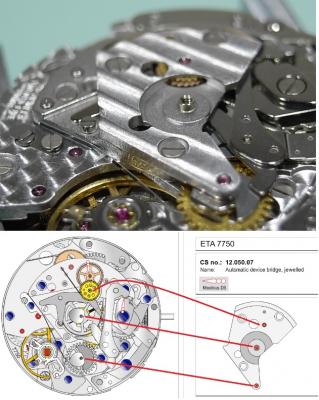
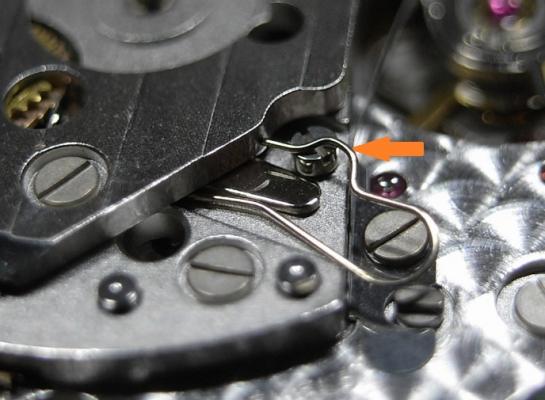
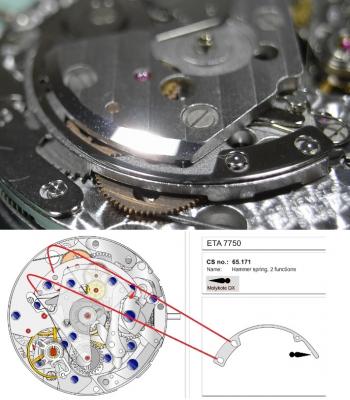
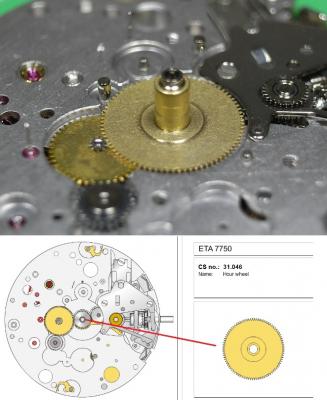
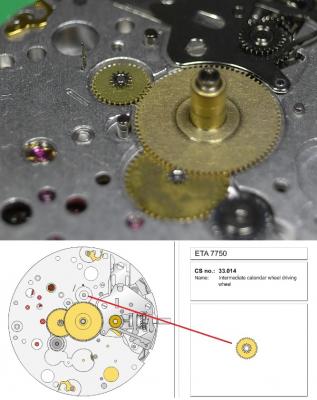
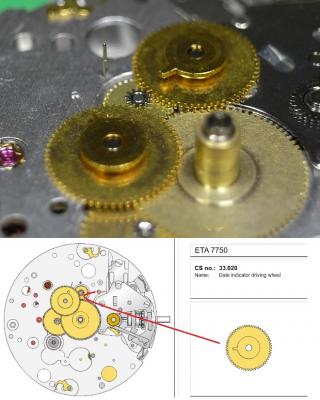
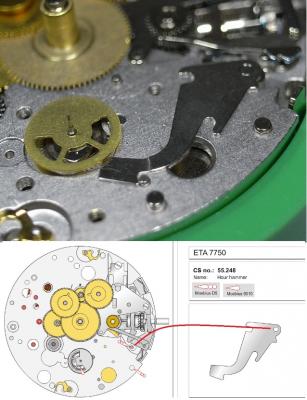
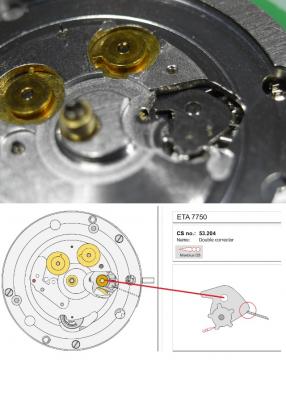
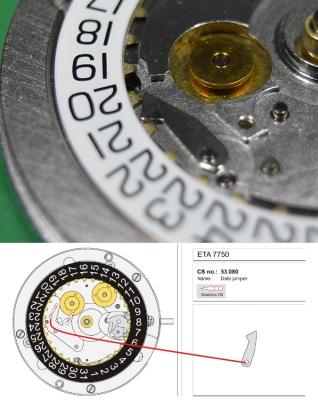
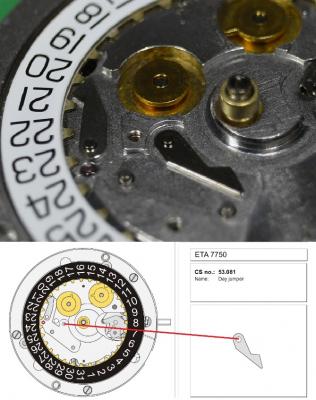
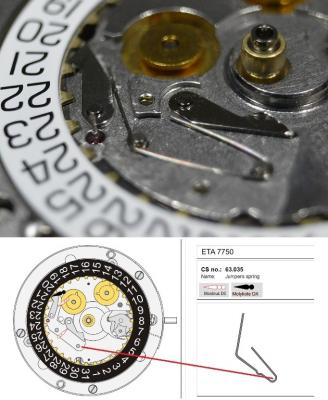
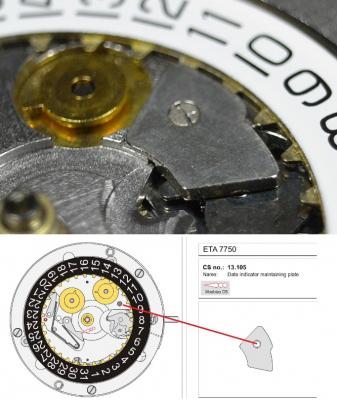
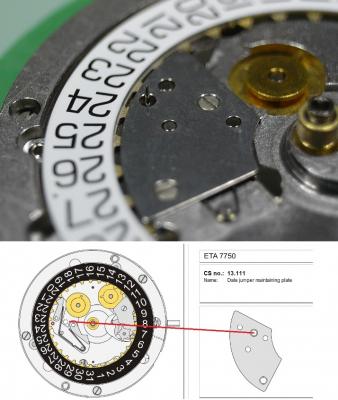
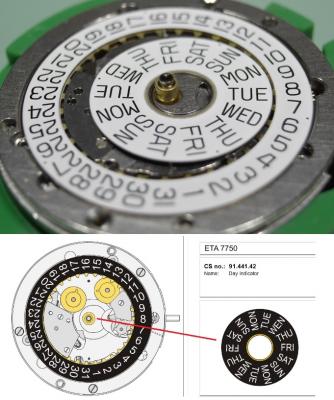
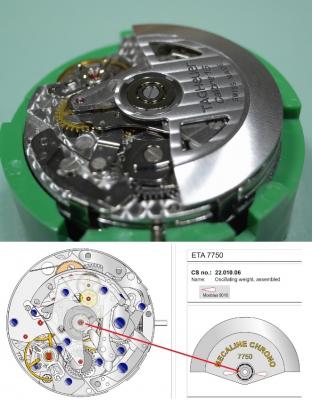
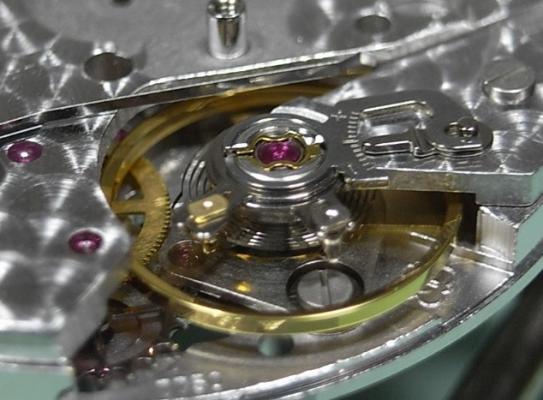
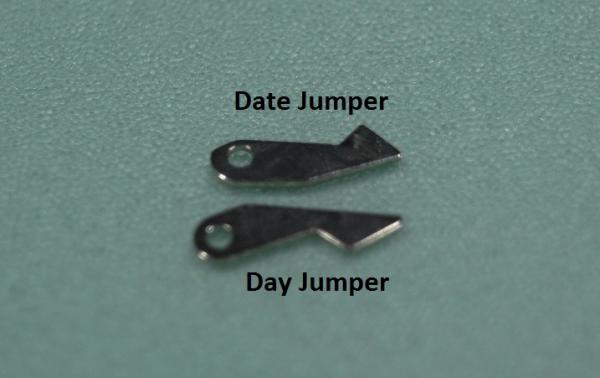
ETA 7750 Walkthrough Part 2 Assembly Now we come to assemble the movement. Here are the lubricants that will be used. Now nothing creates more discussion and controversy than which lubricants should be used on movements in various applications. This is how I approach it ... your choices may vary. The 7750 I am servicing here is a "Top Grade" ETA movement made for TAG, which would normally be cased with a display back. Because of this I will be using Molykote DX instead of Jismaa 125 or 9501 grease for areas that will be seen. As their lubricating qualities are very close, my choice of using Molykote DX is purely for ascetic reasons, as its less visible to the eye, then the bright colours of the 9501 and Jismaa 125. You will notice that Molykote DX is recommended in the 7750 PDF; yet on the SwissLab documentation it states to use Jismaa 125, so all these lubricates are recommended and safe to use. If this was a "Standard" or "Elabore" Grade movement with a full metal caseback, then I'd just go with the SwissLab recommendations, or 9501 for ease of servicing. With all that being said, here is the Lubrication Index for this walkthrough. Housekeeping Make sure your work area has been wiped down to remove any dust, and clear away any unneeded items from around your workspace. Inspect your Screwdrivers and Tweezers, and dress them up if needed. There is nothing worse than marring a screwhead, or have components ping from your tweezers because they need to be re-dressed. Put on some finger cots, or latex gloves. Personally, I use only one latex glove on my left hand, as any manipulation with my right hand will be done with my old trusty customized Dumont Brass #4 tweezers. NEVER touch cleaned parts with bare hands, this will leave prints and tarnish the finish over time. We begin with the parts fresh from cleaning. Try and arrange them in a logical order to start with, this will save you time fishing for parts later on. The 7750 has 7 types of screws, and you'll need 4 sizes of screwdrivers - 0.8, 1.2, 1.4, 1.5mm 1) Date Platform, Crown and Ratchet Wheel Screws 2) Setting Lever Spring Screws (Note the pointed ends) 3) Hammer and Cam Screws 4) Oscillating Weight Screw (Single Screw with the short thread) 5) Pallet Fork, Main Plate, Chronograph Plate, Automatic Work Plate Screws 6) Screws for the Jumper Maintaining Plates 7) Single longer screw for the Balance Cock I like to arrange all the screws in groups like this, that way they are quick to find, and mismatching screws can't happen. One more thing to note on this assembly walkthrough, is that I started by using the 7750 plastic movement holder. I quickly however changed to a Bergeon 4040 movement holder, and found this much better when it came time to fit the plates and align pivots to their jewels. I'd suggest you use the Bergeon 4040 holder right from the get go. Lets begin! Place the Barrel on the Main Plate Next is the Escape Wheel Followed by the Second Wheel, which has the long pivot for the sub-dial hand. The Third Wheel is next to be installed With the last wheel in the train being the Great Wheel. Place 2 small spots of D5 as shown, so the Stop Lever will have a smooth action. Install the Stop Lever. Now install the Barrel/Train Bridge. (1.4 Driver) Make sure all pivots are located correctly and the train is free spinning BEFORE tightening down. Once tightened down check end shake. Install the Crown Wheel Then the Crown Wheel Core and screw down (1.2 Driver). Install the Ratchet Wheel and screw down (1.2 Driver). Once this is done, using a 1.2 Driver, turn the screw on the Ratchet Wheel a 1/4 of a turn to add energy to the Mainspring, and check the free running of the train. Next is the keyless work. Lubricate the Winding and Sliding Pinion as shown below. Also add a spot of 9501 to the Main Plate where the Winding Pinion will come in contact. Be sure when installing he Sliding Pinion that it's seated properly on the Stop Lever Install the Sliding Pinion Install the Winding Pinion Lubricate and install the Stem. Next is the Driver Cannon Pinion. This is one area that needs a lot of lubrication, as it will bind and damage the movement if it becomes dry. To install the Driver Cannon Pinion I use a Horotec Hand Fitting Tool MSA 05.011 Once properly lubricated, install the Driver Cannon Pinion Before installing the Rocking Bar, lubricate the points on the spring. Install the Rocking Bar. Install the Setting Lever Install the Yoke. Place the Setting Wheel on it's post. Construct the Setting Lever Jumper with the Intermediate Wheel As noted above, the screws for the Setting Lever Jumper are the ones with the pointy threaded ends. Be sure to lubricate position points on the setting bar before you lever it into place. Install the Setting Lever Jumper / Intermediate Setting Wheel. The keyless work is now complete, check it is functioning correctly, then turn the movement over. Once the movement is turned over install the Pallet Fork. Then install the Pallet Bridge. Once the bridge is in place, give the mainspring a few winds and check the free movement of the Pallet BEFORE screwing it down (1.4 Driver) After tightening down check the end shake. Use 9415 on the Exit Pallet Stone to lubricate the escapement. Replacing the Balance and oiling the Incabloc Jewels is next. Place the Balance back onto the movement, checking that it's free running before tightening the screw (1.4 Driver). Once tightened check side shake and end shake is correct. Remove the Incabloc Jewel, and then remove the Balance. Note the longer screw that is used to secure the Balance Cock. Cleaning them carefully by soaking in a container with Lighter Fluid ... I use Zippo Fluid. Once clean, dry the Balance and Incabloc Jewel and place a drop of 9010 on the Jewel as shown below. Make sure it covers at least 1/3 to 1/2 of the jewel, without the oil touching the sides of the jewel. Give the movement several winds to add some power to the Mainspring. Replace the Balance back on the movement and refit the Incabloc Jewel. Check that the Balance is oscillating freely. Then repeat the process for the jewel only on the Main Plate. Next to be installed is the Hammer Cam Jumper. Here is my method for installation. Place the Hammer Cam Jumper into position, turning it clockwise to lock it into the slots. Then place the Chronograph Cam on it's post, so that it rests on top of the cam jumper ... as shown below. Then while holding the arm of the cam jumper back, seat the Chronograph Cam into position and affix the screw (1.4 Driver) Install the Switch Insert the Operating Lever Spring, 2 Functions. Make special note of the orientation of this spring, as it will fit in both directions; but only one way is correct. Without lubricating, install the Minute-counter Driving Wheel, 30min. Install the Lock, 2 Functions, and screw down (1.4 Driver) Before installing the next item, which is the Operating Lever, 2 Functions, be sure to lubricate the hinging point from underneath with D5. Then install the Operating Lever, 2 Functions. Be sure that the spring arm of the Lock is out from under the Operating Lever and screw down (1.4 Driver). Place D5 into the little slot opening in the top of the hinge point. Install the Chronograph Wheel Friction. Install the Ratchet Wheel Driving Wheel Before placing the Chronograph Bridge onto the movement, you need to oil the jewel circled in the image below with D5 After oiling that jewel install the Chronograph Bridge. Next, place the Reduction Wheel into the hole in the Chronograph Bridge. Note that there is no post to locate this wheel, as it's on Automatic Device Bridge which will be installed later. The next item is the Oscillating Pinion which seems to cause people a lot of frustration. Here's my method to install it. Firstly, be sure of the correct orientation, as shown below. Pull the Crown out to the third position to engage the Stop Lever and hack the movement. Keep the movement in this hacked position until the Automatic Device Bridge is installed. Then install the Oscillating Pinion and seat it into it's lower jewel. You'll know you've done this correctly when it sits up straight and centered in the slot ... as shown in the image below. By taking your time and getting it well seated you will have less trouble when installing the Clutch later on. However, before we install the Clutch and Automatic Device Bridge, there are a few wheels and a hammer that need to be installed. Install the Chronograph Wheel, 60s, 30min Install the Minute-counting Wheel, 30 min. Install the Clutch 60s, 2 Functions. The Clutch needs to slip underneath a small click spring for the Reversing Wheel, so be careful not to bend and damage this spring. Then gently lift the arm of the Clutch over the Oscillating Pinion. Yes, it's a delicate job, but with a steady hand, patience and well dressed tweezers, it's not too hard. Before we install the Reversing Wheel, we need to lubricate it. The product needed is Lubeta V105, which is an immersion, or dip, lubricant. Simply hold the Reversing Wheel with tweezers and dip it into the solution. Then allow it to dry, which takes about 10 minutes. This leaves behind a waxy type lubricant that has impregnated deep into the wheel. Once dry, install the Reversing Wheel Install the Hammer, 2 Functions. Make special note of the orientation of the cam to the hammer. You may need to rotate the cam into this position before you fit the hammer. Now it's time to install the Automatic Device Bridge. Make sure all wheel pivots are correctly located in their jewels before tightening down (1.4 Driver) Pay close attention that the Oscillating Pinion is still seated correctly in it's pivot hole on the Clutch. One other troublesome operation for people is installing the Clutch Spring. This is my method of installation. Slide the long arm of the spring into it's position until the shorter end is touching the automatic bridge. Then with your tweezers grab the point illustrated below and lift it over the locating screw. Once over the screw, push it forward and until the loop is seated on the locating screw. Lastly, install the Hammer Spring, 2 Functions. Now you can un-hack the movement by pushing the Crown into it's winding position. Check that the Oscillating Pinion is being driven by the movement. Check the Chronograph functions are engaging and dis-engaging correctly by operating the pushers. Once you are satisfied all is well, turn the movement over. Now we come to the calendar work. For this I place the movement back in the Horotec 7750 plastic holder (MSA 09.050-01) Install the Free Cannon Pinion Install the Minute Wheel. Install the Hour Wheel Install the Intermediate Calendar Driving Wheel Next the Day Star Driving Wheel It is most important that you line up the driving tooth of this wheel with the marker on the Main Plate. If the wheel appears to be half a tooth off proper alignment, bring the Crown out to the hand setting position and adjust so the tooth lines up perfectly. Failure to do this will result in improper synchronization of the day and date. Install the Date Indicator Driving Wheel. This time you line up the wheel's driving tooth with the post for the Intermediate Calendar Driving Wheel. Failure to do this will result in improper synchronization of the day and date. Install the Hour-counting Wheel Install the Hour Hammer Install the Hour Hammer Operating Lever Install the Hour Counter Lock Install the Hour Hammer Spring Place on the Date Platform, and secure down (1.2 Driver) Install the Double Corrector, making sure the spring is correctly positioned. Place on the Date Indicator. Install the Date Jumper. Be sure you have selected the correct jumper, as the Day and Date Jumper are not Identical. Install the Day Jumper Install the Jumper Spring. Place on the Date Indicator Maintaining Plate and screw down (0.8 Driver) Place on the Date Jumper Maintaining Plate and screw down (0.8 Driver) Fit the Day Indicator, and test the function and timing of the Day/Date Turn over the movement to fit the last item. The last item to fit is the Oscillating Weight. Gently place it on the movement, check it's meshed properly and then screw down (1.5 Driver) Service on the ETA 7750 is now complete, and adjusting the timing of the movement is the only operation left. I hope this has been of interest and helps those wishing to tackle this caliber. I'm sure, as I did, that you'll find it a fun and reward movement to service.


 1 point